Tokyo Photo Spots: Instagram-Worthy Locations & Tips
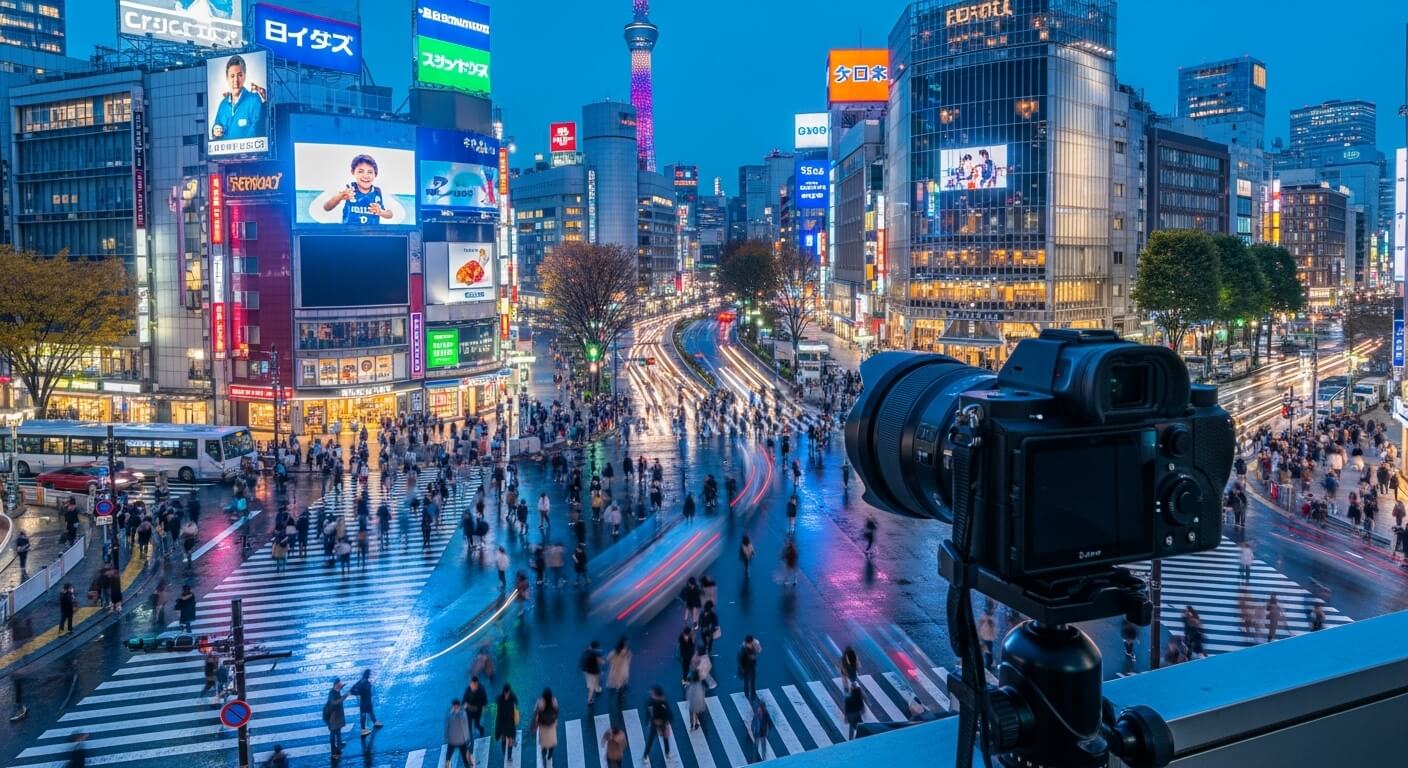
Best Tokyo Instagram Spots: Photography Guide & Camera Tips – Tokyo brims with photogenic magic: Shibuya Scramble’s motion blur, Shibuya Sky at sunset, and neon-soaked Shinjuku alleys.
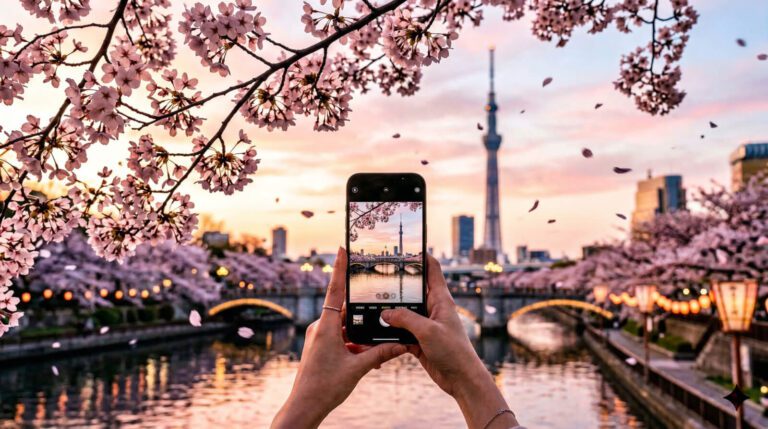
Hit Sensō-ji at dawn, then chase blue-hour reflections along the Sumida River from Azuma Bridge.
In Harajuku and Omotesando, frame mirrored façades and sleek cafes; in Ginza, capture luxury reflections after rain.
Pack a wide-angle, shoot RAW, use ISO 800–1600 at night, and arrive early.
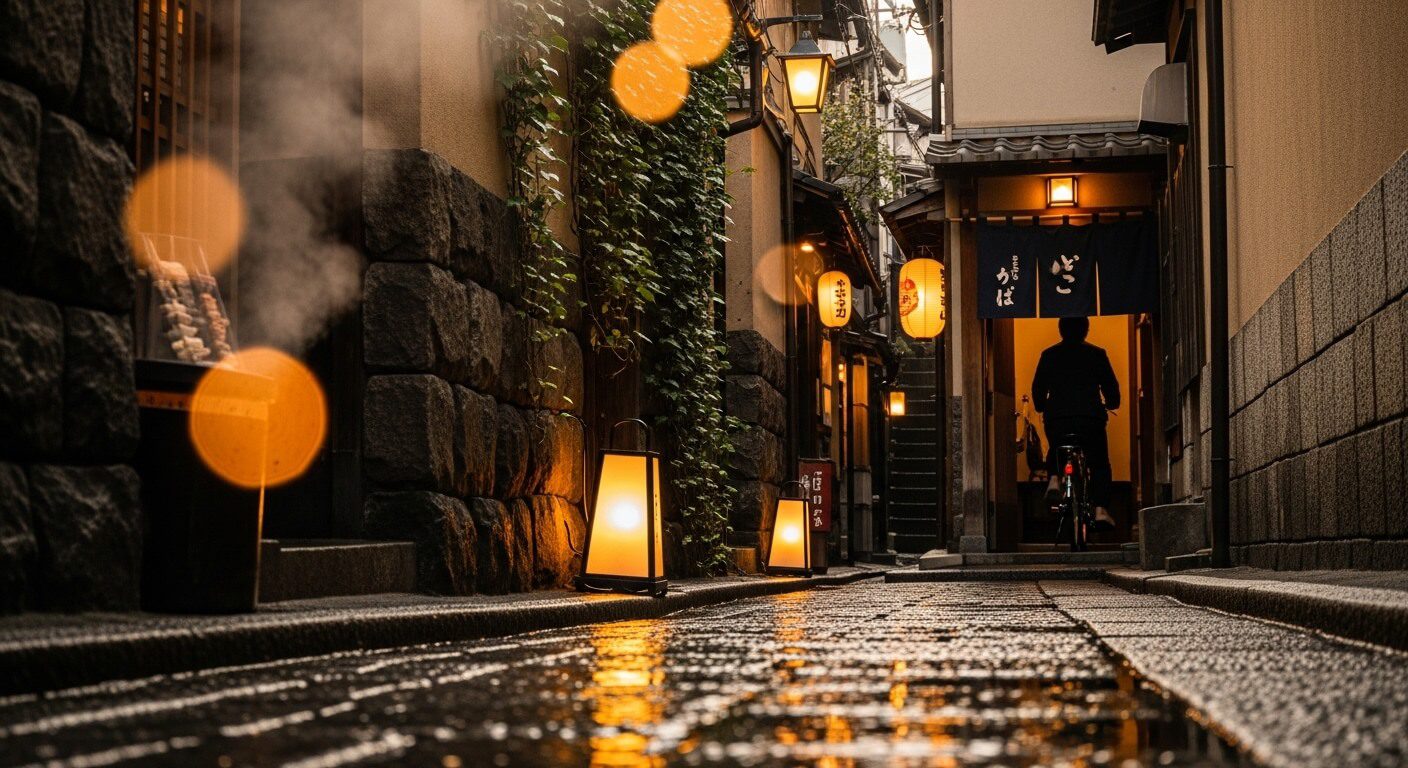
Bonus: Kagurazaka’s lantern-lit lanes whisper old Tokyo charm—and there’s plenty more to uncover.
Key Highlights
Hide- Shoot iconic neighborhoods: Shibuya Crossing/Sky, Asakusa’s Sensō-ji, Shinjuku Gyoen, Harajuku–Omotesando, and Ginza’s mirrored architecture.
- Time your sessions: sunrise for soft light, blue hour for city glow, and pre-dusk rooftops; arrive early/late to avoid crowds.
- Use techniques: reflections, silhouettes, motion blur, natural framing; bracket exposures and shoot RAW for dynamic range.
- Night settings: 1/60–1/125 sec, f/2–f/2.8, ISO 800–1600; long exposures on Sumida River for silky reflections.
- Respect etiquette: ask permission for portraits, avoid tripods in tight alleys, keep quiet in traditional areas, and follow local rules.
Tokyo Photo Spots: Instagram-Worthy Locations & Tips for Picture-Perfect Moments

Although Tokyo can feel like a neon whirlwind, the best photo ops reveal themselves to those who know where to look—and when.
Tokyo Trip Add-Ons
Equip yourself for the ultimate Tokyo adventure with the following add-ons, curated just for you.
Sunrise grants soft, flattering light; blue hour turns glass towers into glowing lanterns.
Pack light, move fast, and chase reflections in puddles after rain—city magic.
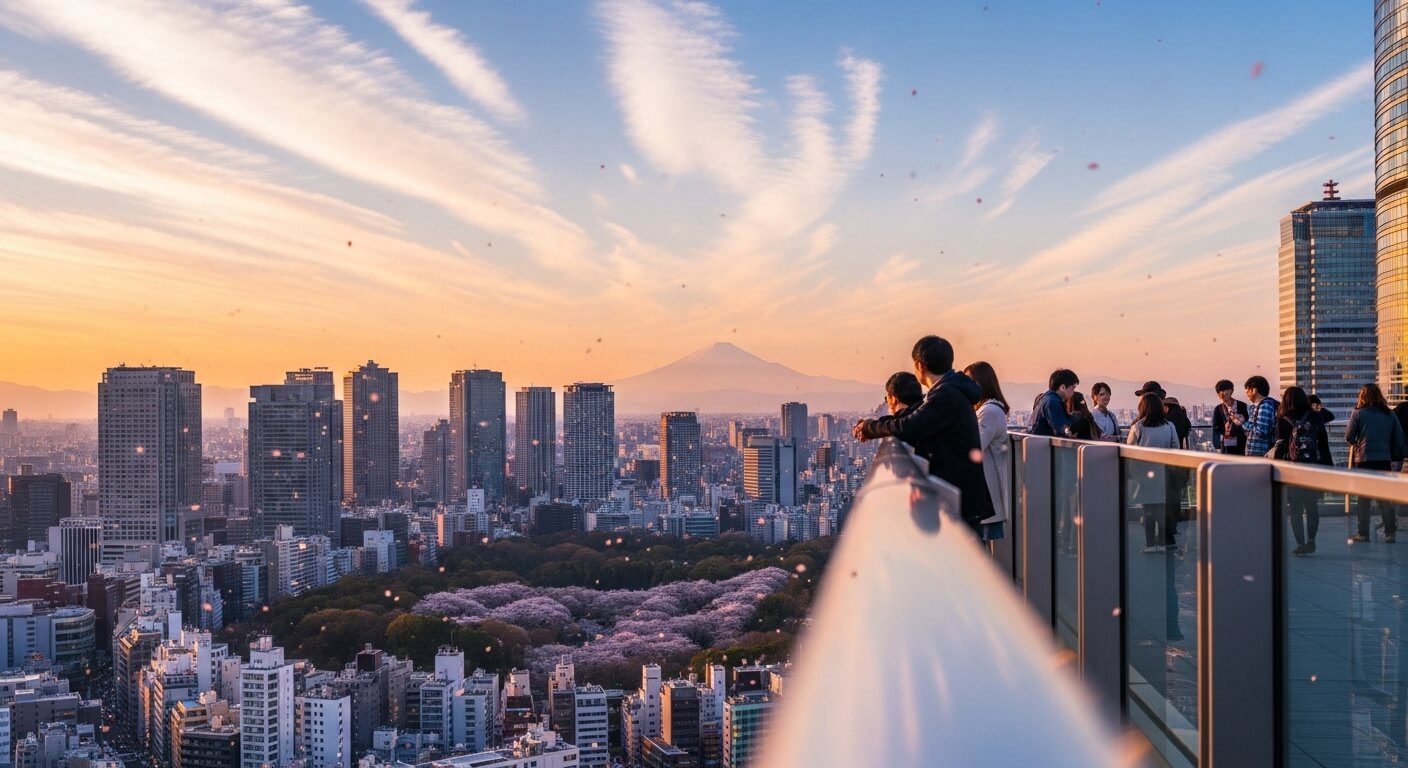
For sweeping drama, time rooftops and observation decks just before dusk for buttery aerial shots and glittering horizons.
Prefer grit and character?
Bring Vintage cameras for creamy tones and slower, mindful framing; let film soak up street glow and vending-machine blues.
Shoot crosswalks from elevated walkways, then pivot to alley shrines where incense curls and lanterns hum.
- Tokyo Translation Apps: Must-Have Tools For Non-Japanese Speakers
- Tokyo Earthquake Preparedness: What Travelers Should Know
- Tokyo Fashion Areas Comparison: Harajuku vs. Ginza vs. Shibuya Style Districts
- Tokyo New Year’s Guide: Shrine Visits & Holiday Traditions
- Tokyo Time Zone and Business Hours: A Traveler’s Handy Schedule
- Tokyo Christmas Guide: Illuminations & Holiday Events
Pro tip: use burst mode for candid motion, shield lenses from drizzle, and carry cash for capsule-toy prop surprises!
Tokyo’s Best Photo Spots by Neighborhood
Ready to hop neighborhood to neighborhood?
Think the iconic Shibuya Crossing and gritty backstreets, Shinjuku’s neon canyons after dark, Asakusa’s temple-lined lanes and lantern glow, Harajuku and Omotesando’s fashion murals and sleek cafes, plus mirrored façades and luxe night reflections in Ginza.
Grab a camera, time your stops for golden hour and blue hour, and chase bold contrasts—from heritage reds to electric blues—for shots that pop!
Shibuya’s Iconic Urban Photography Locations
Shibuya serves up three crowd-pleasers for your camera: nail the Shibuya Scramble Crossing by timing lights and picking a high perch or corner for leading lines.
Then head up to Shibuya Sky where golden hour paints the skyline in honeyed tones—pack a polarizer and arrive early for barrier-front spots.
For the Hachiko Statue, swing by right at sunrise or late night to avoid the queue of selfie sticks and snag a clean, story-rich frame.
Ready to chase neon, soft light, and a legendary pup in one stroll?
Shibuya Scramble Crossing: Timing Your Perfect Shot
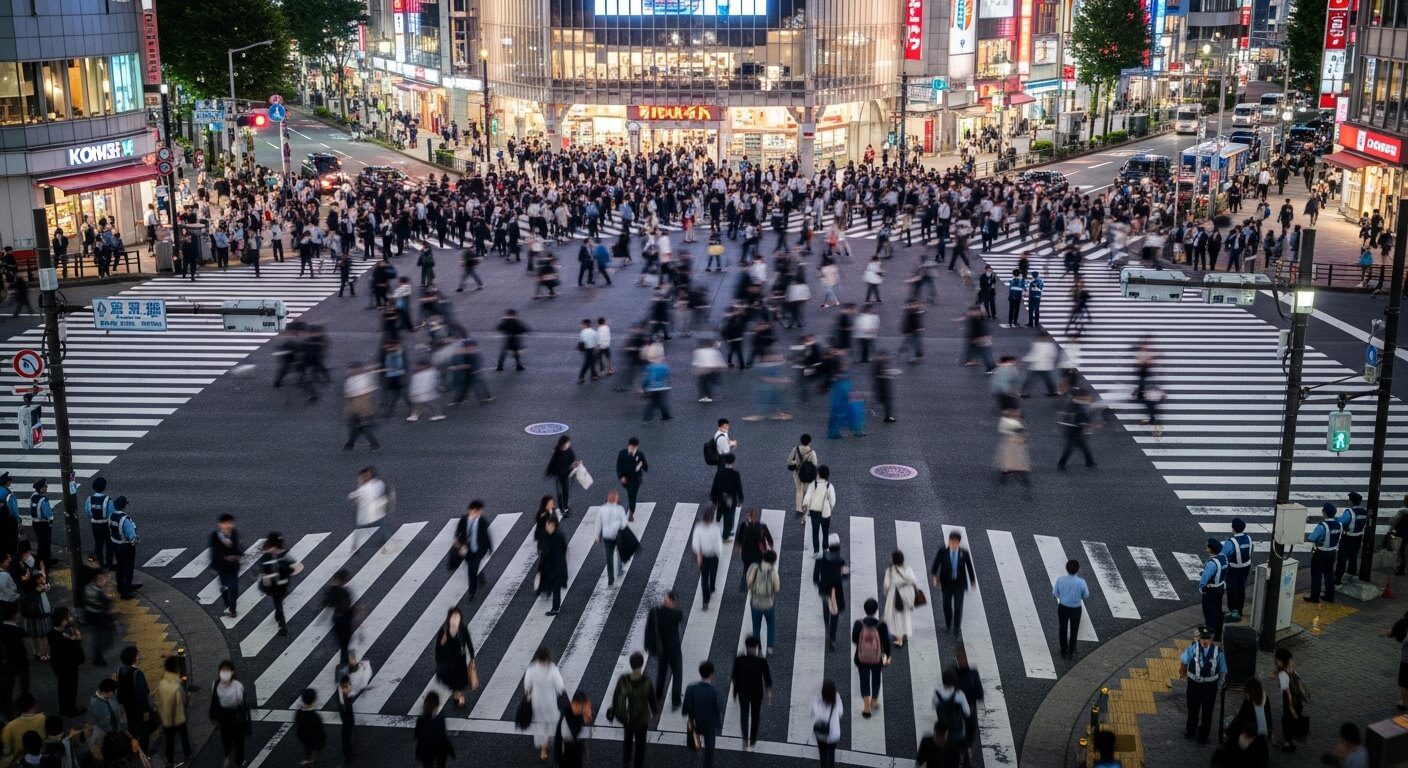
While the light cycles seem chaotic at first glance, there’s a rhythm to Shibuya Scramble Crossing that rewards those who time it right.
A savvy shooter watches crowd timing, then strikes just as walkers surge, neon blooming across wet asphalt for gorgeous light reflection.
Patience pays—two signals build momentum, the third erupts.
Step bold, frame wide, and let the city’s pulse spark the shot!
- Anticipate the third green cycle
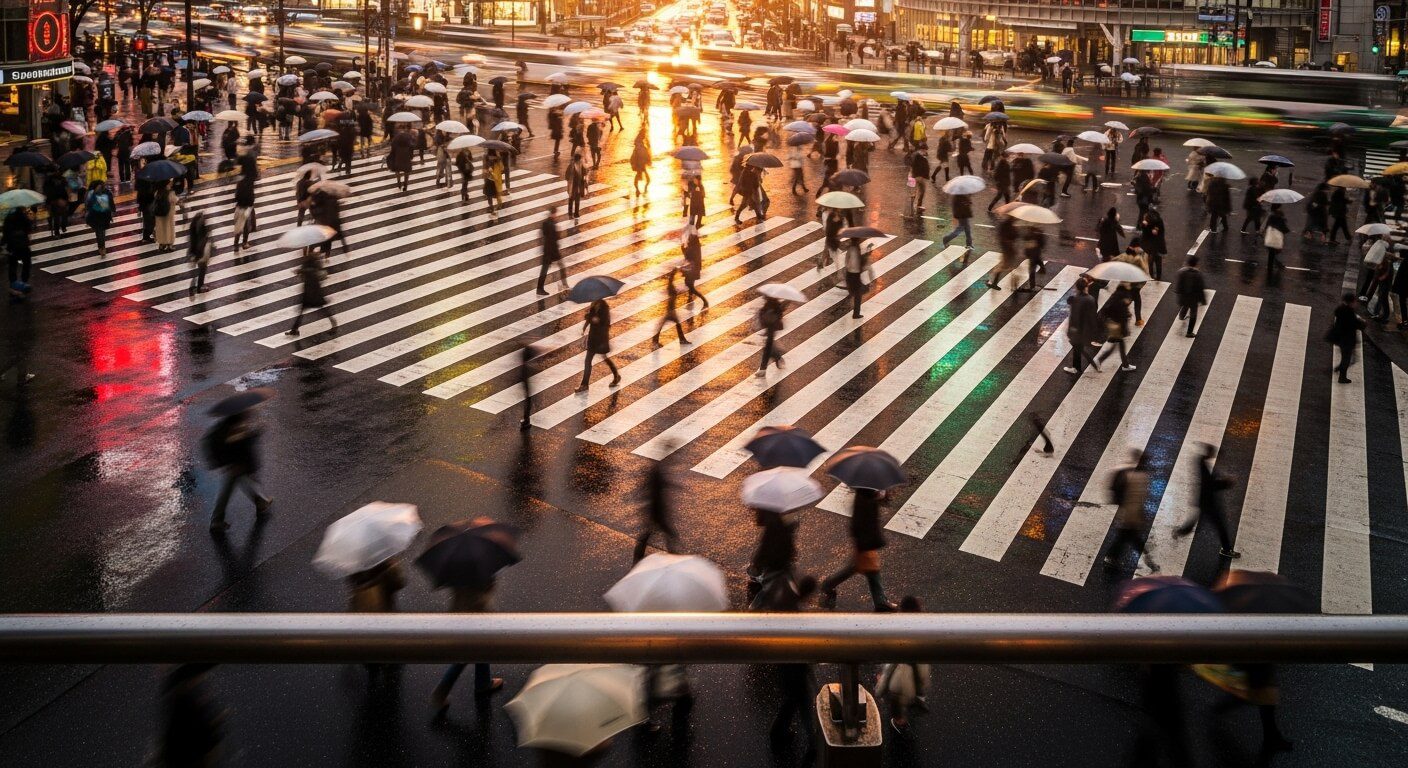
- Shoot during drizzle for mirror-like streets
- Use a wide lens; crouch for dynamic depth
- Stand near Hachiko exit for clean lines
Shibuya Sky Observatory: Golden Hour Photography Tips
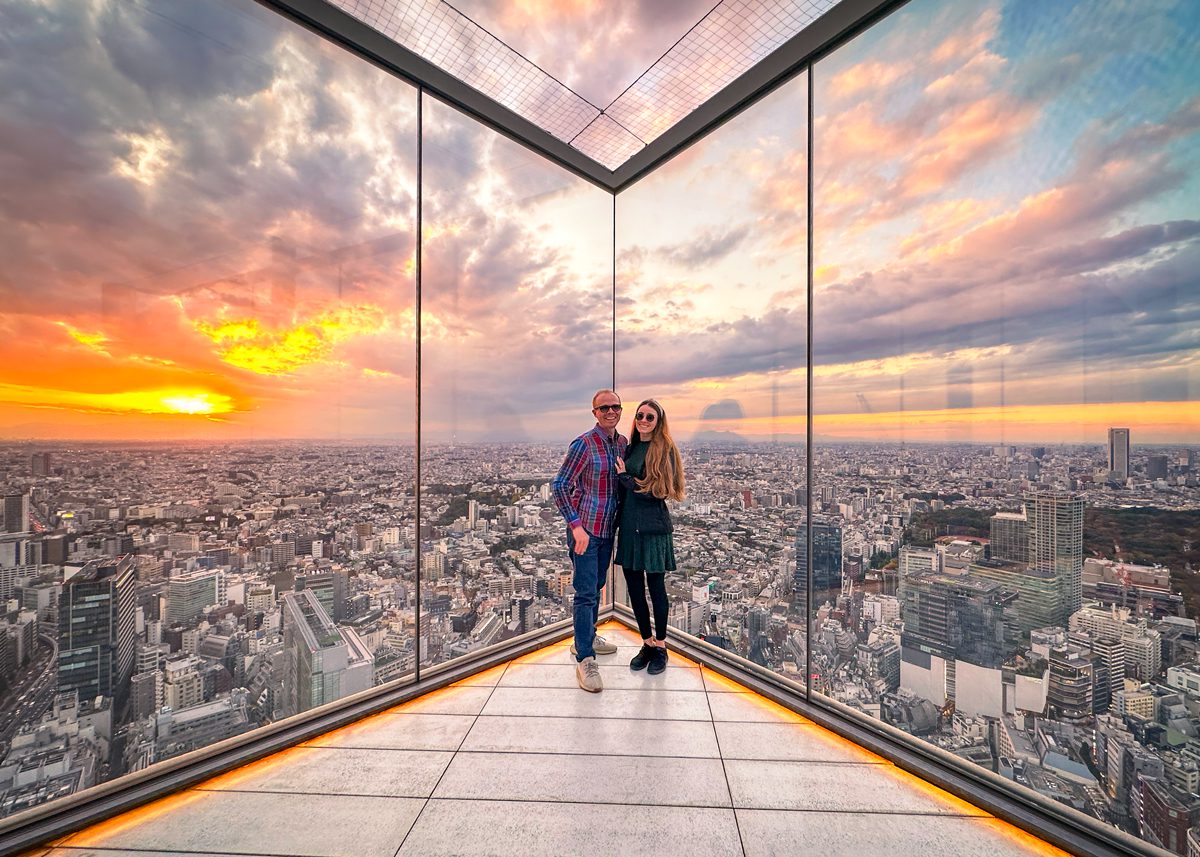
That street-level rush at the Scramble is electric, but the real magic glows a few hundred meters up.
At Shibuya Sky, arrive 45–60 minutes before sunset for prime railing spots and unobstructed Tokyo skyline frames.
Pack a wide-angle, shoot RAW, and bracket.
As twilight deepens, chase sunset reflections on the glass deck, then pivot for blue-hour trails.
Windy?
Anchor elbows, drop ISO, and let neon breathe.
Hachiko Statue: Avoiding Crowds for Clean Compositions

Ever wonder how to photograph Hachiko without a sea of selfie sticks in the frame?
A savvy local would suggest dawn for prime crowd avoidance, when the Hachiko statue glows softly and the plaza is blissfully calm.
Late-night also works—neon reflections, fewer elbows.
Frame tight, shoot low, and use passing trains as motion blur magic.
- Arrive before 7 a.m.
- Weeknight late shoots
- Tight 35–50mm framing
- Patience, then burst shots
Shinjuku’s Neon-Lit Photography Opportunities
Shinjuku lights up like a sci‑fi set, and photographers can start at the Tokyo Metropolitan Government Building for free panoramic vistas—sunset to blue hour is gold, so bring a tripod and shoot through the reflection-free corners.
After dark, Omoide Yokocho and Golden Gai burst with lantern glow and tight alley drama; think fast primes, neon color pops, and candid street scenes where steam, sake, and laughter become your backdrop.
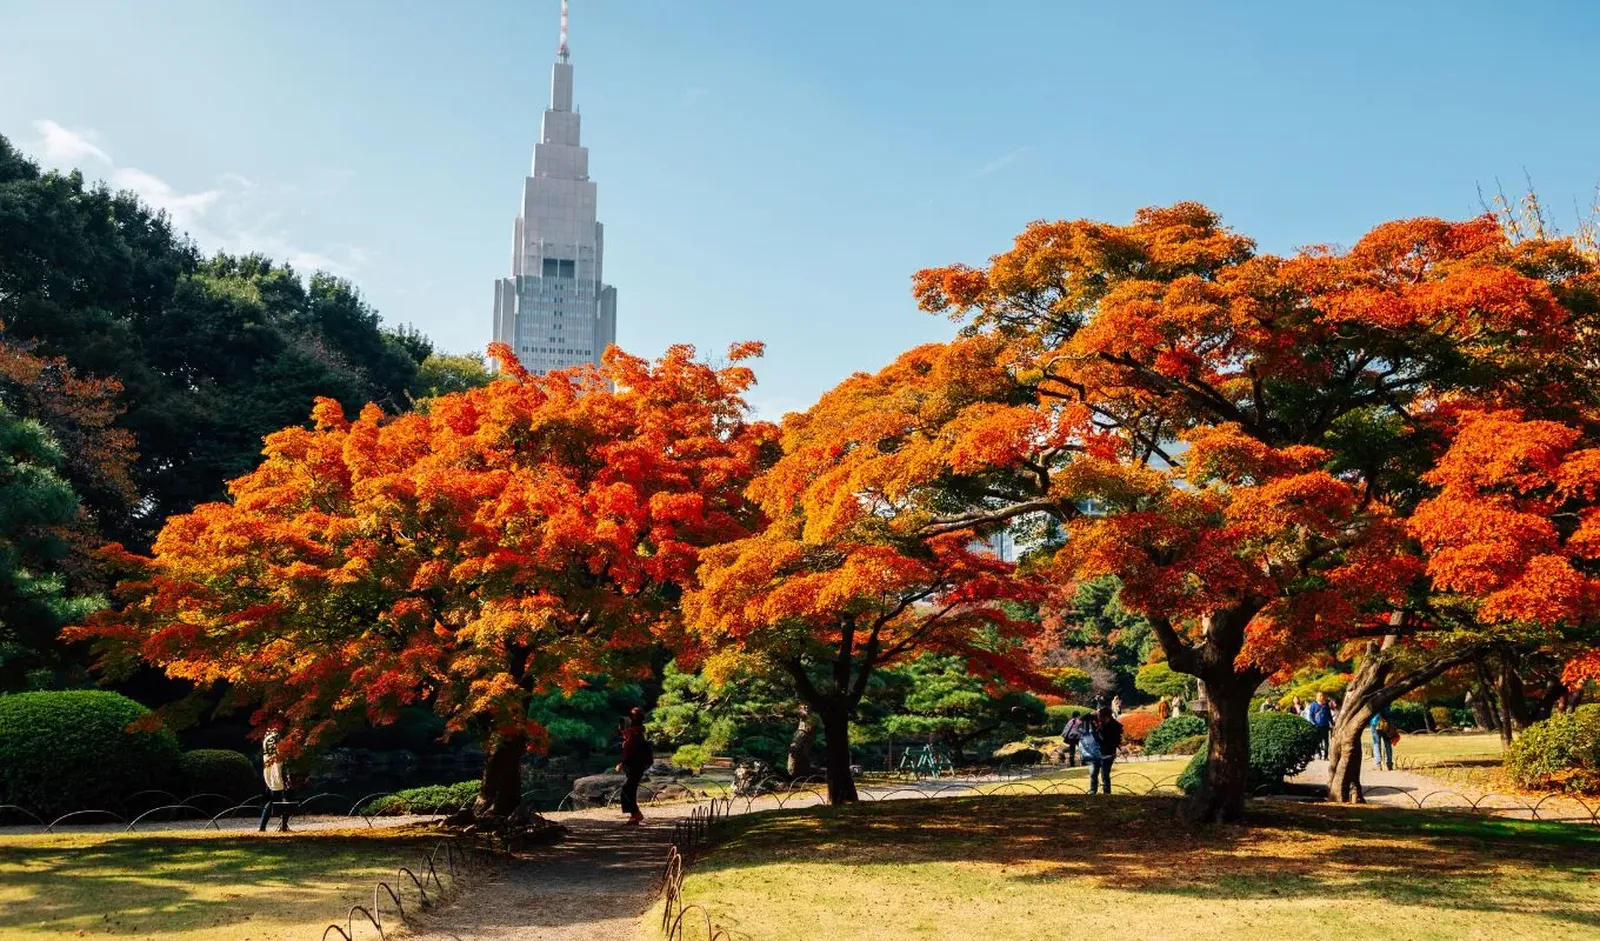
For a softer counterpoint, Shinjuku Gyoen offers dreamy cherry blossoms in spring and fiery foliage in autumn—arrive early, frame wide paths and ponds, and let the city’s hum fade into quiet, painterly compositions.
Tokyo Metropolitan Government Building: Free Panoramic Views
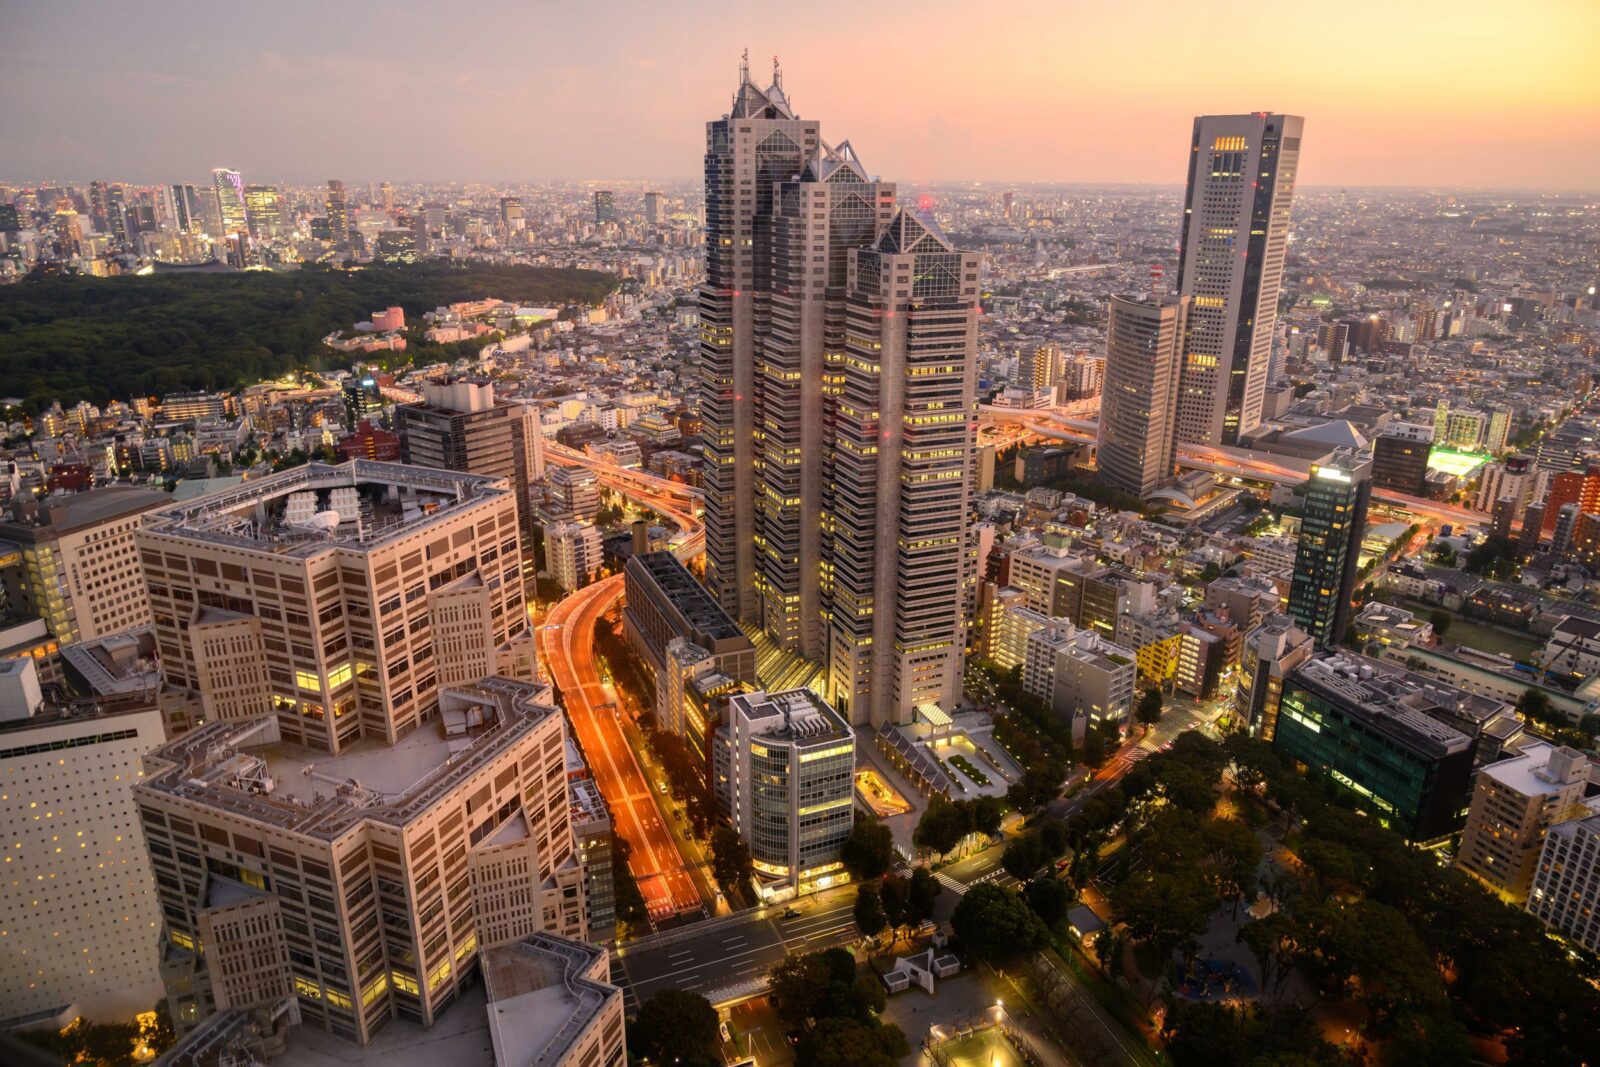
Why pay for a sky deck when Tokyo offers one of its best views for free?
From Shinjuku’s Tokyo Metropolitan Government Building, visitors snag an unusual perspective on skyscrapers, parks, and distant peaks.
Arrive near sunset, ride the elevator up, and hunt candid moments—silhouettes against neon, clouds rolling like surf.
Tripods are restricted, but steady hands and rail support work.
- Sunset-to-blue-hour magic
- Reflections on observation glass
- Clear-day Fuji sightings
- Lines move fast, no ticket needed
Omoide Yokocho and Golden Gai: Night Photography Settings
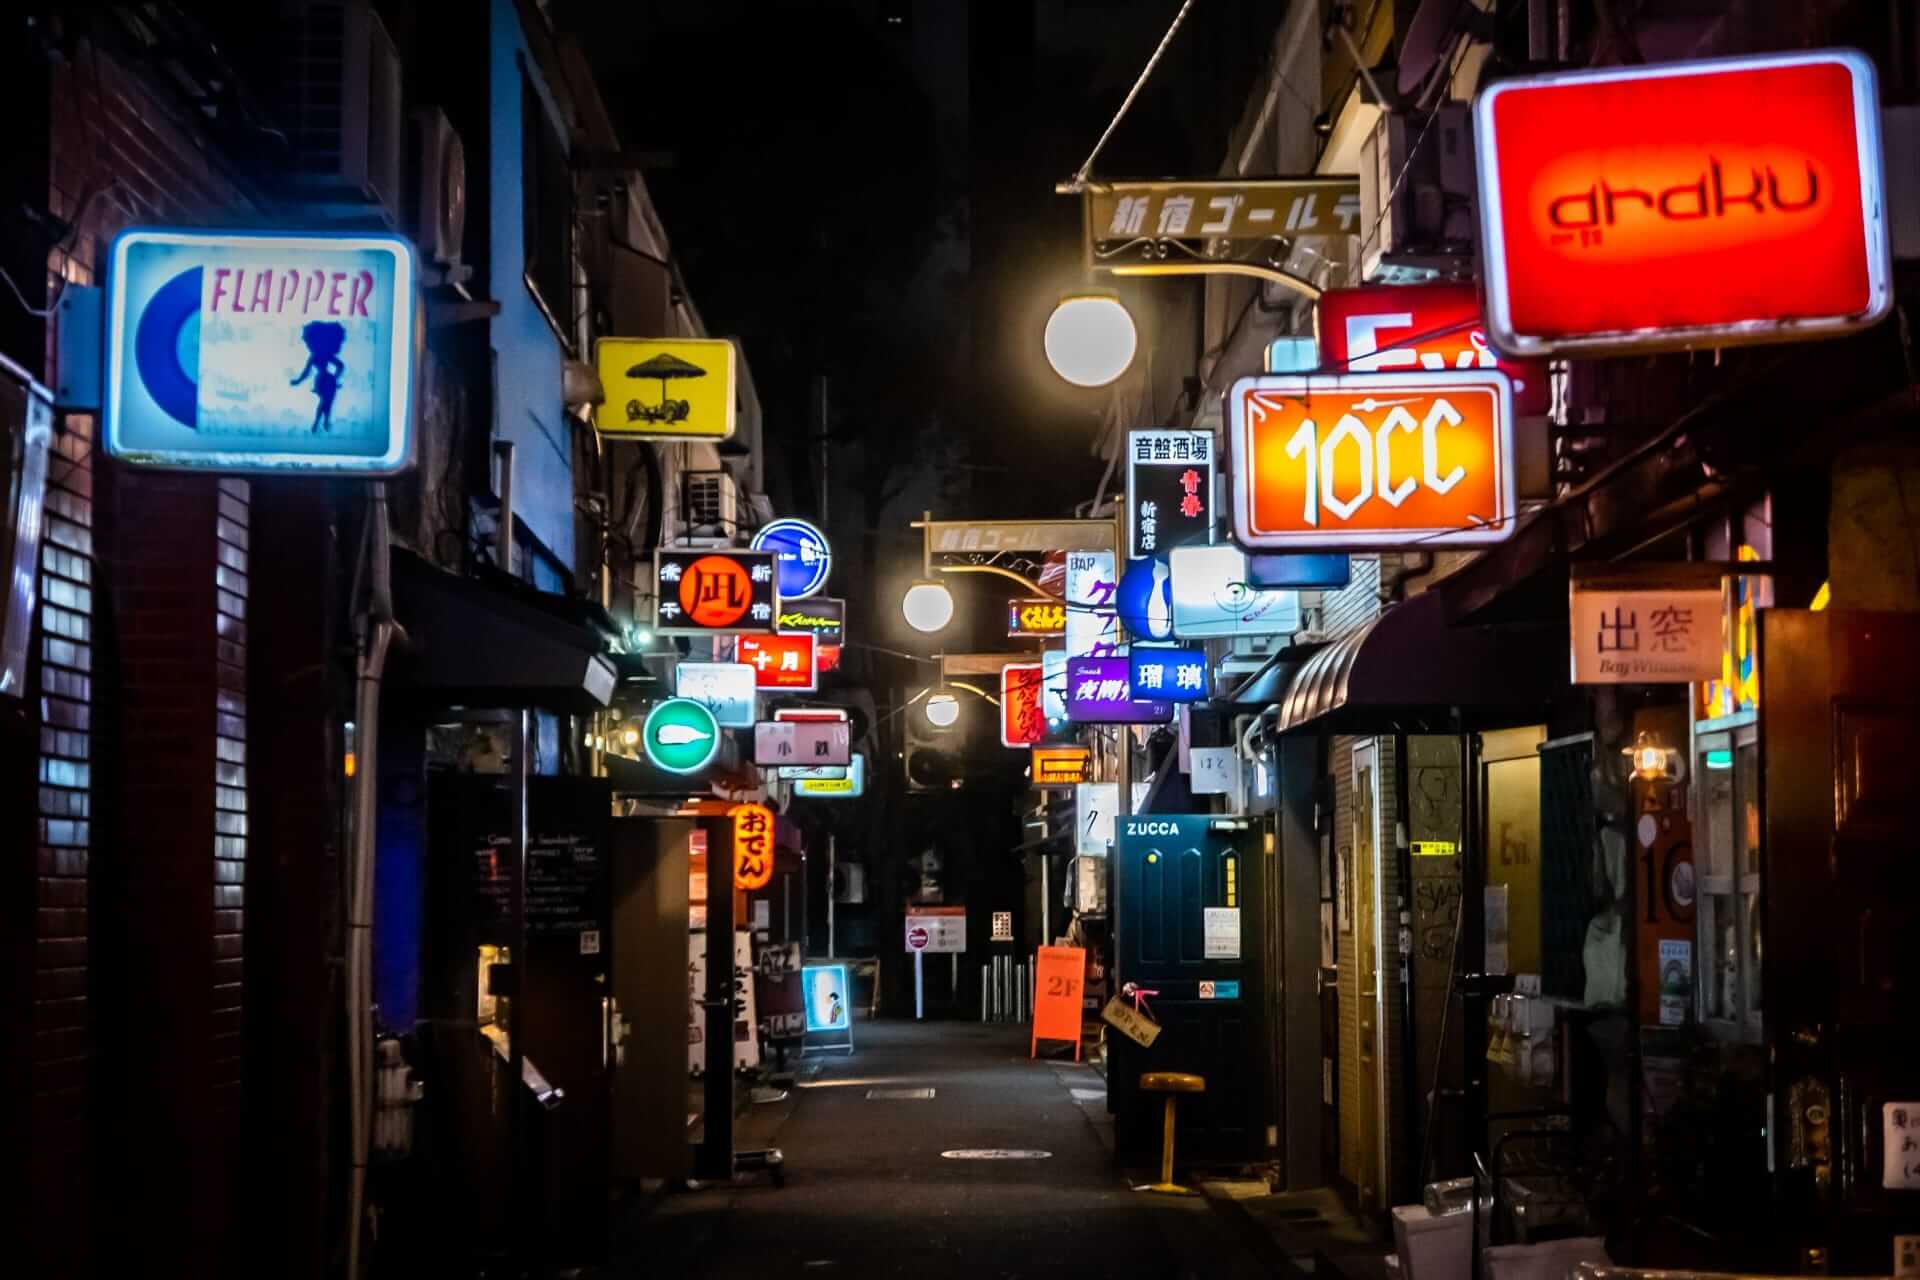
Although the alleys feel timeless, Omoide Yokocho and Golden Gai reward modern night shooters who dial in smart settings before stepping into the glow.
Try 1/60–1/125 sec, f/2–f/2.8, ISO 800–1600; stabilize with elbows or a tiny clamp.
Embrace neon signs, exposing for highlights.
For alleyway ambiance, white balance around 3000–3800K, shoot RAW, and snag candid reflections in ramen shop windows—quietly adventurous!
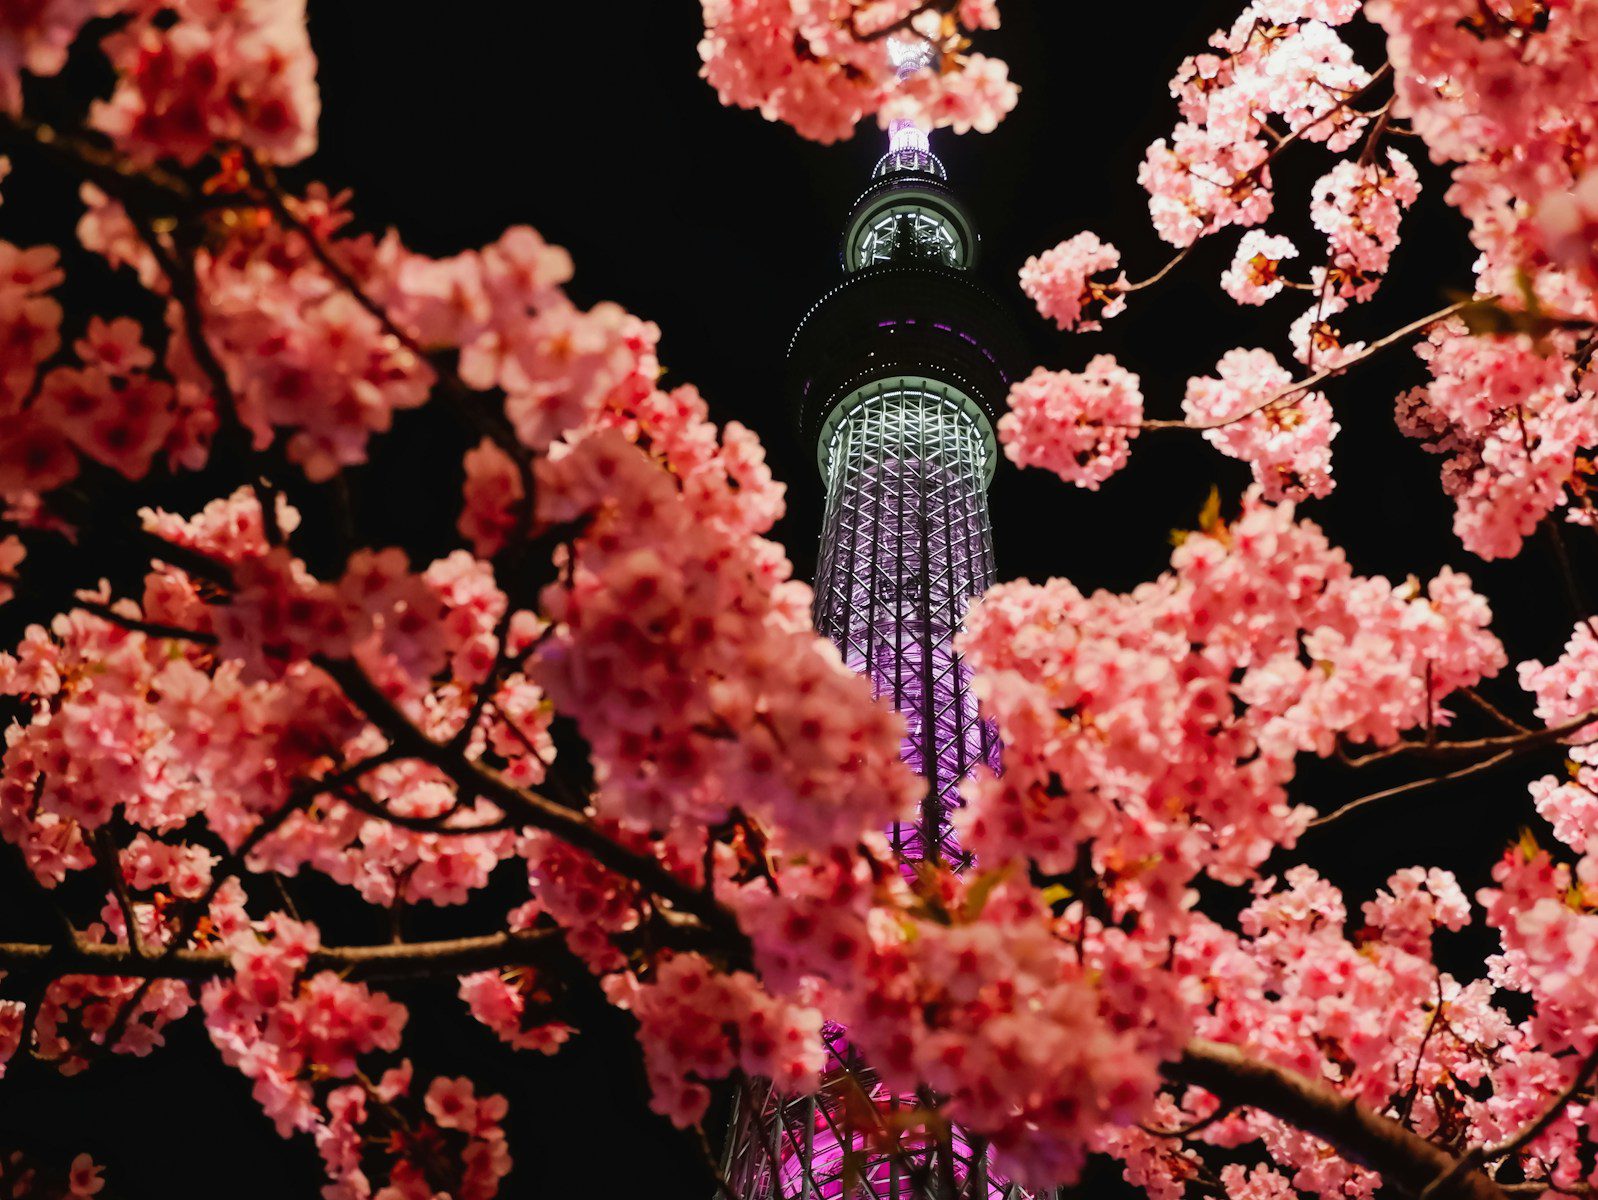
Shinjuku Gyoen: Cherry Blossom and Seasonal Photography
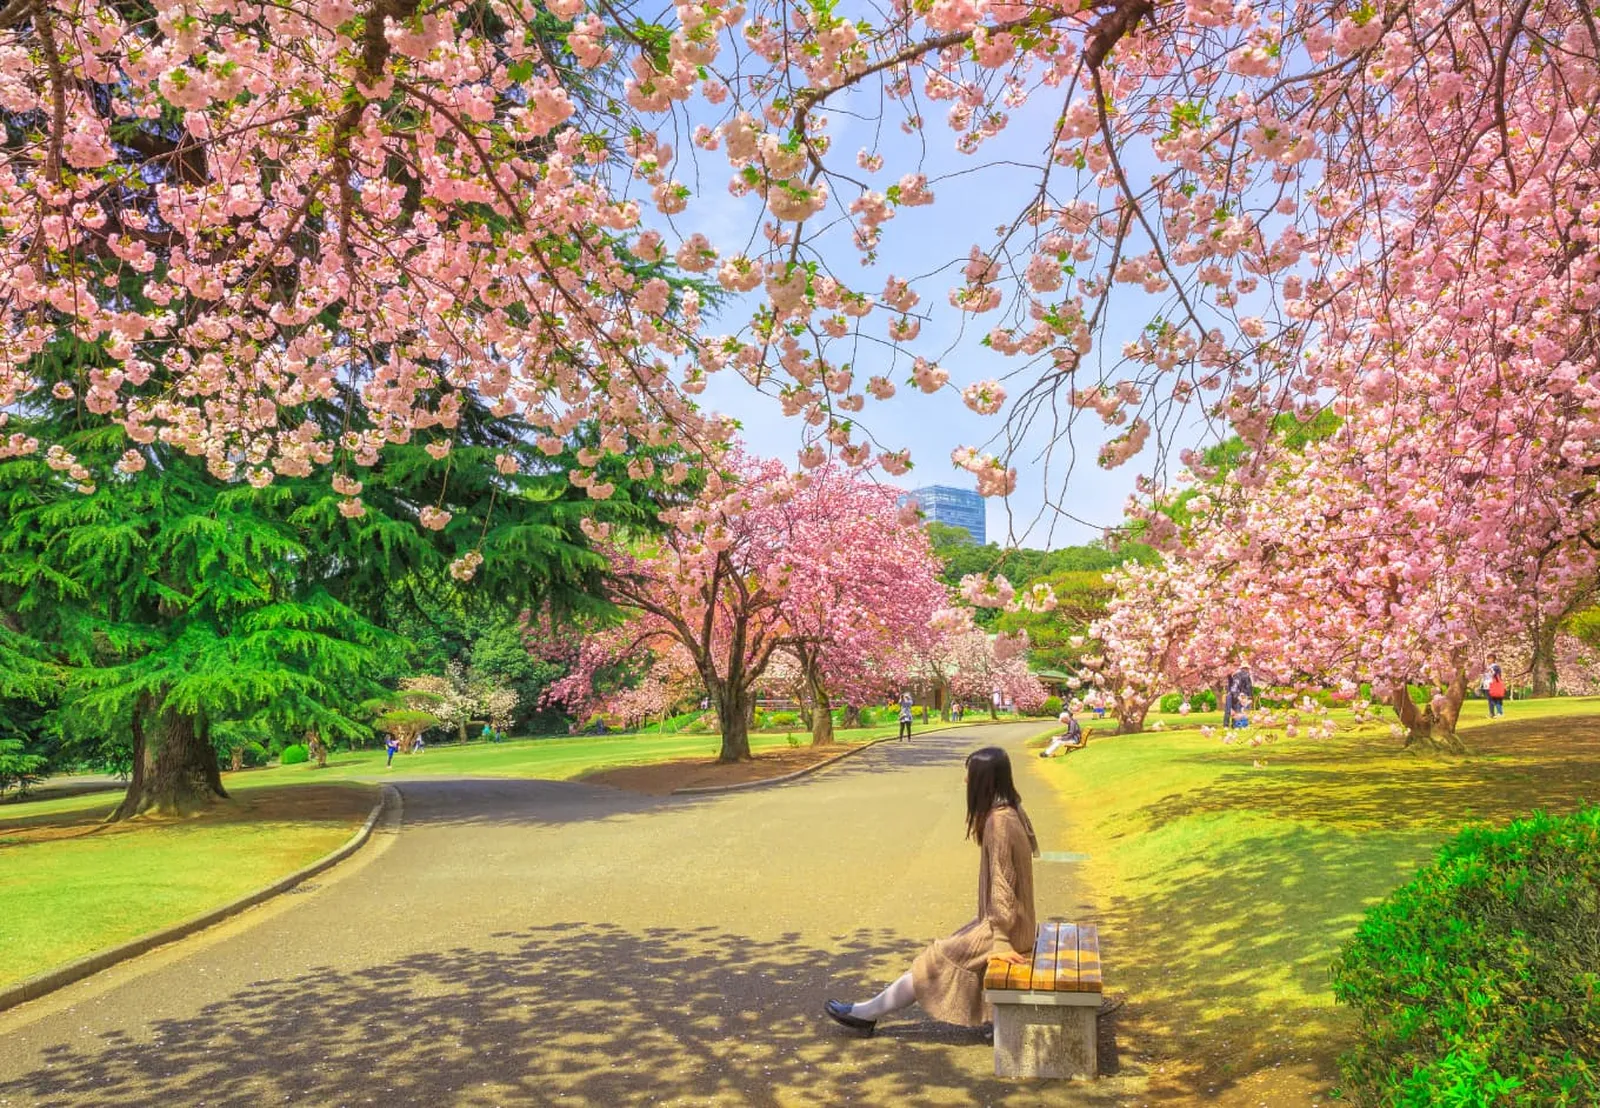
After the nocturnal buzz of Omoide Yokocho and Golden Gai, the scene softens just a few blocks away in the vast calm of Shinjuku Gyoen, where seasons put on headline performances.
Here, seasonal sakura explode in pastel clouds, ponds mirror sky, and outdoor lighting at dusk kisses branches gold.
Arrive early, breathe deep, and roam wide—freedom feels tangible.
- Peak bloom: late March–early April
- Best gates: Shinjuku and Sendagaya
- Lenses: 35mm for scenes, 85mm for portraits
- Golden hour glow: western lawns
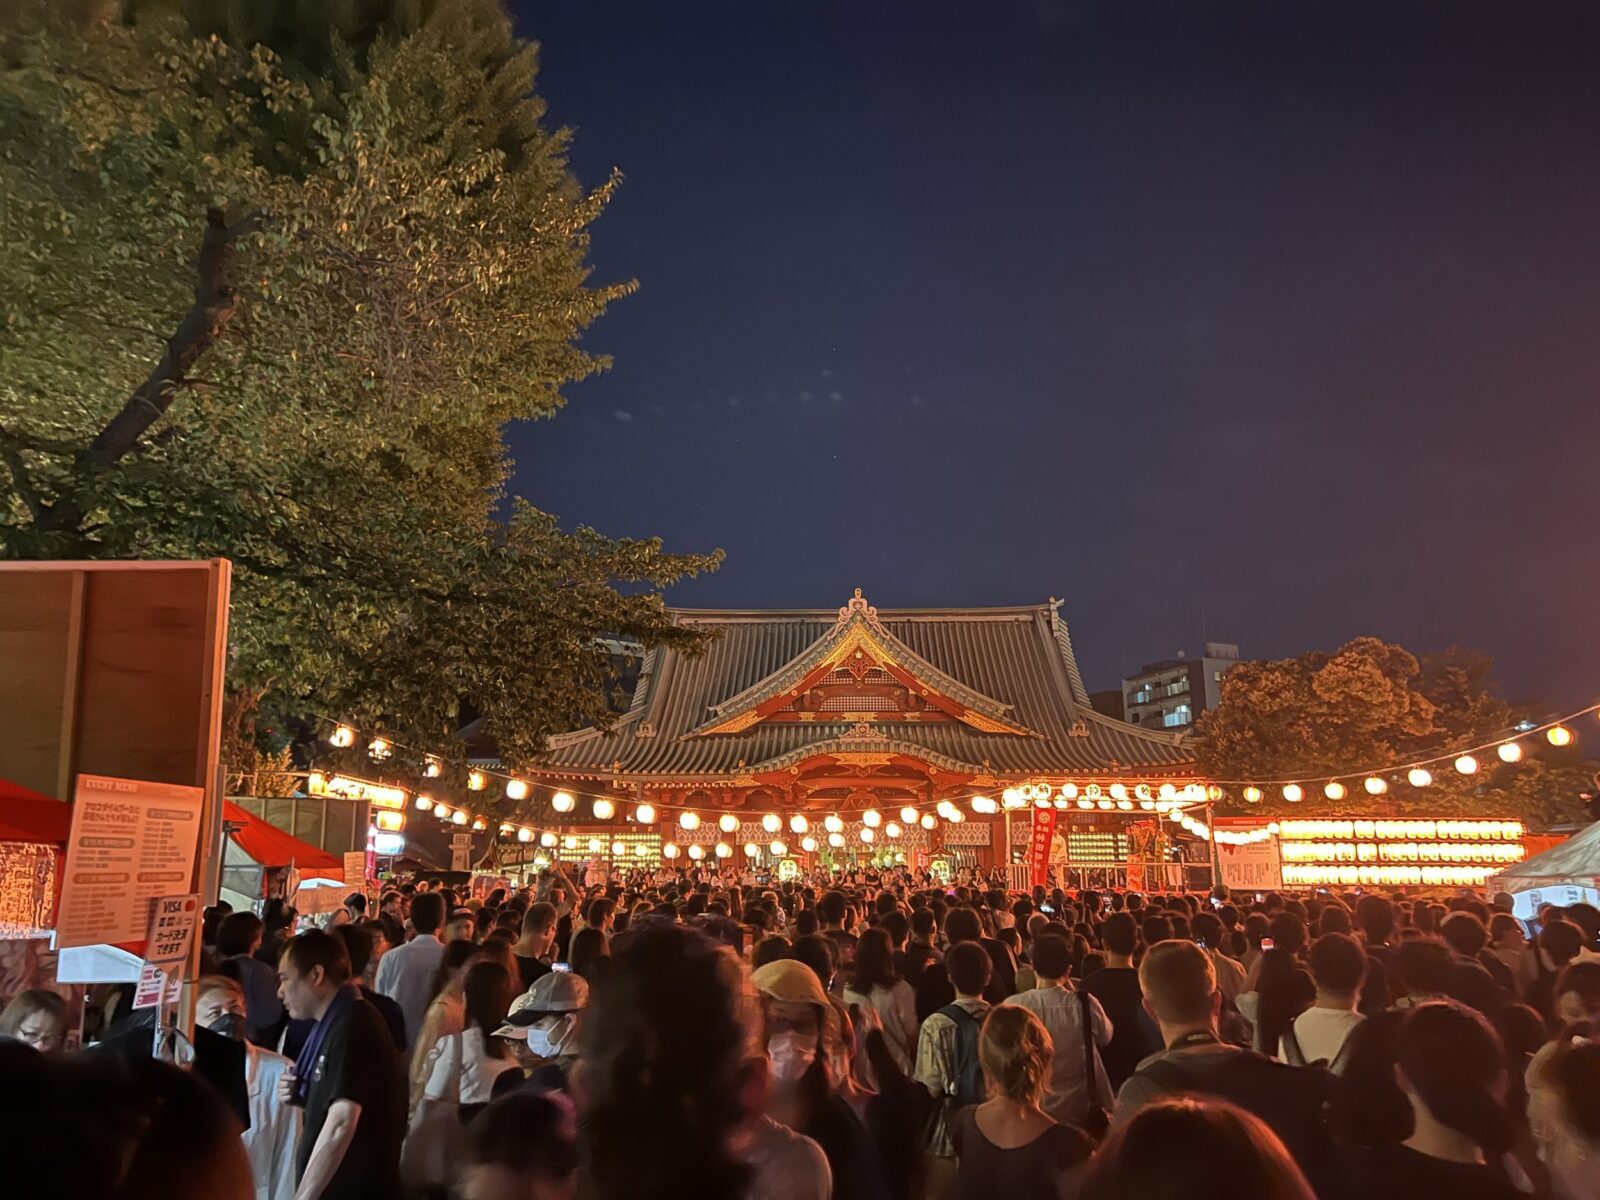
Asakusa’s Traditional Japanese Aesthetics
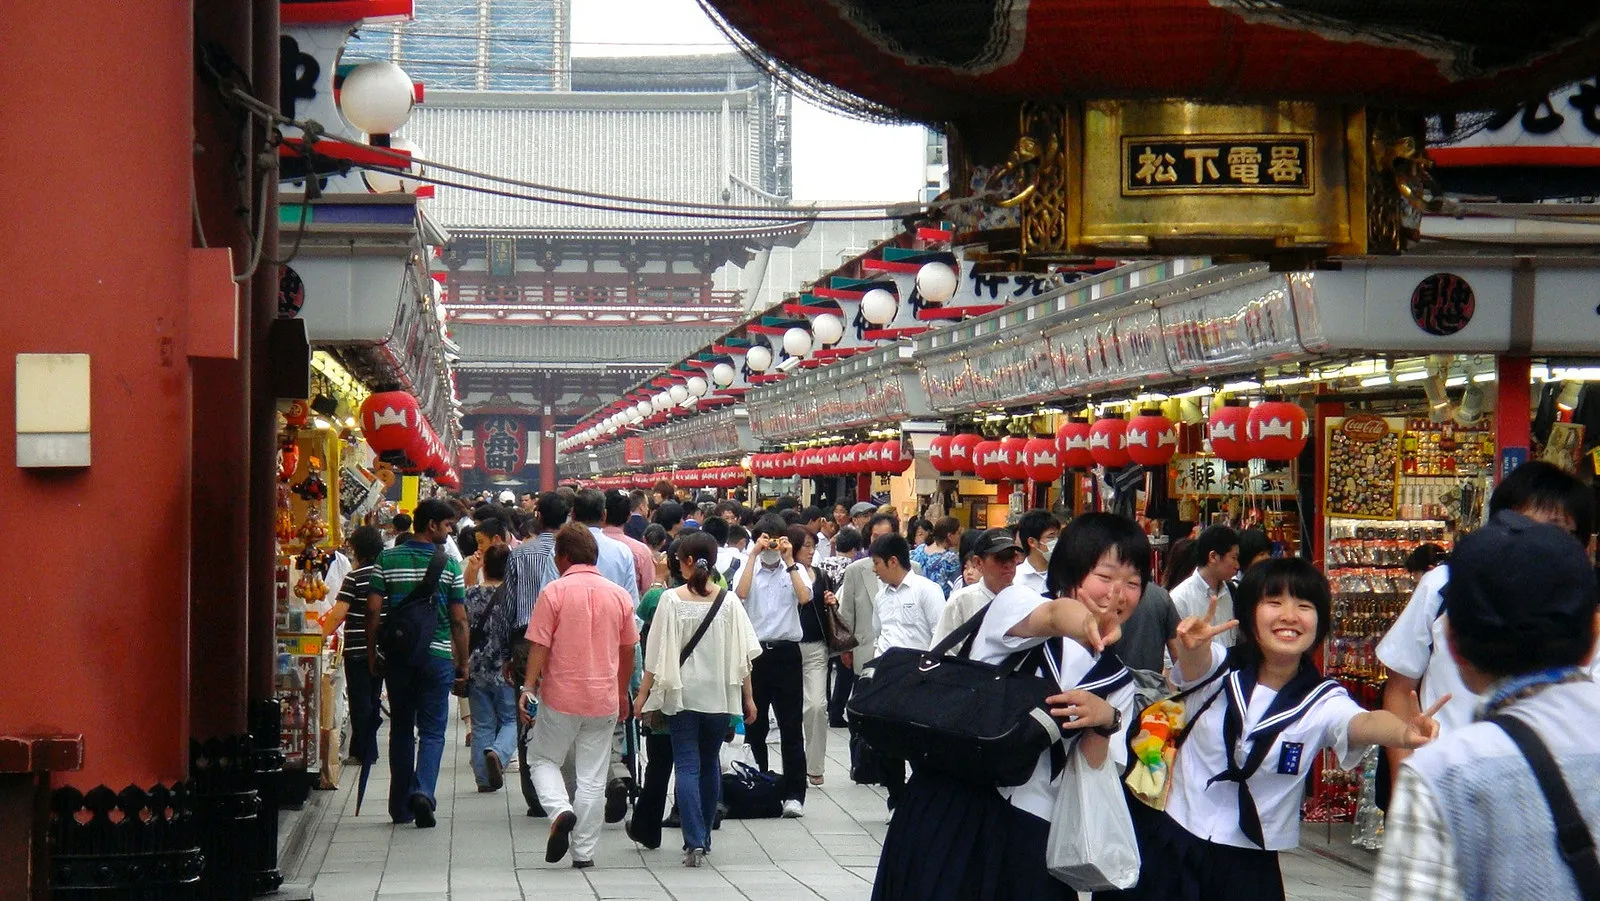
Asakusa serves classic Tokyo on a silver platter—start at Sensō-ji at sunrise, framing the vermilion gate and incense smoke with clean leading lines for crisp, low-contrast portraits.
Stroll Nakamise Shopping Street and snap tactile close-ups—lacquered fans, kimono fabrics, and sweet treats—using a fast lens to turn the crowd into creamy bokeh (yes, your snack is a prop and a perk!).
Finish by the Sumida River at golden hour, lining up Tokyo Skytree’s reflection in calm water or rain puddles—a tripod helps, but steady elbows and a slower shutter can work wonders too.
Sensō-ji Temple: Morning Light and Composition Techniques
The first rays hit Sensō-ji like stage lights, washing the vermilion gates and curling incense smoke in a soft gold that flatters every frame.
He suggests chasing temple shadows and playful morning angles—arrive before 7 am, frame the Thunder Gate, then pivot to the five-story pagoda.
Move low, go wide, and let lantern lines guide you—freedom-loving compositions await!
- Frame incense drifting through sunbeams
- Use pagoda symmetry with negative space
- Capture guardians’ fierce faces in side light
- Anchor leading lines with stone pathways
Nakamise Shopping Street: Capturing Cultural Details
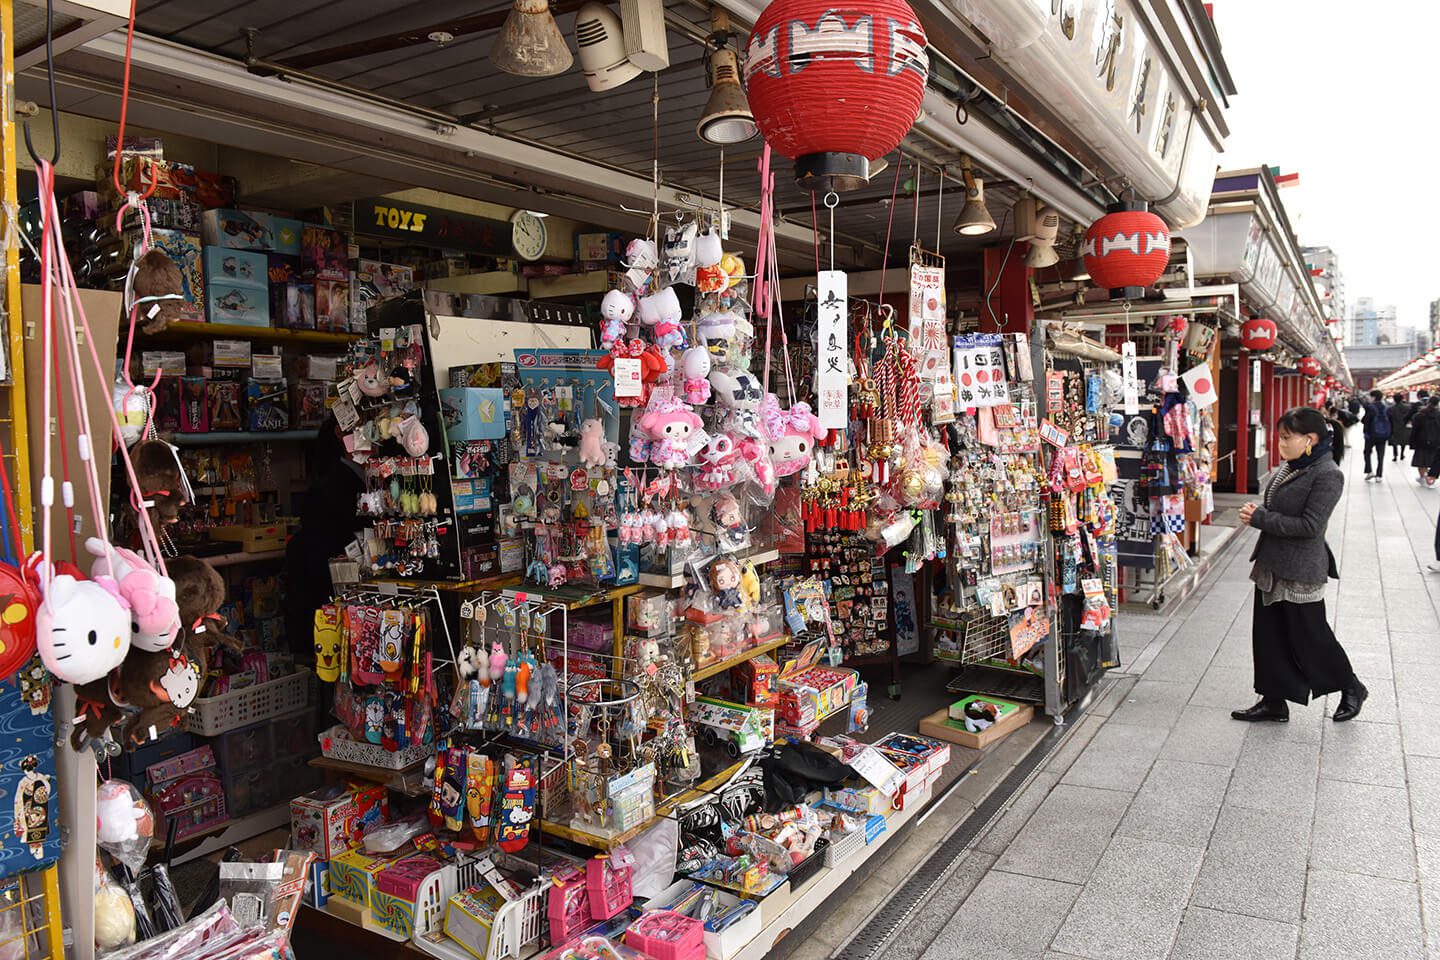
Two hundred meters of candy-colored awnings and lacquer-red stalls stretch from Kaminarimon to Hozomon, and every step begs for a close-up.
Photographers should chase textures—woodgrain signage, steamed buns hissing, gold-leaf sweets glittering.
Ask vendors about Traditional crafts; they’ll proudly pose.
Frame hands exchanging omamori, incense wafting, and tiny bows—Cultural rituals that sing on camera.
Go early, shoot low, and use shop eaves for leading lines.
Freedom loves detail!
Sumida River Views: Tokyo Skytree Reflection Photography
Slip down to the Sumida River at blue hour, when Skytree switches on like a sci‑fi lighthouse and the water turns into a giant mirror.
From Azuma Bridge, reflections stretch silky-smooth—perfect for long exposures.
Expect Traditional kimono strolls, street performers, and breeze-kissed railings.
Travel light, shoot bold, chase freedom.
- Best vantage: Azuma Bridge
- 10–20s shutter; ISO 100
- Polarizer off for reflections
- Tripod, wind hook, patience
Harajuku and Omotesando’s Fashion-Forward Backdrops
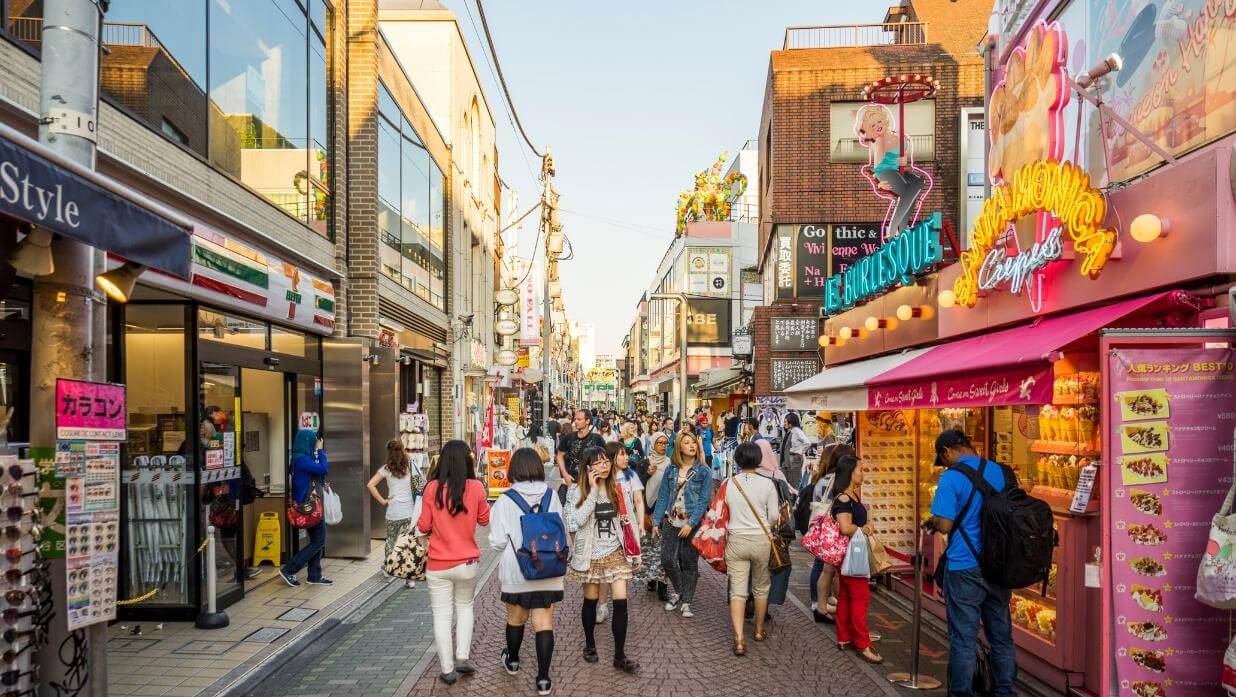
Harajuku and Omotesando pack a stylish punch: start on Takeshita Street where neon signage, candy-colored boutiques, and fast-moving crowds call for wide angles, quick shutter speeds, and bold color profiles.
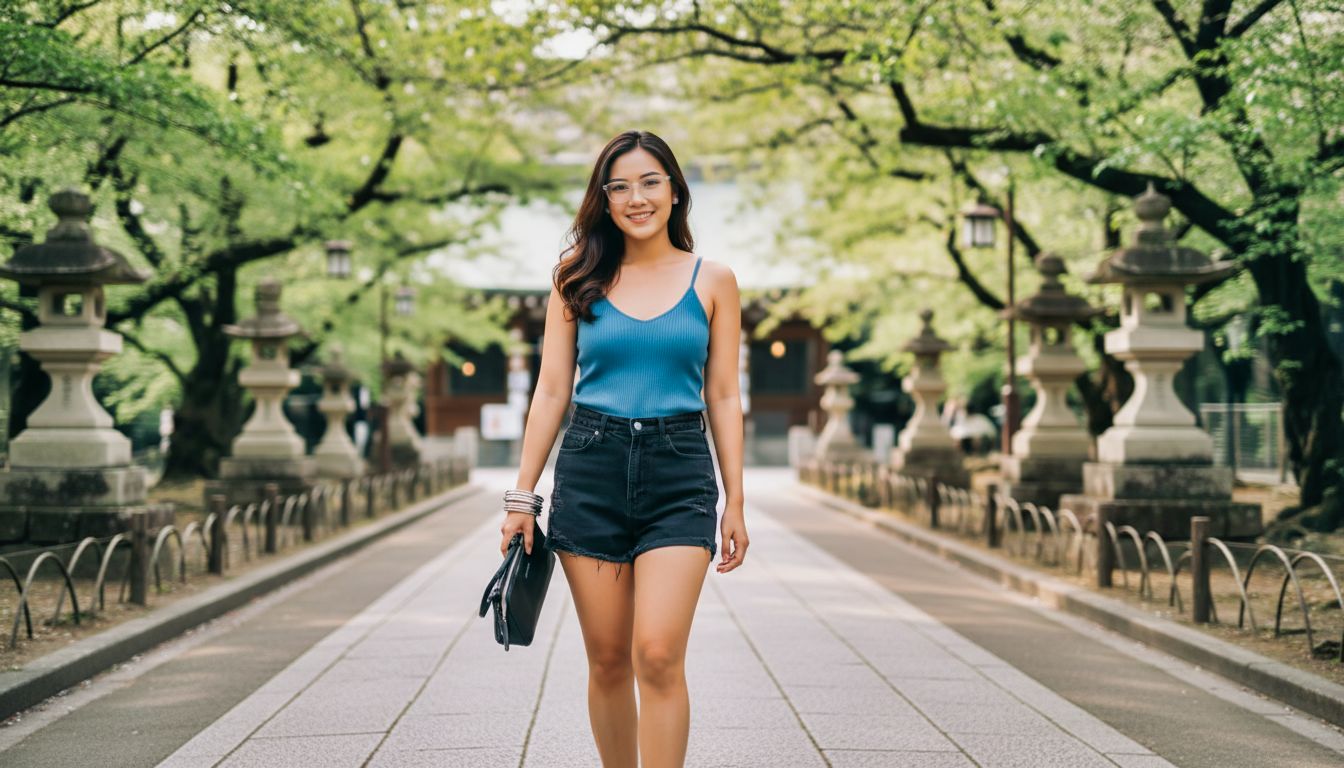
Slip into Meiji Shrine’s forest next door, using early-morning natural light, soft backlighting, and a 50mm or 85mm lens to capture serene paths and textured cedar trunks.
Then wander Omotesando’s sleek boulevard, framing mirrored facades and sharp lines with leading perspectives, reflections, and a polarizer to tame glare—hello, magazine-ready geometry!
Takeshita Street: Colorful Street Photography Tips
Although crowds can feel like a moving rainbow, Takeshita Street rewards patient shooters with vivid color and character.
Here, colorful fashion and street art collide, inviting bold frames, playful angles, and lively edits.
Shoot low to amplify neon signage, backlight candy shops, and time bursts of movement for kinetic portraits.
- Scout side alleys for murals
- Capture reflective shop windows
- Frame accessories close-up
- Ask permission, then snap confidently
Meiji Shrine: Natural Light Forest Photography
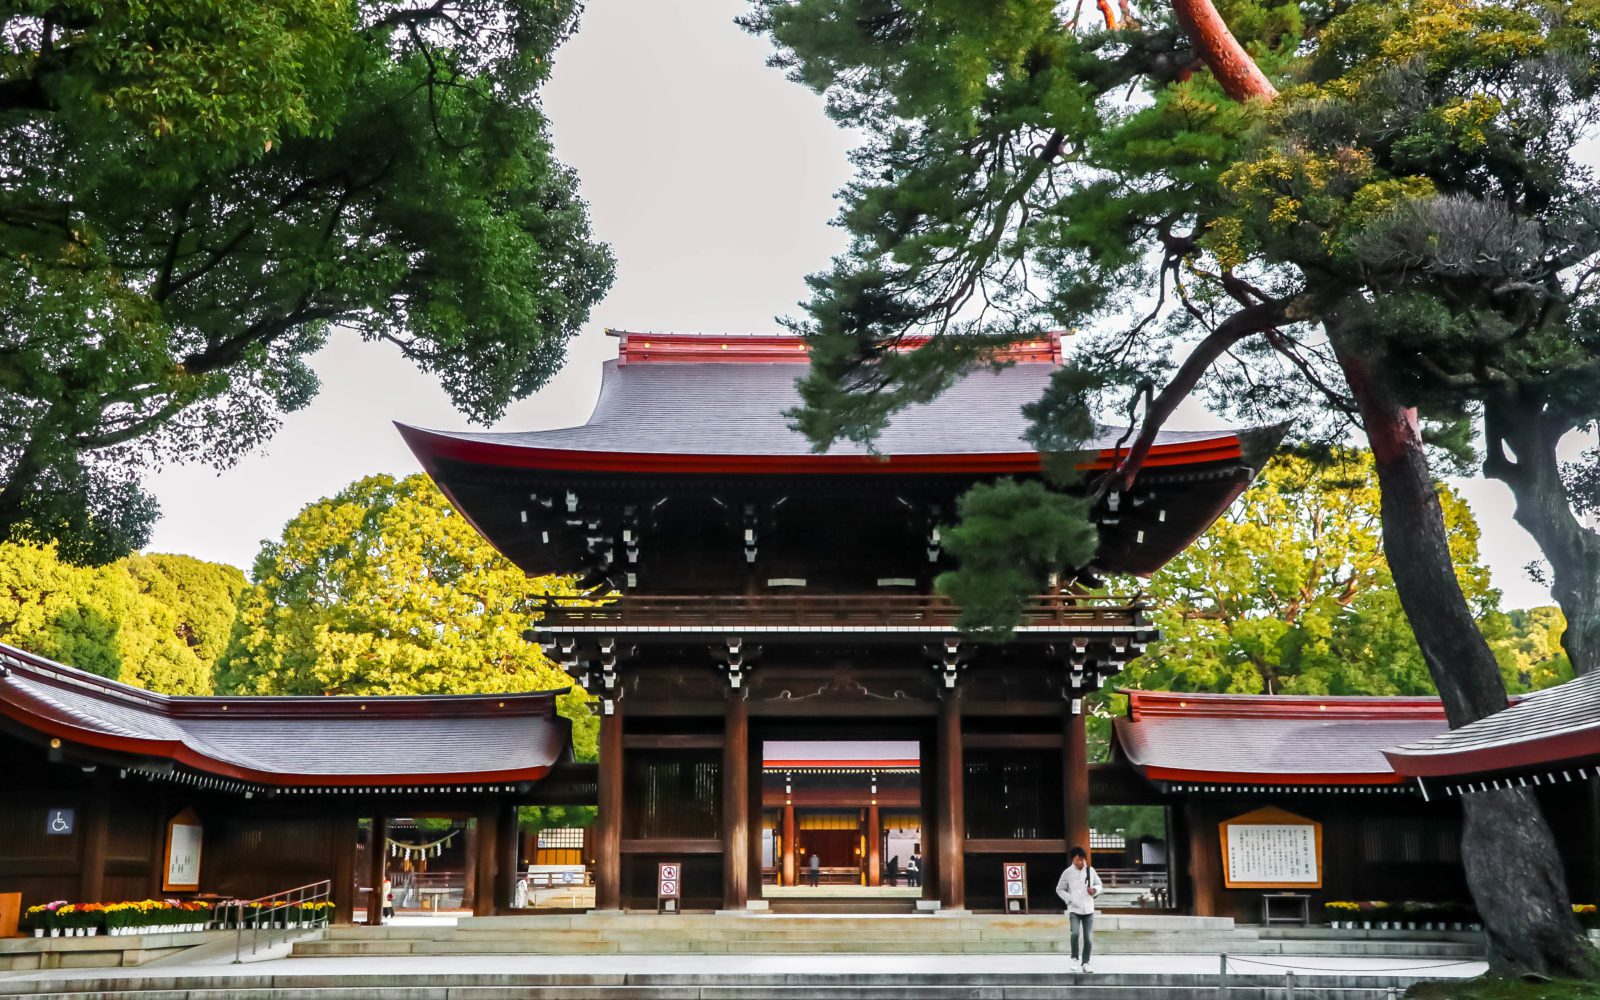
A short stroll from the buzz of Omotesando drops visitors into Meiji Shrine’s hushed forest, where soft, dappled light turns every path into a ready-made reflector.
Aim for golden hour; the canopy funnels glow onto faces and textures, delivering forest serenity without harsh shadows.
Shoot near torii and sake barrels, step back for scale, then lean in for bokeh.
Walk slow, breathe, and let Meiji Shrine exhale.
Omotesando Architecture: Modern Design Photography
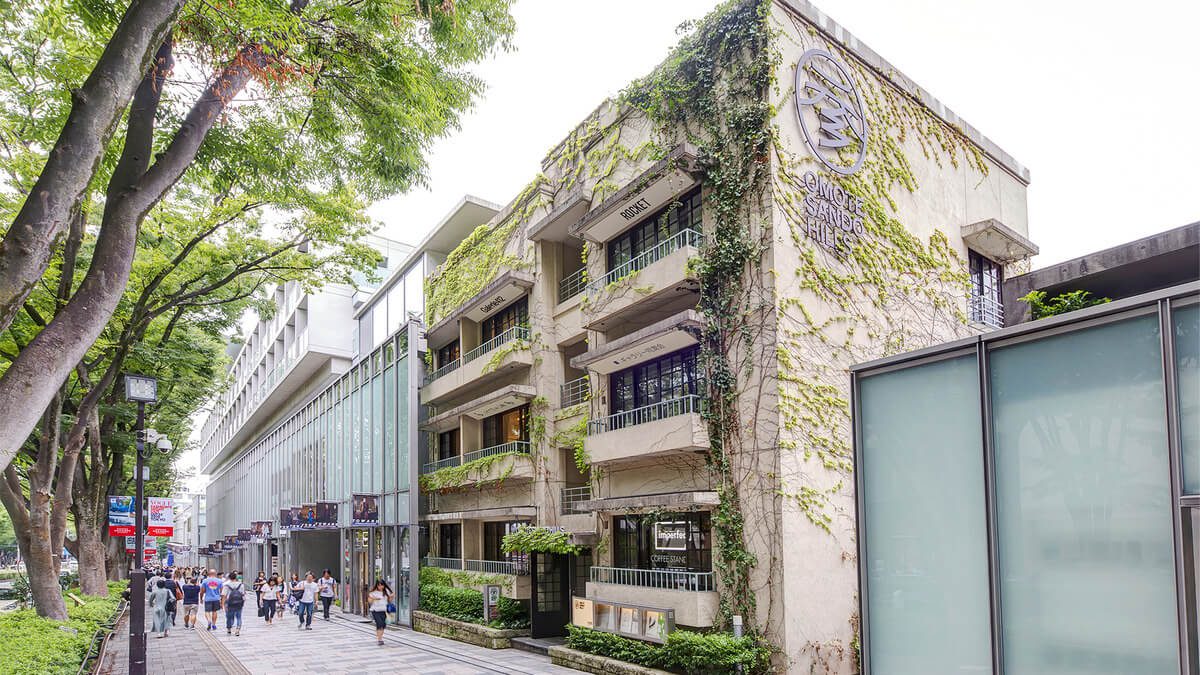
This sleek boulevard doubles as an open-air design museum, where starchitects flex and glass facades catch sky like mirrors.
Here, Concrete facades meet geometrical patterns, casting crisp shadows that beg for wide angles.
Hit Omotesando Hills at golden hour, then pivot to Prada’s crystalline tower for dreamy reflections—move fast, breathe easy, and chase symmetry like it’s your favorite playlist.
- Shoot early: clean sidewalks, soft light
- Frame crosswalk stripes as leading lines
- Use reflections in boutique windows
- Capture textures: steel, cedar, Concrete facades
Ginza’s Luxury District Photo Opportunities
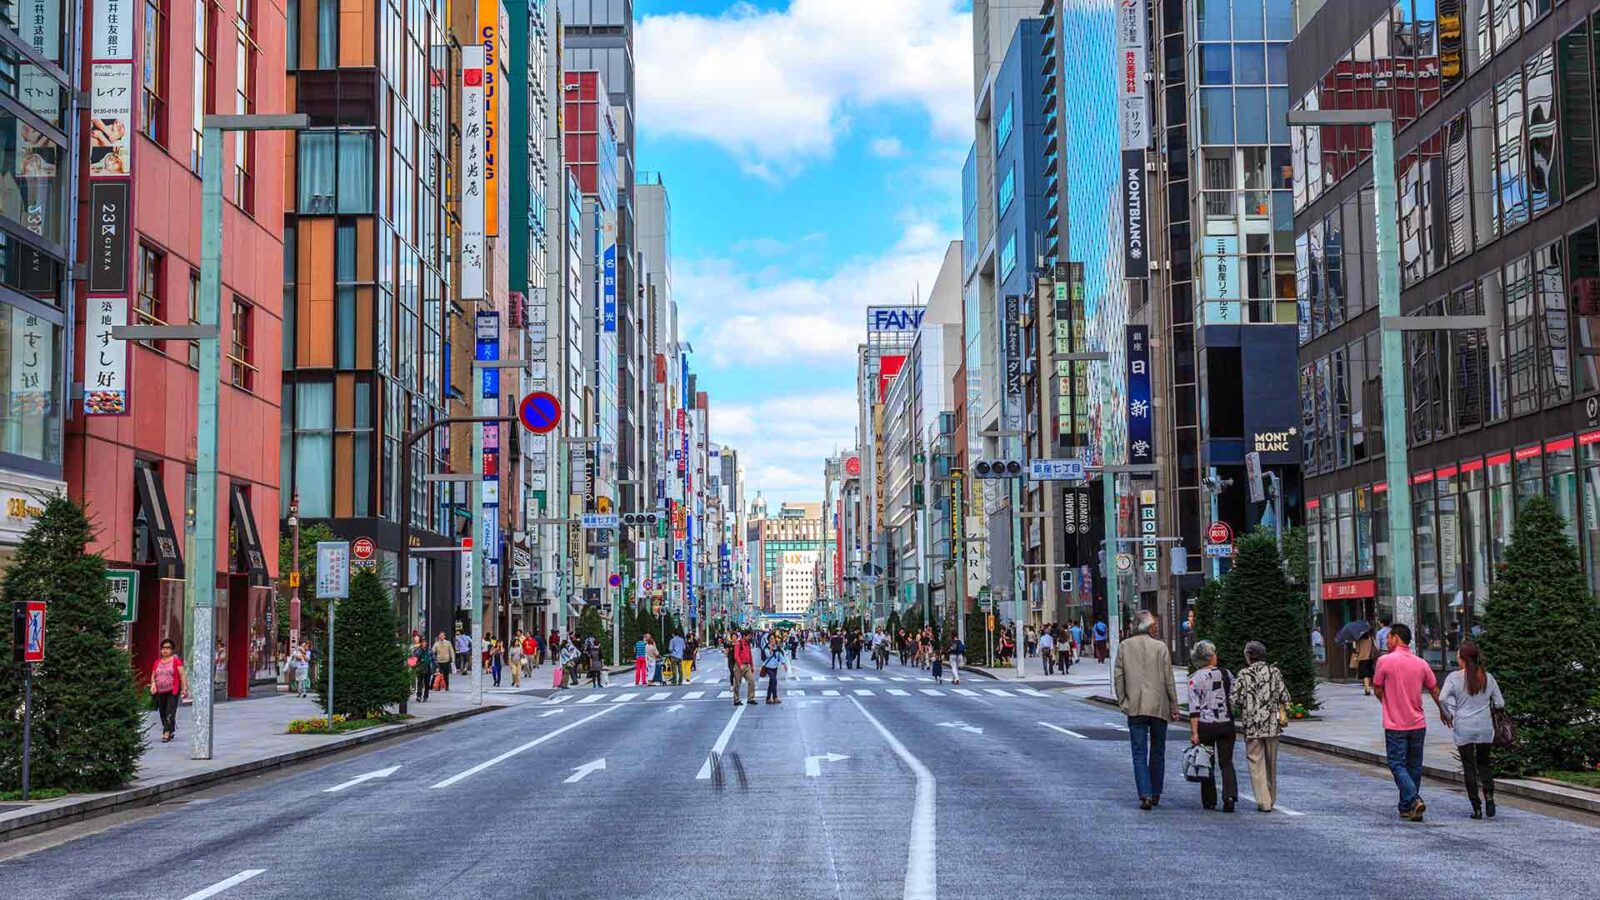
Ginza turns electric after sunset, and the Ginza Crossing is your stage—stand at the curb, wait for the all-walk signal, then frame neon billboards against sleek facades for crisp architectural shots.
For glass architecture and reflections, hug the flagship stores along Chuo-dori, angle low to catch layered mirror effects, and use a polarizing filter to control glare while preserving those dreamy highlights.
Try bracketing exposures and shooting during light rain—wet pavements double the spectacle, and your photos will look like a glossy magazine spread!
Ginza Crossing: Architectural Photography at Night

Under neon skies, the Ginza 4-chome crossing becomes a luminous playground for architectural photography.
Here, glassy flagships and heritage facades glow like theater sets.
He spots crisp lines, daring curves, and sleek Ginza architecture catching night reflections.
Then times shots with the famous Seiko clock.
Step lightly, shoot boldly—traffic ebbs in waves.
- Best vantage: Mitsukoshi corner
- Blue hour magic
- Polarizer optional
- Avoid tripod congestion
Glass Architecture and Reflections: Advanced Techniques
Although glass can be unforgiving, Ginza rewards anyone who treats its façades like giant mirrors and puzzles them into layered compositions.
He scouts the Mikimoto and Hermes buildings, then angles low to blend neon with sky, a playful mash-up.
He uses Reflections techniques: polarizer half-turned, exposure bracketing, and clean edges.
Dawn reduces glare, rain turbocharges glass facades, and shop windows add cinematic silhouettes—blink-and-you-miss-it moments!
Hidden Photo Gems Most Tourists Miss in Tokyo
Ready for the sleeper hits?
Think motion-blur light trails at TeamLab Borderless (mind the no-flash rule and brace for low light).
A pastel tunnel of sakura over the Meguro River at blue hour, and Yanaka Ginza’s retro storefronts where late-afternoon shadows sculpt perfect street portraits.
Add Kagurazaka’s stone-paved alleys—best on weekdays at dusk—where lanterns glow, textures pop, and a 35–50mm lens keeps scenes intimate without elbowing anyone.
Pack a fast prime, watch reflections on wet pavement after a drizzle, and you’ll leave with shots that feel secret and cinematic!
TeamLab Borderless: Digital Art Photography Guidelines
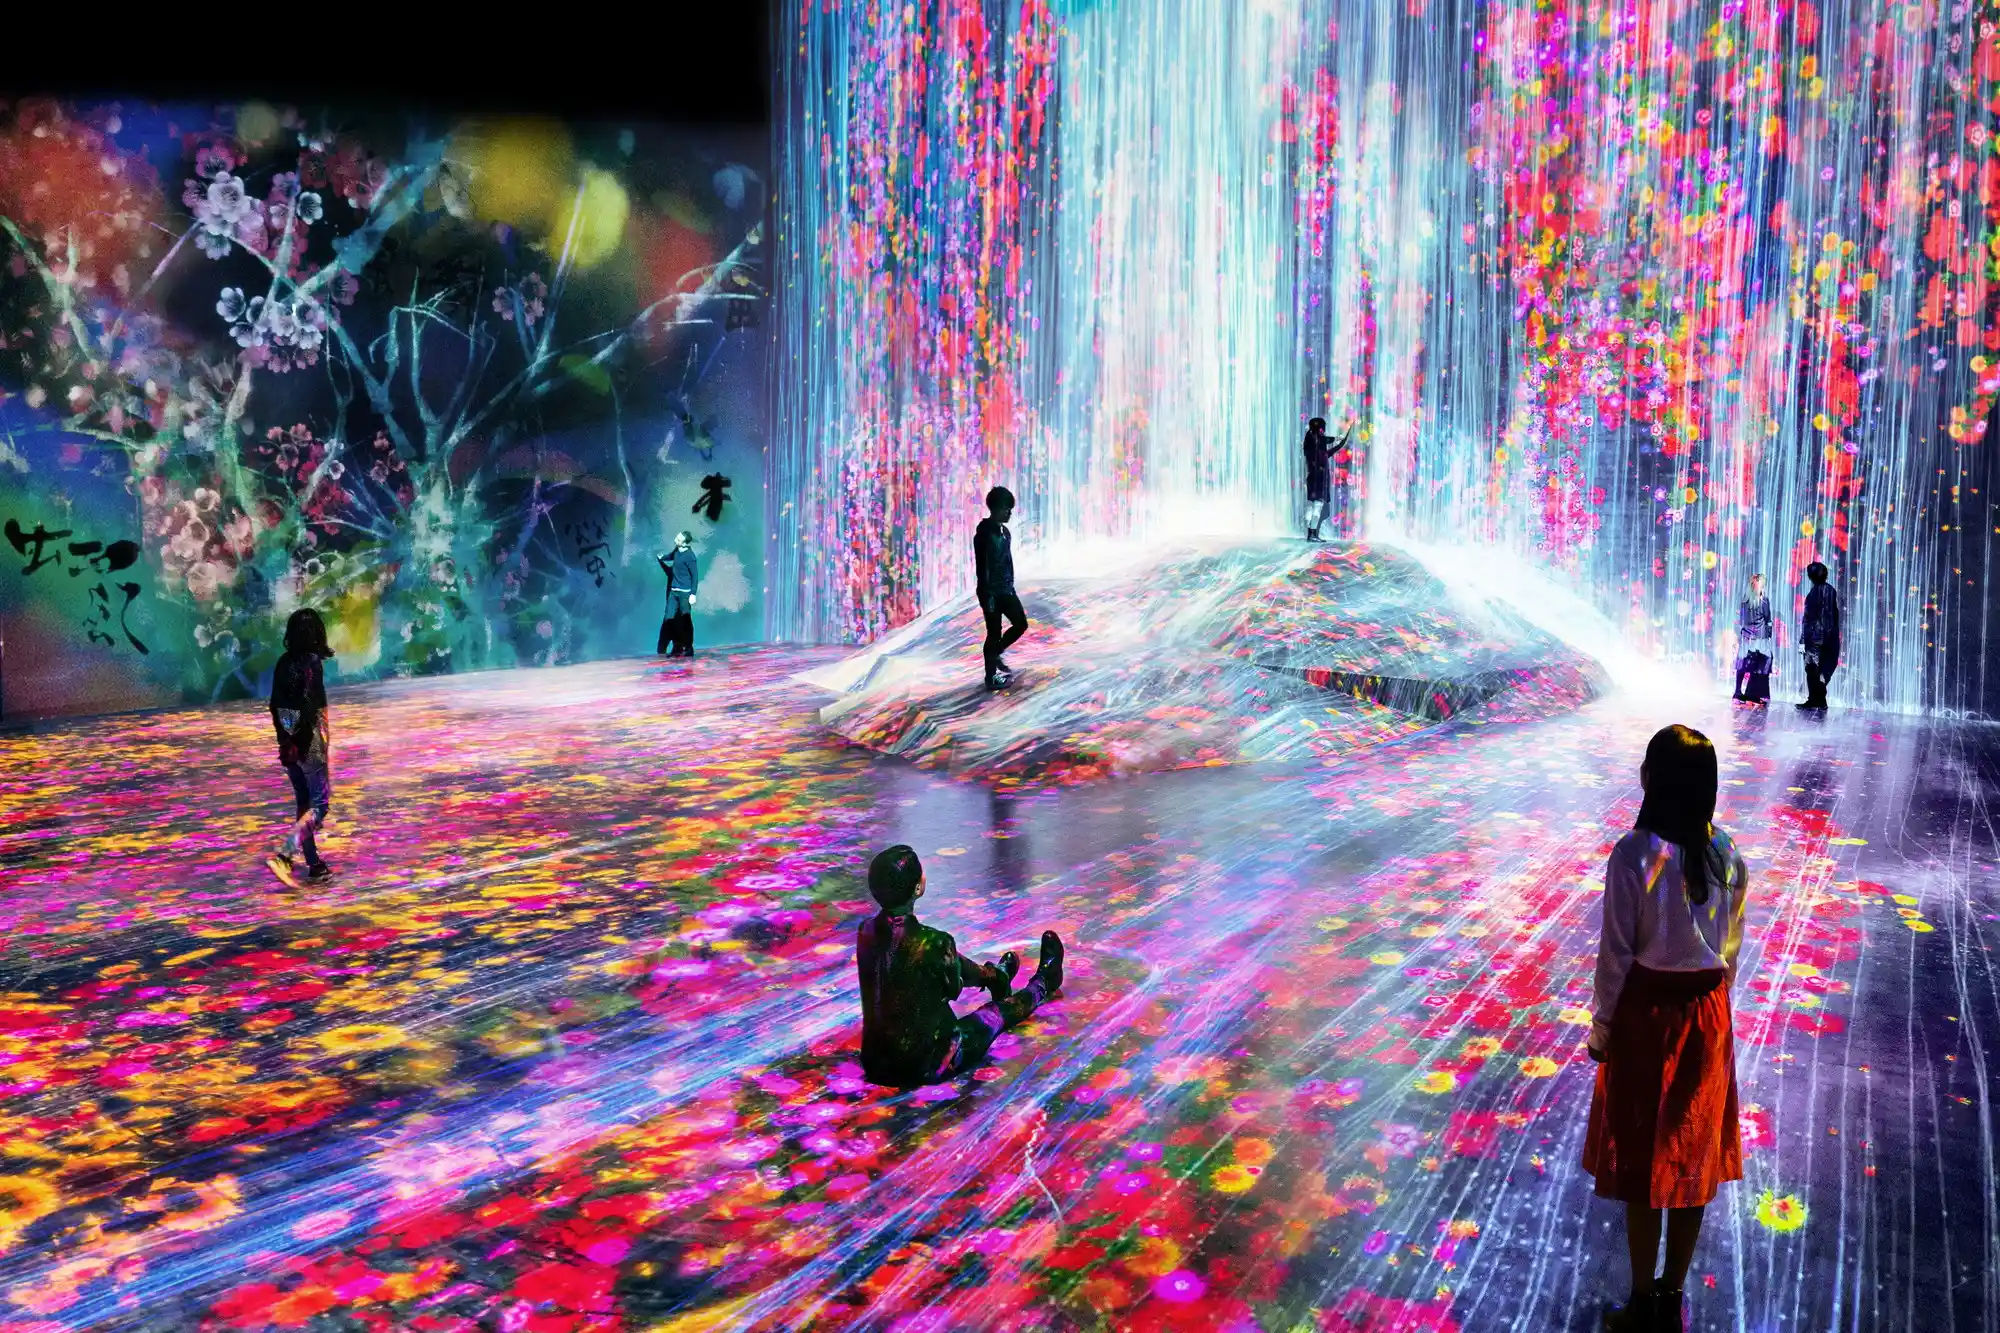
Ever wonder how to photograph light that feels alive?
At teamLab Borderless, a traveler can capture digital art that constantly shifts, wraps around bodies, and paints faces with luminous color.
The trick: embrace motion.
Use a wide aperture, bump ISO moderately, and keep shutter speeds flexible—fast for crisp beams, slow for dreamy trails.
Arrive early, then wander.
These immersive exhibitions reward curiosity—mirrors, narrow corridors, and hidden alcoves create cinematic frames.
Wear darker clothes to avoid blown highlights, and step aside from crowds to snag reflections in glossy floors.
Respect staff rules, keep flashes off, and let the rooms breathe.
- Scout mirror angles for infinity effects
- Try 1/10–1/30 sec for light streaks
- Lock focus with back-button AF
- Use hands as flags to block glare
Meguro River: Cherry Blossom Tunnel Photography
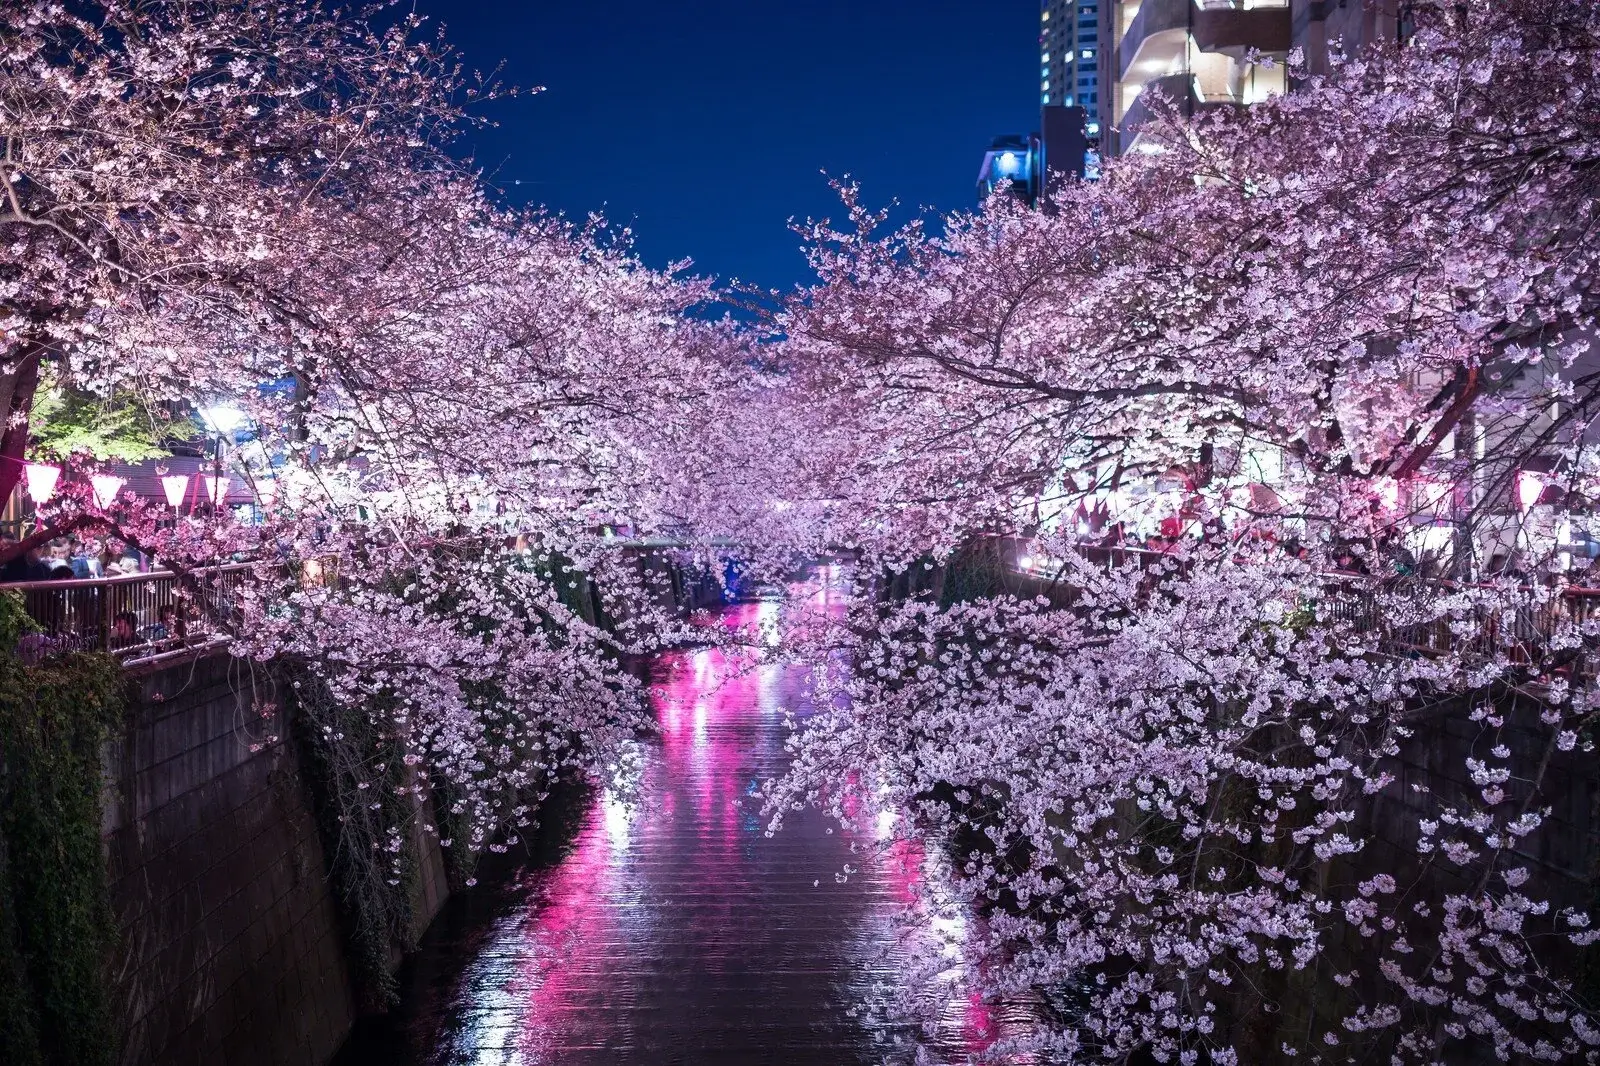
Two stops past the crowds, the Meguro River turns into a pink tunnel that locals quietly adore each late March to early April.
It’s a hush-hush favorite: lanterns glow at dusk, petals drift like confetti, and the water mirrors everything.
Freedom-seekers will love the open strolls along both banks—no tour bus choke points, just breeze, bloom, and space.
For cherry blossoms and reflections, arrive blue hour; the mix of lantern light and fading sky flatters skin tones and water shimmer.
Prime lenses rule—35mm for context, 50mm for dreamy bokeh.
Try low angles at bridge edges, then shoot down the canal for vanishing lines.
Photography tips: spot-meter faces, keep ISO modest, use burst for petal fall.
Pack a light tripod, mind foot traffic, and celebrate spontaneous moments!
Yanaka Ginza: Old Tokyo Street Photography
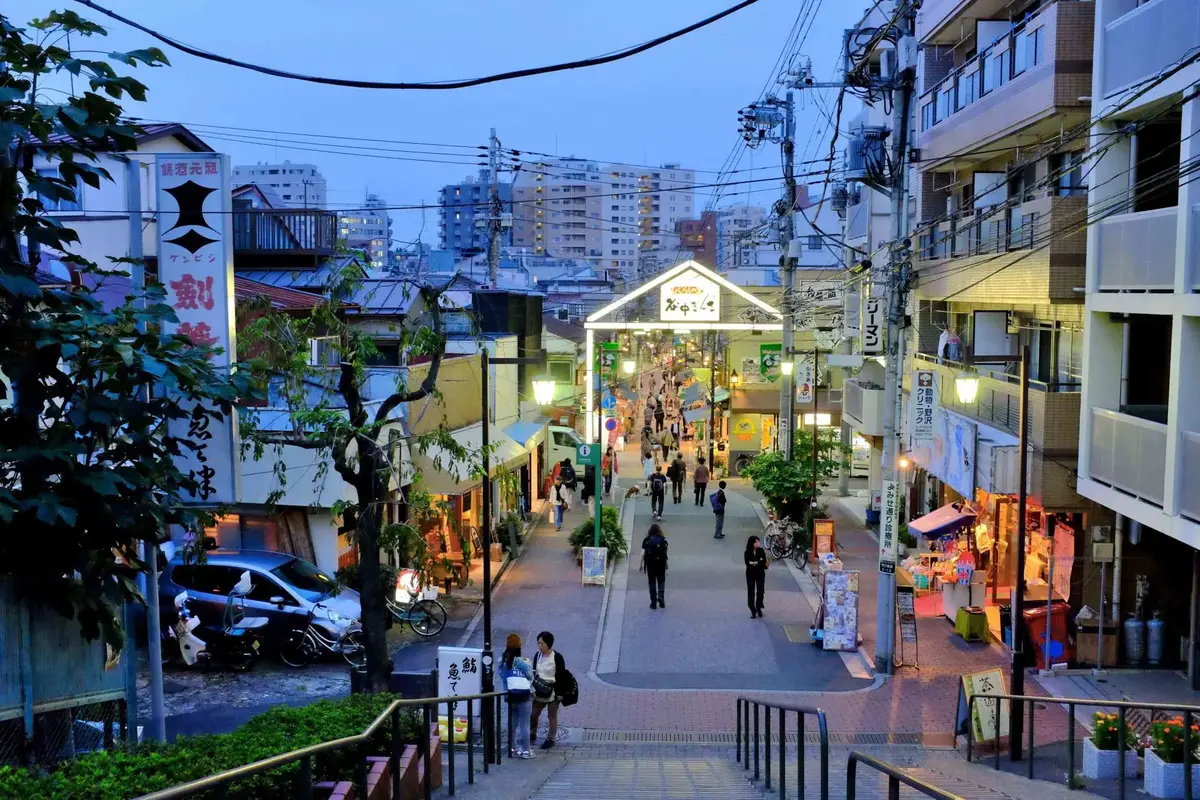
When the last cherry petals settle on Meguro’s water, the camera should wander north to Yanaka Ginza—an old-school shopping street where Showa-era storefronts, cats, and snack steam make photowalk magic.
Here, historical architecture frames sloping alleys, laundry flaps like flags of independence, and the sun melts gold across tin roofs.
He should arrive near golden hour; the famous Yuyake Dandan steps deliver silhouettes, while shop lanterns spark up like friendly constellations.
Shoot candid life at traditional markets: skewered yakitori smoke, taiyaki presses hissing, grandmas negotiating prices with samurai-level focus.
Compose tight details—weathered wood signs, retro fonts, feline mascots lounging on crates.
Travel light, move slow, and chat with vendors; smiles liberate portraits faster than any lens.
- Sunset vantage: Yuyake Dandan
- Best lanes: behind the main arcade
- Prime snacks: croquettes, taiyaki, yakitori
- Etiquette: ask before portraits, tip with purchases
Kagurazaka: Traditional Alleyways and Stone-Paved Streets
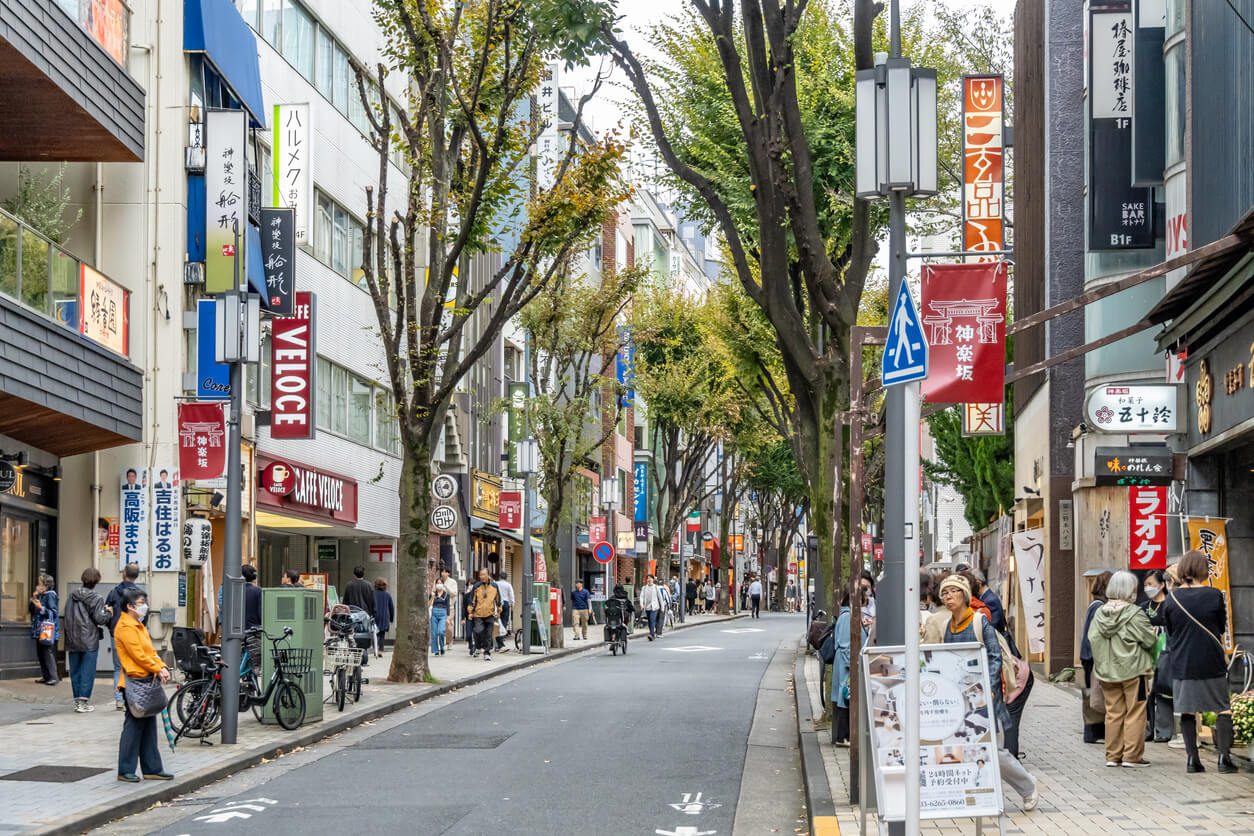
How does a hilltop maze in central Tokyo still feel like a secret?
Kagurazaka pulls it off with whisper-quiet traditional alleyways, lantern glow, and mischievous turns that invite detours.
Photographers get moody shadows at dusk, bright textures at noon, and occasional geisha passing like living postcards—yes, really.
Start at Zenkoku-ji, then wander the stone streets toward Hyogo Alley; look for wooden lattices, tiny shrines, and cat-tail flicks in doorways.
Grab portraits by noren curtains, or shoot leading lines down sloped lanes—great for reels with depth.
For night shots, capture reflections after a light rain; the pavements gleam like ink.
Tip: visit weekdays, late afternoon to blue hour, and keep footsteps quiet.
Respect residents, skip tripods in tight spots, and savor a taiyaki reward.
Seasonal Photography Planning for Tokyo
Tokyo changes outfits with the seasons, so plan your shoots like a savvy local!
In spring, time cherry blossoms at Chidorigafuchi and Shinjuku Gyoen after peak forecast updates.
Summer brings lively matsuri and fireworks at Sumida River—arrive early, pack a tripod, and use slower shutter speeds for silky light trails.
Come autumn, chase fiery maples in Rikugien and Meiji Jingu Gaien’s ginkgo avenue, then switch to winter magic with Marunouchi and Roppongi Hills illuminations and rare snow scenes at Asakusa or Ueno—gloves on, batteries warm, and you’re golden.
Spring Cherry Blossom Spots and Timing
Spring in Tokyo means cherry blossoms—and smart planning makes your photos shine!
At Ueno Park, arrive at sunrise on peak weekends, stick to the Shinobazu Pond edges for cleaner frames, and use a longer lens to crop out picnic crowds that pop up faster than convenience stores.
For moodier magic, head to Chidorigafuchi after sunset, shoot the illuminated moat from the rental boat pier side, and bring a tripod plus a ND filter to smooth water reflections and tame bright lantern glare.
Ueno Park: Managing Crowds During Peak Season
Ever wondered why Ueno Park feels like the heartbeat of hanami season?
He shares crowd management hacks and punchy peak season tips: arrive at nautical dawn, hug the Shinobazu Pond edges, and stride past the main promenade to quieter cherry canopies.
Travel light, shoot fast, breathe slower.
Freedom thrives in nimble moves!
- Sunrise sprints, sunset strolls
- Side paths over central lanes
- Benchless zones, quicker turnover
- One prime lens, zero fuss
Chidorigafuchi: Night Sakura Photography
If Ueno was the daytime hustle, Chidorigafuchi is the moonlit hush where petals glow like lanterns on water.
Seek night sakura along the moat path; arrive by blue hour, then linger as moonlit cherry blossoms shimmer.
Pack a fast lens, tripod, and warm layers—breezes bite. Shoot from Kudanshita exit, frame boats and reflections, and bracket exposures.
Respect queues, avoid flash, and savor that silky, silver calm.
Summer Festival and Fireworks Photography
Summer in Tokyo explodes with color, and the Sumida River Fireworks are the crown jewel—think wide apertures around f/8–f/11, ISO 100, a sturdy tripod, and bulb mode with 2–5 second exposures from early-staked spots near Asakusa or along the River Walk.
For positioning, arrive two hours early, scout wind direction to avoid smoke, and frame with a foreground—bridges, lanterns, or silhouettes—for scale and drama.
Meanwhile, Bon Odori festivals invite respectful, close-range storytelling: use a fast prime (35mm or 50mm), shoot at ISO 800–1600, keep shutter around 1/125 to freeze dancers, and smile your way into candid moments—yes, the taiko beats make feet tap faster than your shutter.
Sumida River Fireworks: Camera Settings and Positioning
Though the Sumida River hums all year, it truly crackles to life on fireworks night, and smart positioning makes or breaks the shot.
A nimble fireworks camera loves manual mode: ISO 100, f/8–f/11, 2–6s with a remote.
Stake a viewing position upstream for skyline silhouettes, or bridges for leading lines.
- Scout rooftops, parks, and quays at golden hour
- Bring a sturdy tripod and ND filter
- Use bulb mode for layered bursts
- Arrive early, then pivot with the wind
Bon Odori Festivals: Cultural Event Photography
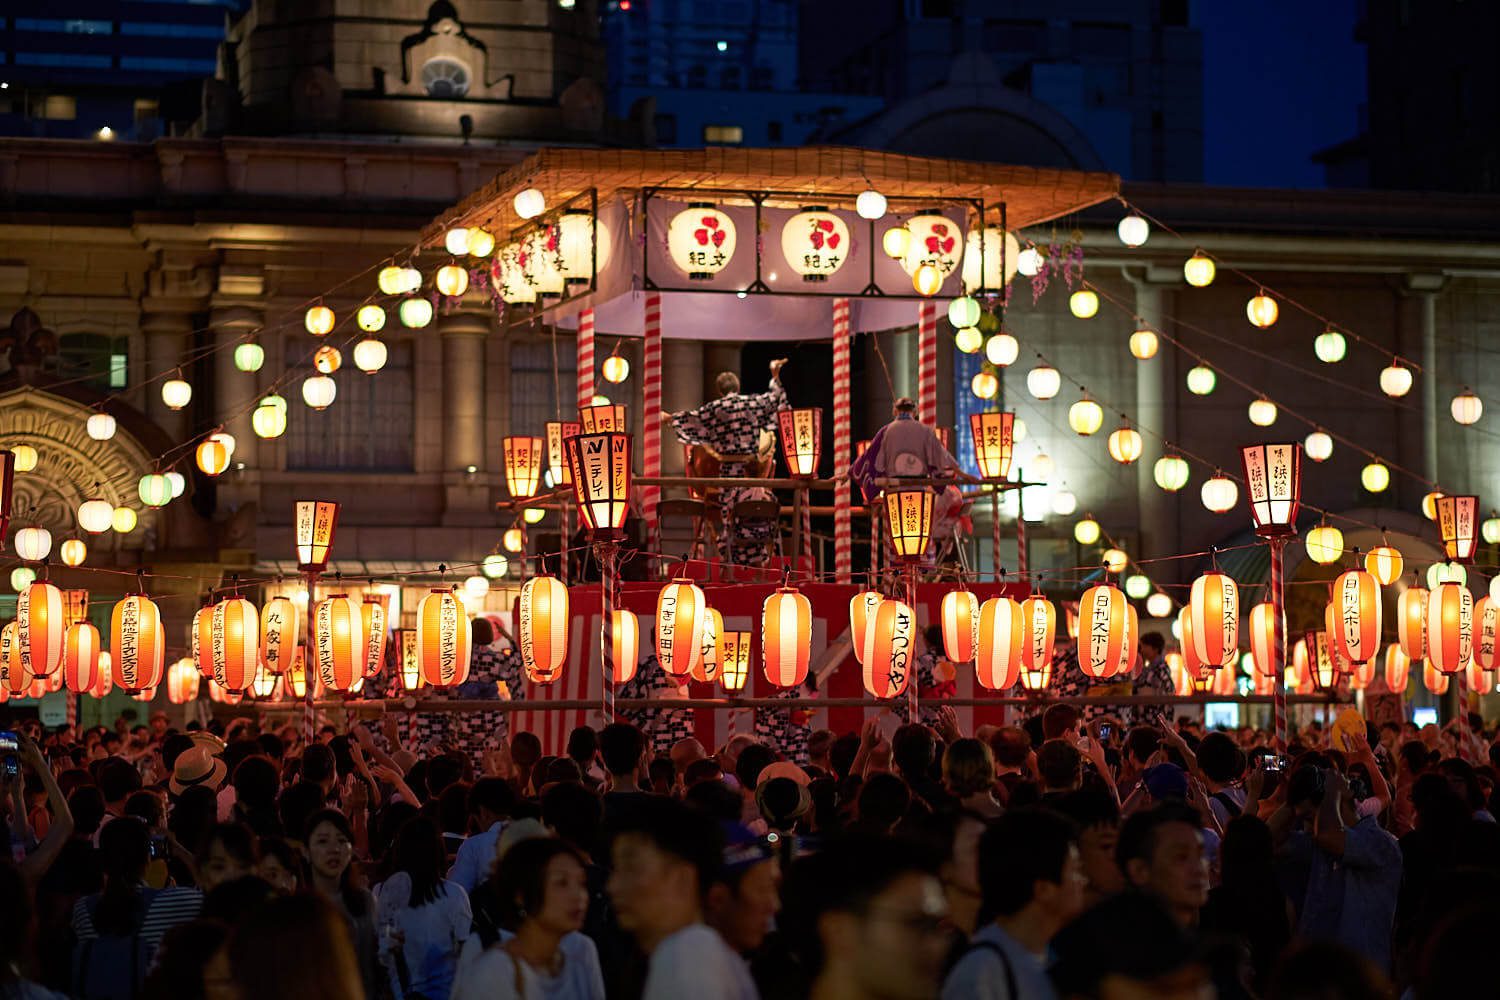
Fireworks may steal the skyline, but Bon Odori pulls photographers into the heart of the crowd—lantern-lit circles, hypnotic taiko, and yukata swishing under balmy night air.
Seek neighborhood plazas like Tsukuda or Hibiya Park.
Move with the Traditional dance, not against it.
Capture festival costumes in sweeping mid-turns; use 1/125s, f/2.8–4, ISO 1600.
Go wide, then zoom details—fans, geta, gleaming drumsticks.
Respect space.
Smile.
Autumn Foliage Photography Locations
Ready for Tokyo’s leaf-peeping season?
Head to Rikugien Garden for crimson maples reflected in still ponds—arrive mid-afternoon for soft side light, then stay for the occasional night illumination to frame bridges and teahouses with mirror-like symmetry.
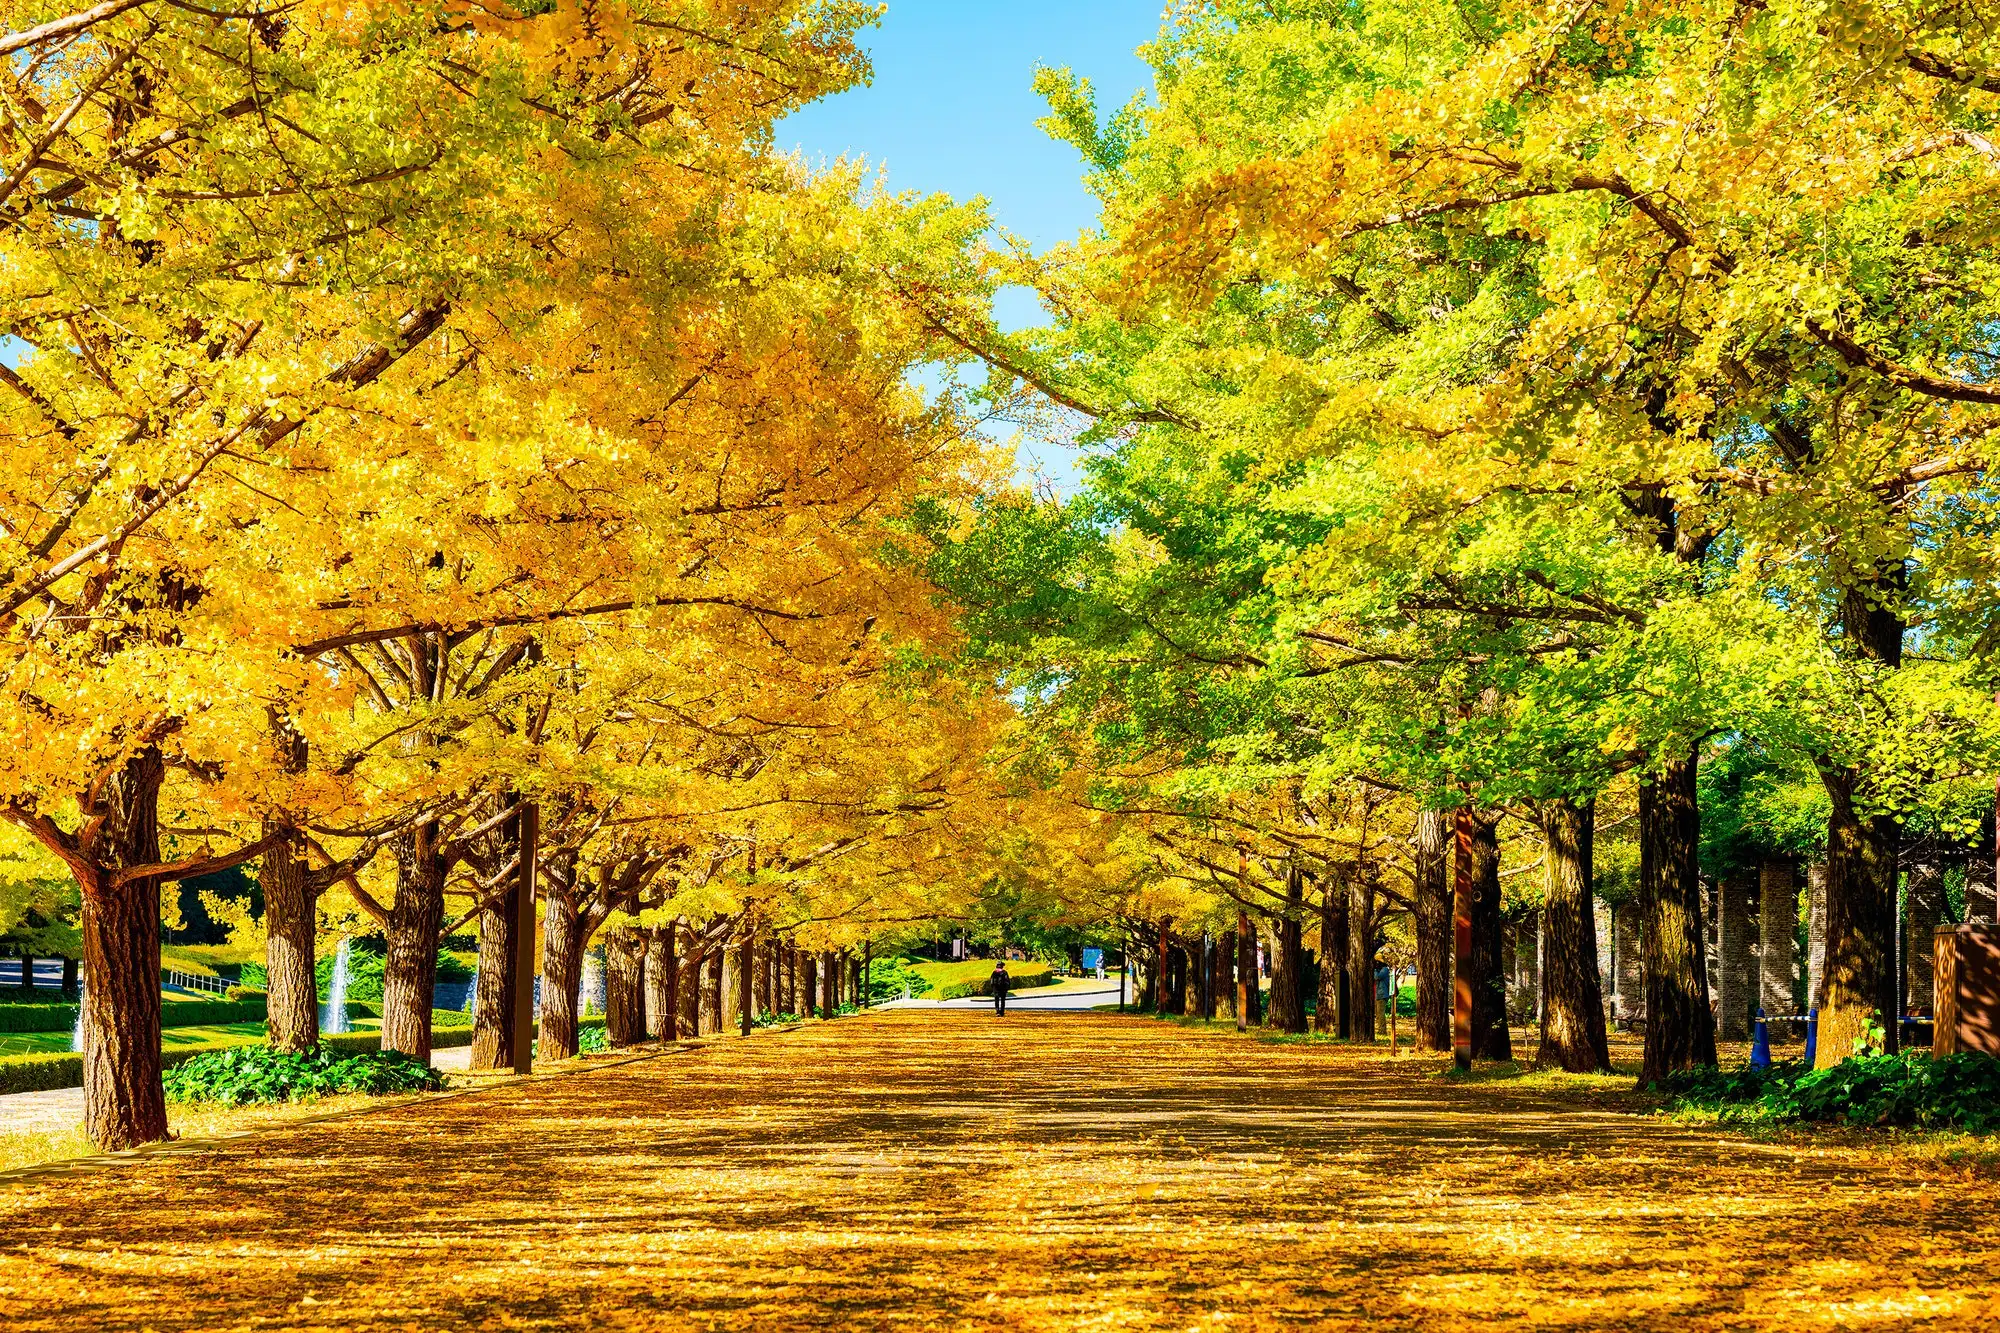
For a gold rush, stroll Jingu Gaien’s Ginkgo Avenue at peak color (usually late November).
Shoot low-angle along the tunnel of leaves for leading lines, and bring a polarizer to tame glare on those shiny, sunlit fans—leaf confetti underfoot is a bonus!
Rikugien Garden: Fall Colors and Composition
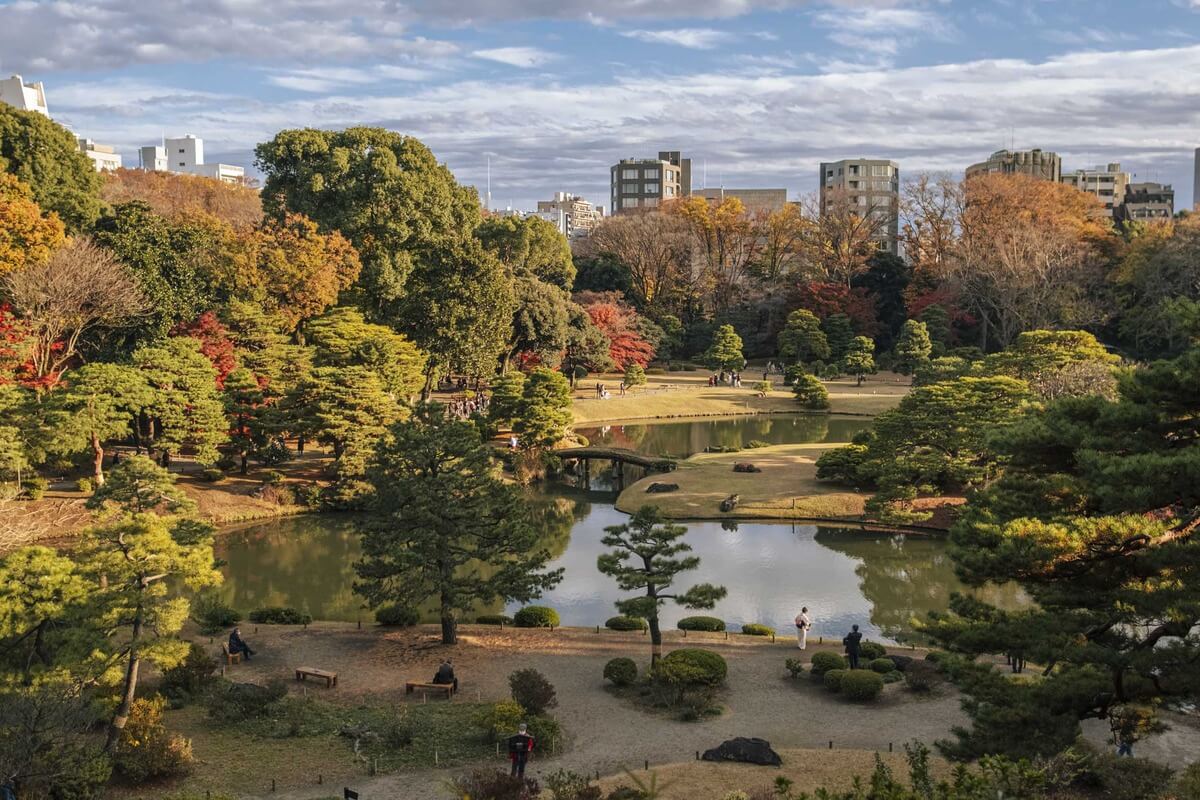
When, exactly, does Rikugien flip the switch from serene greenery to a blaze of scarlet and gold?
Late November, usually.
A local would time sunsets, chase Autumn reflections on the central pond, and use foliage framing around stone bridges for depth.
Pack a fast prime, arrive before illumination, and wander—freely—between lantern-lit paths and tea-house vistas.
- Best light: 3:30–4:30 p.m.
- Tripod rules: restricted
- Top spot: Tsutsuji-no-chaya
- Bonus: night illuminations
Jingu Gaien Ginkgo Avenue: Golden Yellow Photography
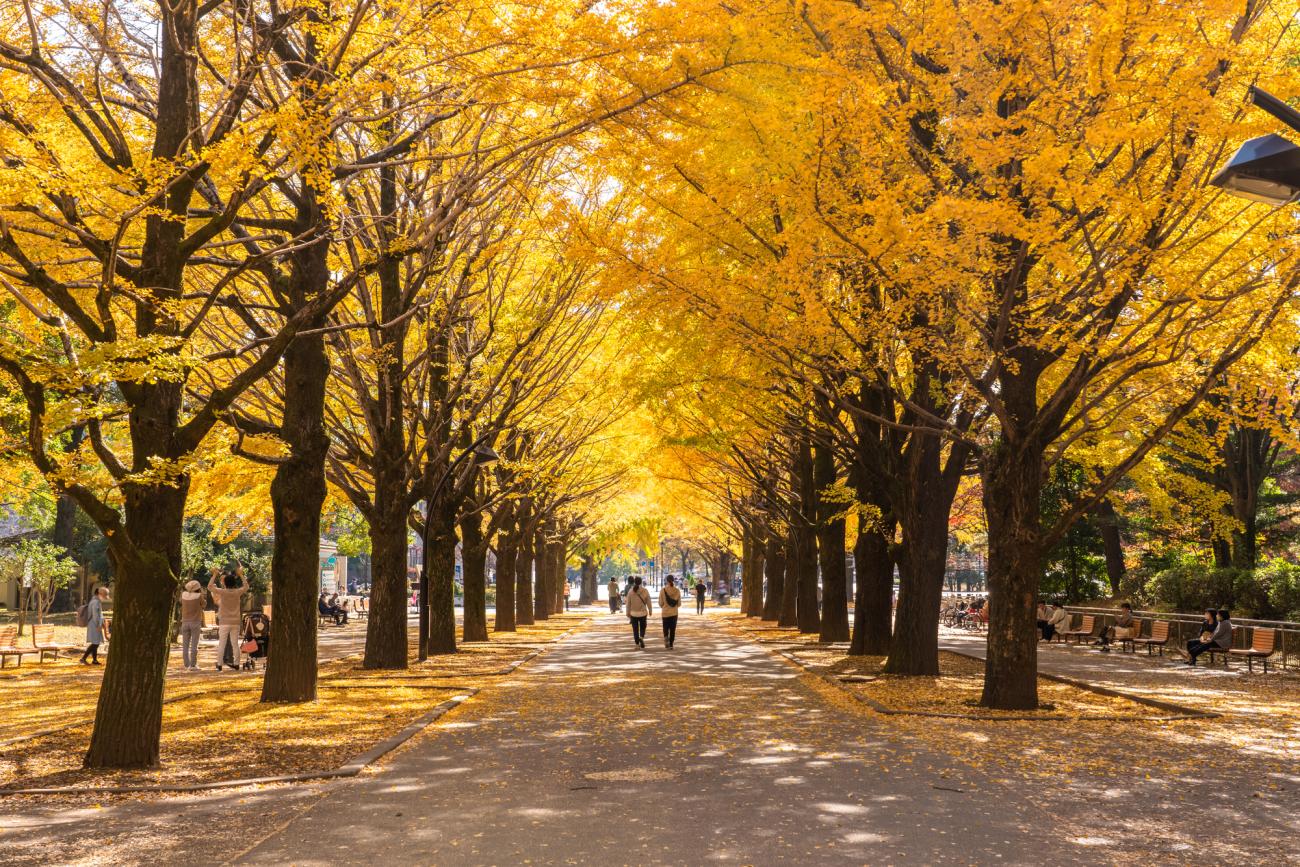
How about a corridor of sunshine you can walk through?
At Jingu Gaien Ginkgo Avenue, rows of gold-leafed trees blaze with Autumn foliage, casting honeyed light perfect for portraits and dreamy strolls.
Visitors time shoots for late afternoon, catching urban reflections in café windows and polished bikes.
Angles matter: shoot low for canopy tunnels, or frame Aoyama’s sleek lines. Weekdays beat crowds—Sundays become pedestrian paradise.
Winter Illumination and Snow Photography
Winter nights sparkle in Tokyo, and Roppongi Hills is the stage—perfect for light trail techniques as taxis streak past blue-lit zelkova trees, so bring a tripod, set a low ISO, and try 1–4 second exposures.
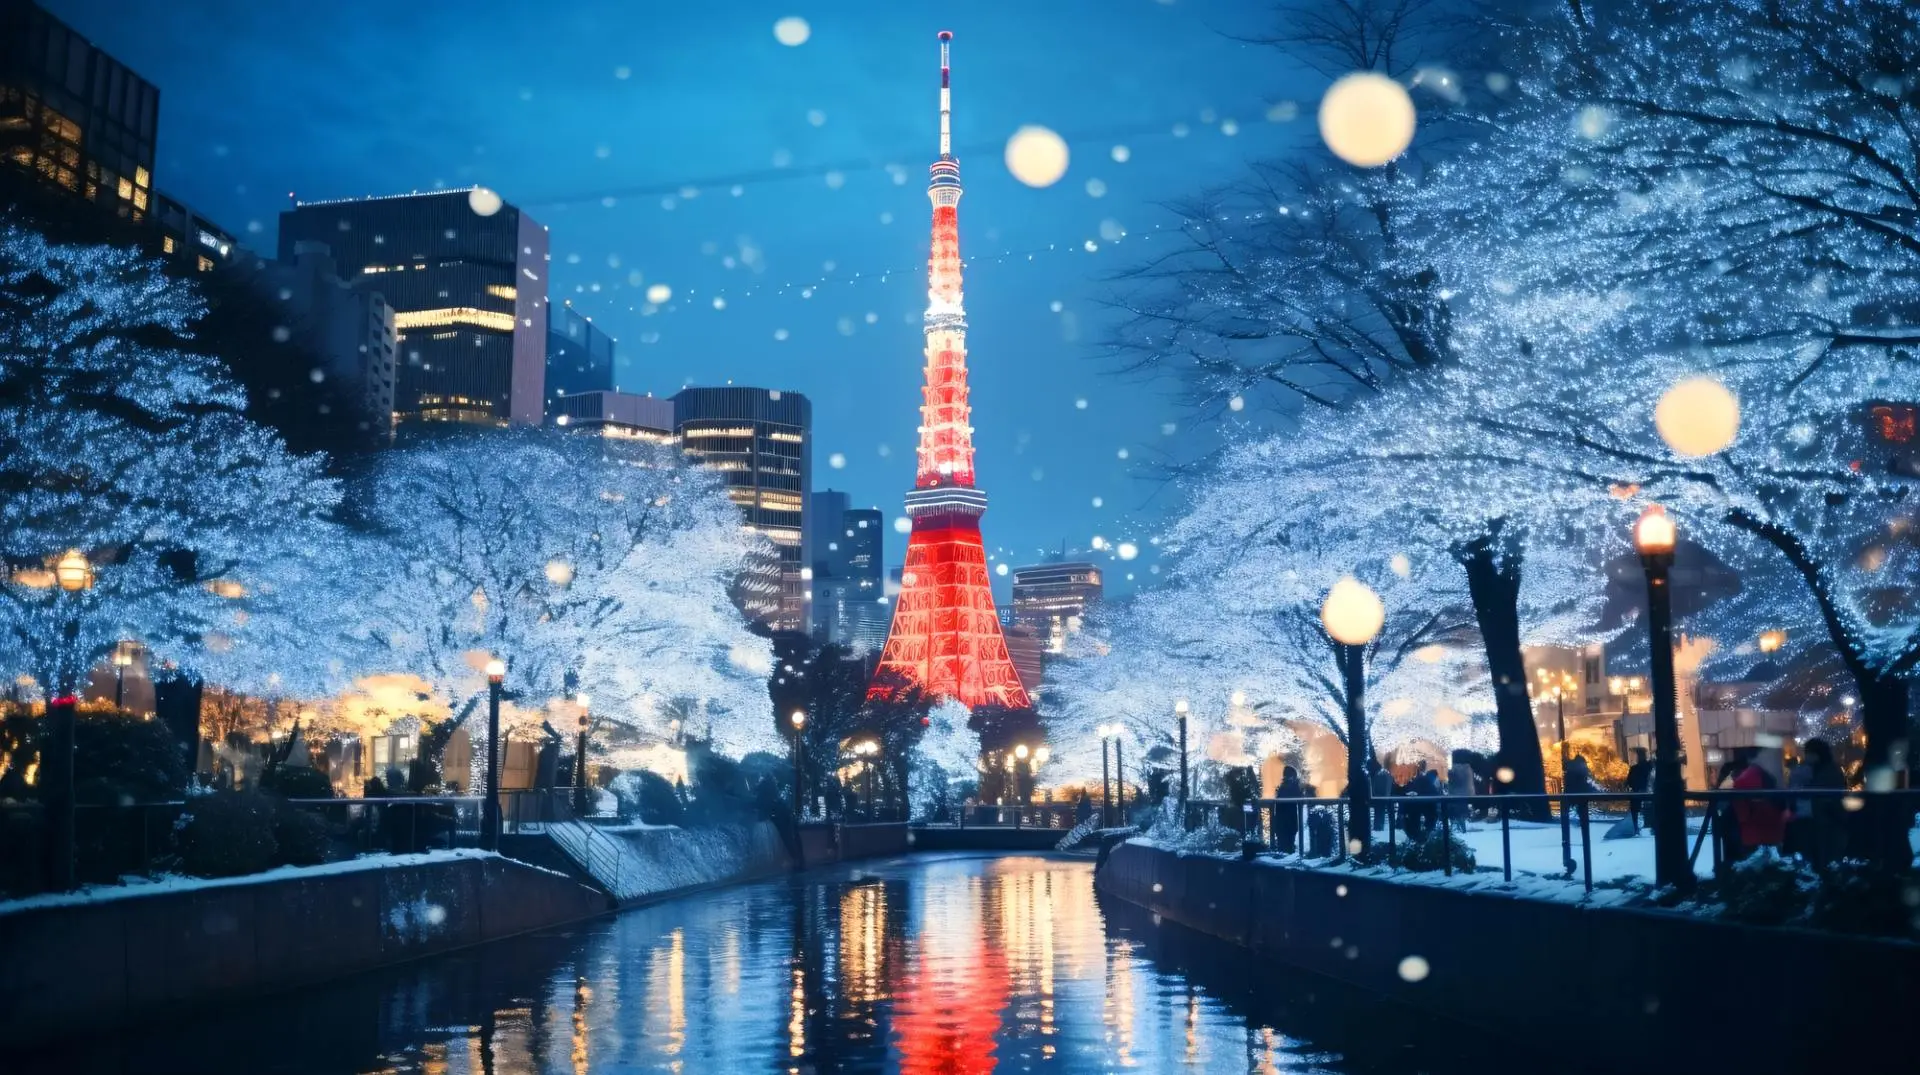
When a rare snowfall blankets the city, the Imperial Palace transforms into a serene monochrome—arrive at dawn, protect your gear with a simple rain cover, and meter for the snow to avoid blown highlights.
Stay flexible, check forecasts obsessively, and be ready to swap lenses fast—because when flakes fall here, the magic is brief but unforgettable!
Roppongi Hills Illuminations: Light Trail Techniques
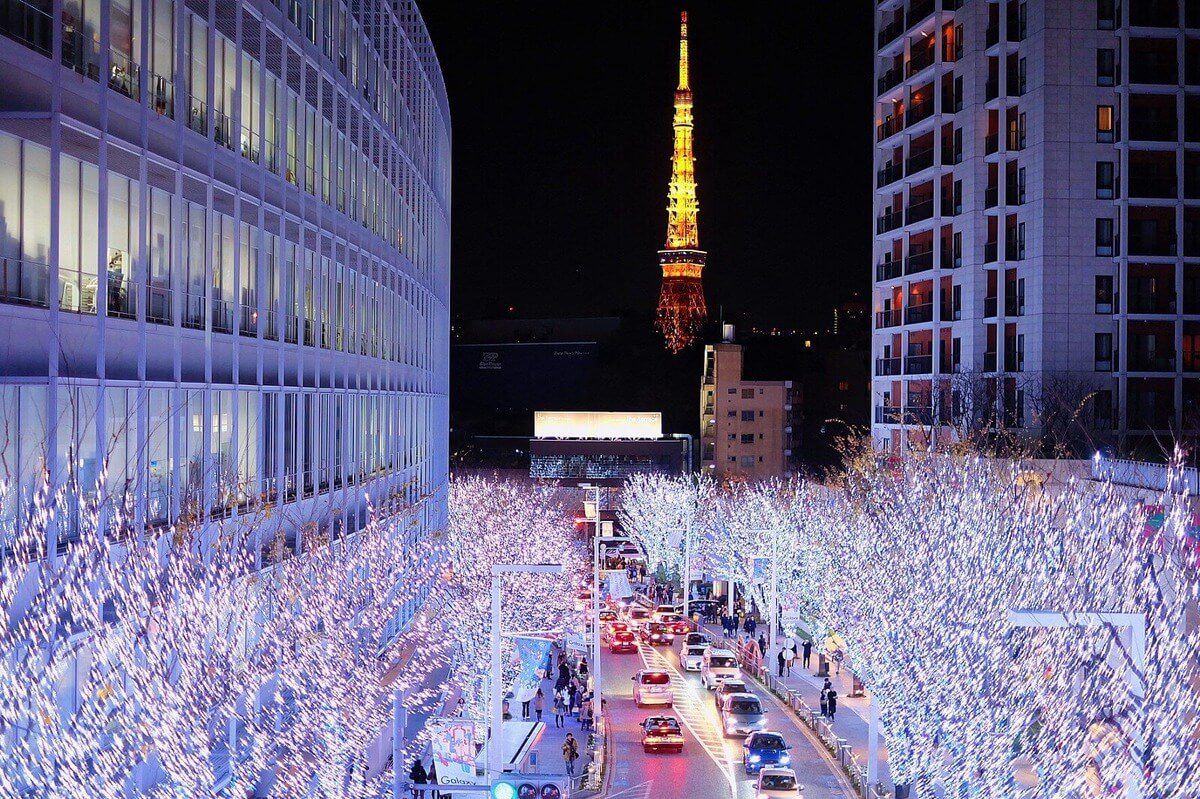
Ever wondered where Tokyo’s shimmering holiday lights meet perfect car light trails?
Roppongi Hills delivers, pairing glowing zelkova trees with sleek traffic ribbons.
Using light trail techniques in urban night photography, they recommend standing near Keyakizaka Street, framing Tokyo Tower, and timing shots for rush-hour flow.
Go manual, lock ISO low, and let shutters dance.
- Best vantage: Keyakizaka slope facing Tokyo Tower
- Shutter: 2–6s; adjust for traffic speed
- Use tripod, 2s timer, or remote
- Polarizing filter off; lens hood on
Snow at Imperial Palace: Rare Weather Photography
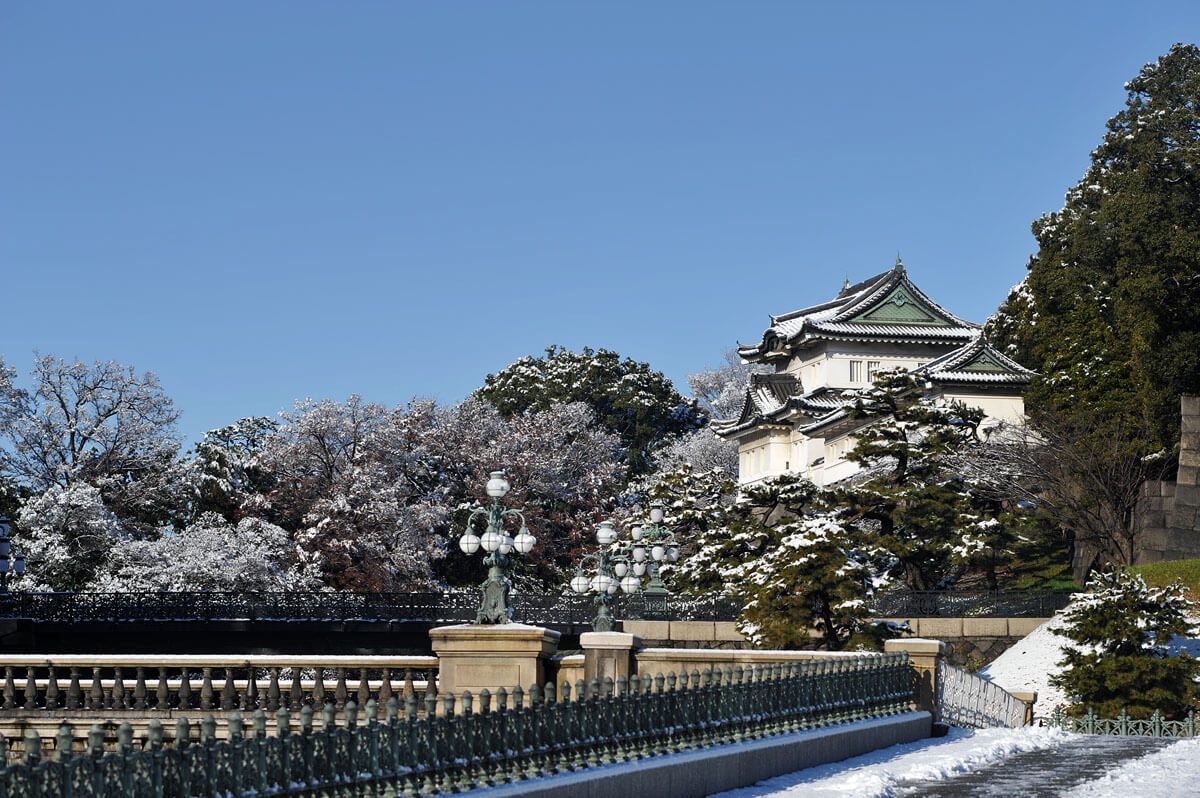
A rare snowfall transforms the Imperial Palace into a hushed, cinematic stage—moats rimmed in white, black pines frosted like confection, and stone bridges wearing delicate lace.
For snow photography, arrive at dawn, when traffic hushes and flakes linger on parapets.
Pack a fast lens, polarizer, and microfiber cloth.
Shoot across Nijubashi, then circle the moat.
Watch your footing—slush happens!
Warm up with vending-machine cocoa.
Instagram-Worthy Tokyo Food Photography
Tokyo’s food scene begs for the grid, from steaming ramen and sizzling yakitori shot overhead at yokocho alleys to convenience store hauls styled by neon-lit vending machines—yes, even onigiri can look glam!
For café jewels and parfait towers, a window seat with soft natural light, a neutral backdrop, and a quick phone reflector (menu works!) keeps colors crisp and appetizing.
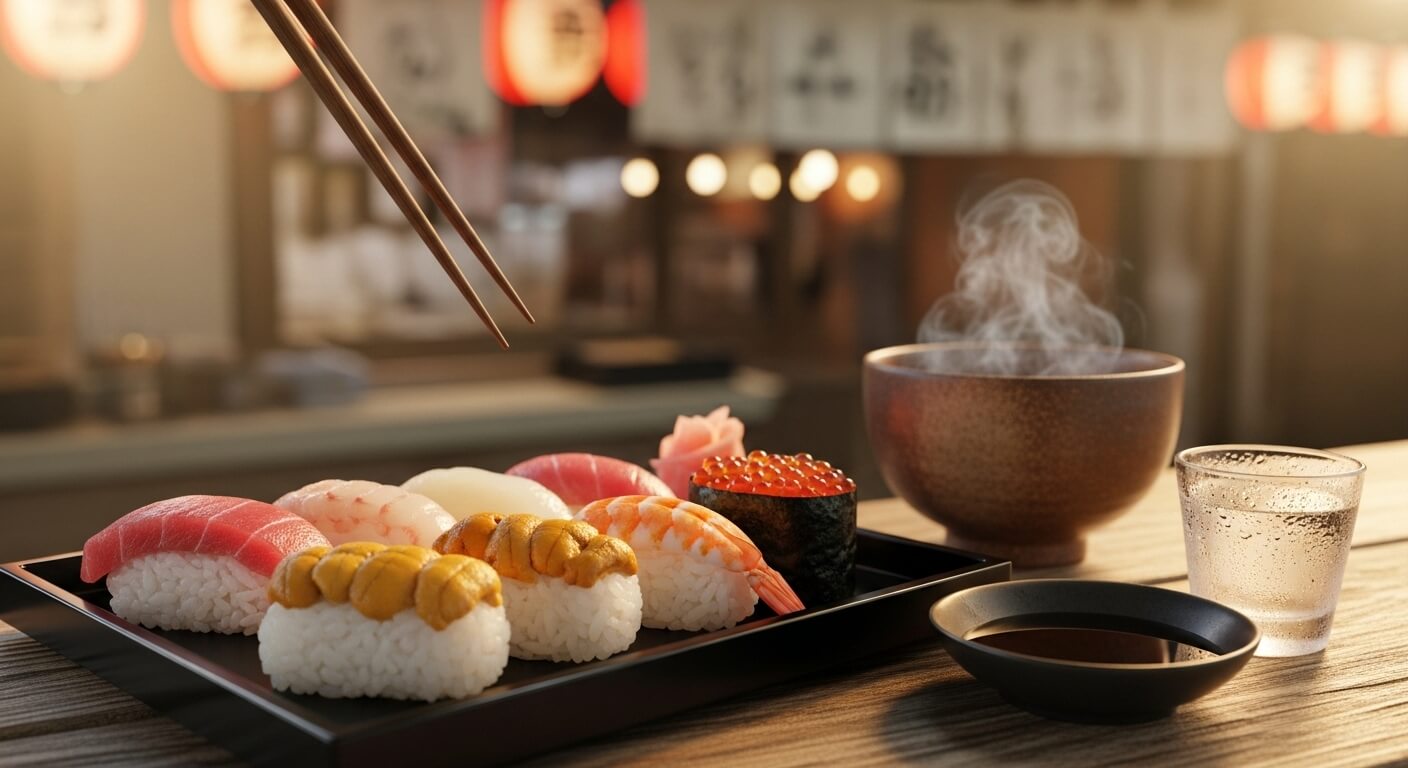
In sushi counters and fine-dining rooms, they keep it classy: ask before shooting, mute the shutter, avoid flash, and capture quiet details—chef’s hands, lacquered plates, and that perfect nigiri shine.
Ramen and Street Food: Overhead Shot Techniques
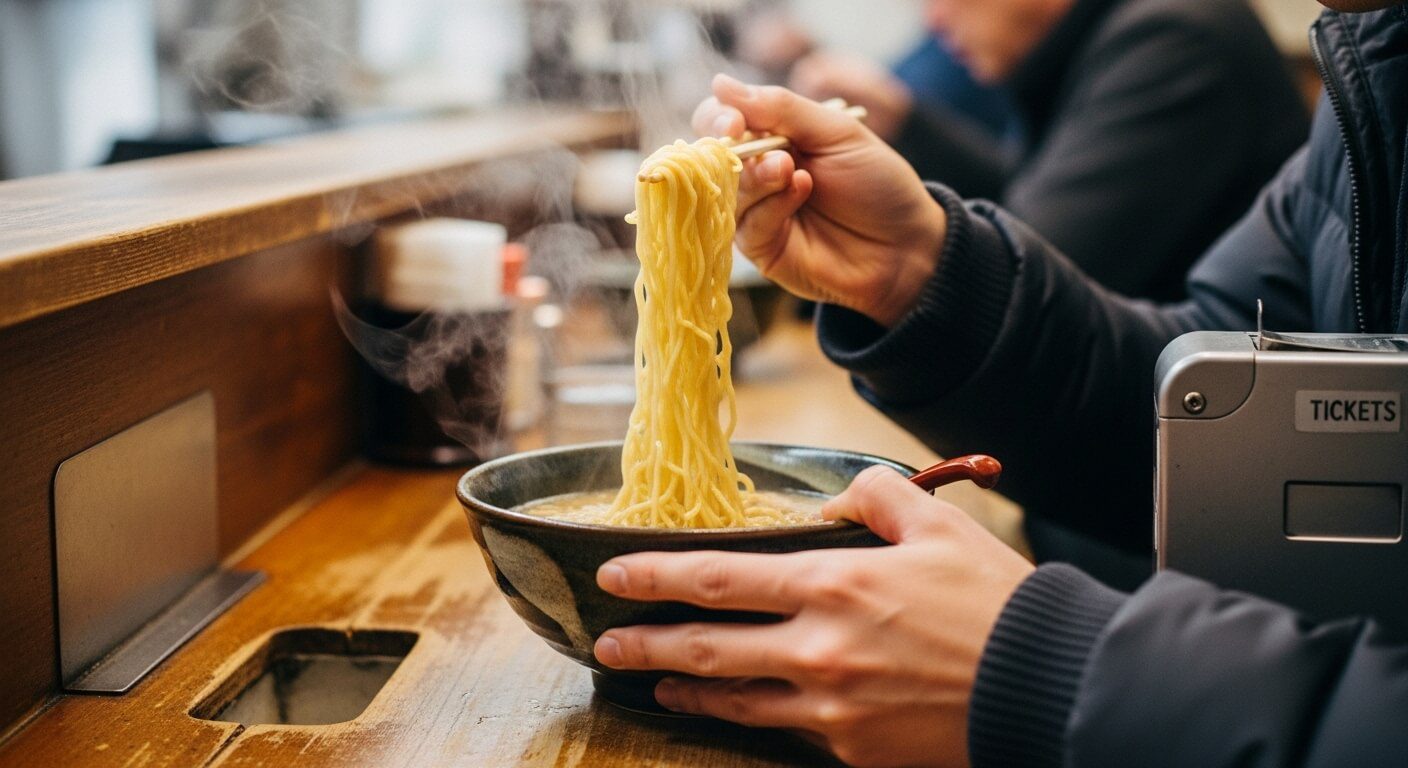
Two chopsticks, one camera, and a bowl that steals the show—overhead ramen and street-food shots shine in Tokyo when framed with purpose.
A local’s trick: stand square over the bowl, elbows tucked, phone flat, then nudge the frame to include chopsticks like arrows pointing at swirls of noodles.
Overhead shot techniques thrive at steam-filled counters in Shinjuku Omoide Yokocho or under neon in Ameya-Yokocho, where textures pop and colors thrill.
For punchy Ramen photography, keep backgrounds simple—wooden counters, paper menus, or tiled tables—so toppings command attention.
Wait for steam; it adds life.
If glare hits the broth, shift a step, not a filter.
Travel light, move fast, and chase that decisive slurp.
- Angle, lock focus, then shoot in bursts
- Use napkins as quick glare diffusers
- Add human elements—hands, chopsticks, tickets
- Capture side dishes for layered stories
Fancy Desserts and Cafes: Natural Light Setup
From slurps to sugar, the scene shifts to Tokyo’s patisserie playground—think glazed tarts at Glacé in Daikanyama, souffle pancakes at A Happy Pancake, and jewel-like parfaits at Ginza’s Café de l’Ambre annex.
For fancy desserts, natural lighting is the secret weapon: grab a window table, kill harsh overheads, and let side light carve silky highlights and gentle shadows.
Ask for an unplugged candle, tilt the plate toward the glass, and keep napkins handy to bounce light subtly.
Time your visit for late morning or golden hour; both flatter creams and fruit like a dream.
Shoot at table height, then a 45-degree angle to show layers—no jailhouse bars of chair backs creeping in.
Clean compositions, warm tones, decisive snaps—freedom for your sweet-tooth story!
Sushi and Fine Dining: Respectful Restaurant Photography
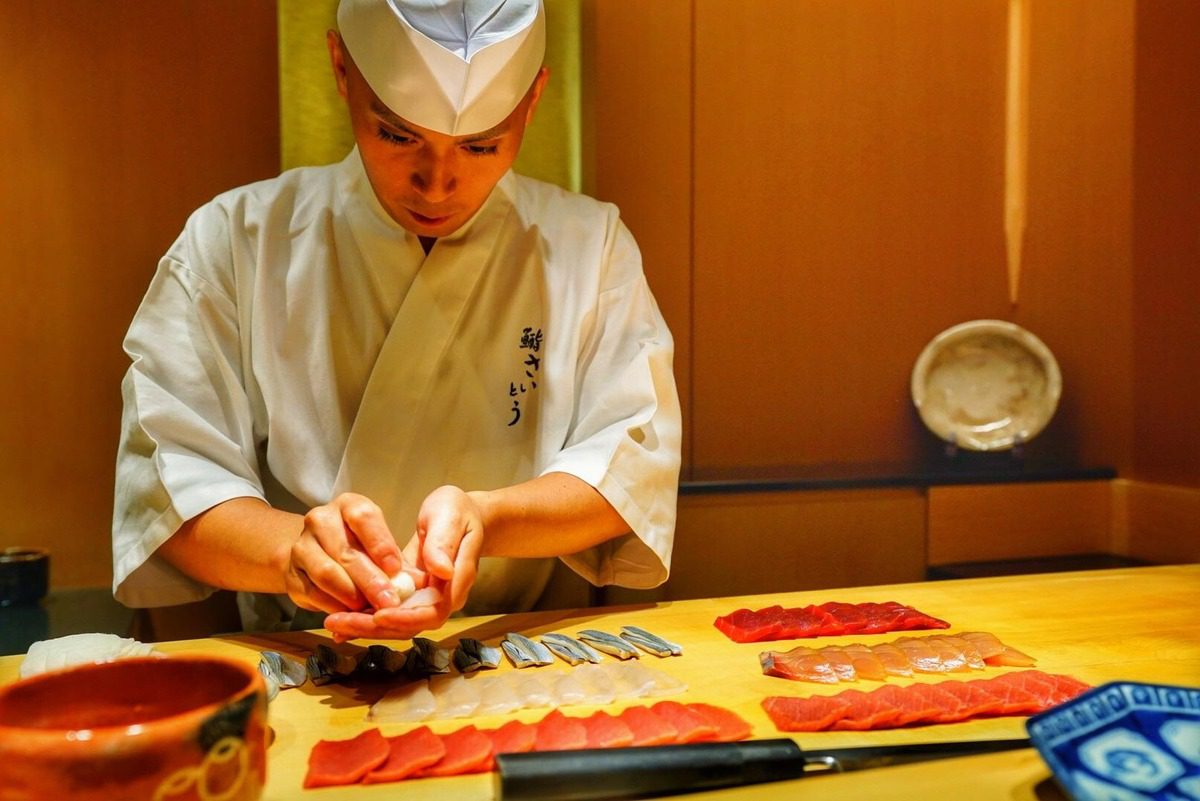
How does one capture omakase magic without ruffling a single feather?
Start with quiet confidence.
A respectful nod to restaurant etiquette—ask before shooting, keep the shutter silent, and ditch flash—earns goodwill.
Sit at the counter if invited, framing the chef’s hands, the lacquered board, and the glistening fish; it’s intimate, not invasive.
Lean into minimalism.
Compose tight shots that celebrate food presentation: the sheen of toro, the snap of nori, the jewel-like gloss on ikura.
Time photos between courses, then phone down, savor the rhythm.
Order the seasonal set; it tells a color story you can’t fake.
- Confirm photo policies politely
- Use silent mode and natural light
- Focus on textures, angles, and negative space
- Thank the chef; share discreetly later
Vending Machines and Convenience Store Aesthetics
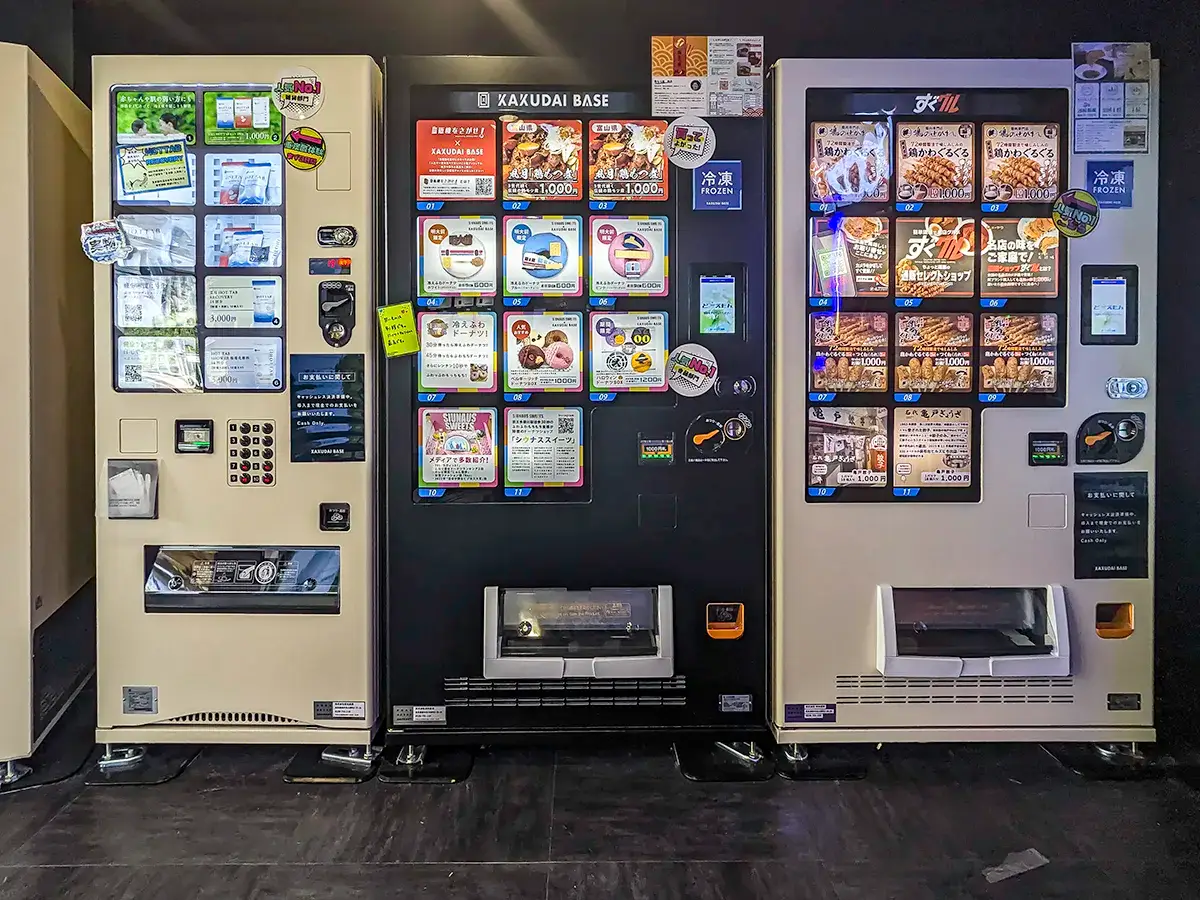
Why do neon-lit vending machines and konbini aisles feel like tiny movie sets waiting for a close‑up?
Because Tokyo stages them everywhere—Shinjuku backstreets, Harajuku alleys, quiet Meguro corners—each glowing frame a ready-made backdrop.
Think saturated labels, chrome panels, and soft hums; it’s cyberpunk, but snackable.
For punchy shots, hunt clusters of vending machines near Omoide Yokocho and Kabukicho; aim low, tilt up, and let kanji signage fill the negative space.
In convenience store aesthetics, choose FamilyMart’s cool greens or Lawson’s blues for color harmony; 7-Eleven warms reds and oranges—great for onigiri or pudding portraits.
Go late, after rain: puddles mirror neon like liquid glass.
Buy something—manners matter—and shoot quickly, avoiding customers and staff.
Freedom with respect wins.
Technical Photography Tips for Tokyo
Ready to sharpen the craft before hitting Tokyo’s streets?
Expect quick, candid moments that favor fast shutter speeds and zone focus.
Smart smartphone tweaks like HDR control and night mode optimization can make a big difference.
Strict but workable drone rules—know the no-fly zones and altitude limits before liftoff!
Along the way, lean on bold composition for urban landscapes: leading lines from neon-lit alleys, reflections in rain-slick crosswalks, and layered frames from overpasses that make the city hum.
Best Camera Settings for Street Photography
For Shibuya’s rushing crosswalks, a fast shutter—around 1/500 to 1/1000—freezes motion crisply, while slowing to 1/20 can paint lively light trails if a railing or mini tripod steadies the shot.
After dark in Shinjuku’s neon canyons, bump ISO to 1600–3200 (higher if needed), then tame grain with slight noise reduction—better a sharp, grainy keeper than a blurry heartbreaker!
For depth control, shoot f/2–f/2.8 to isolate a subject against glowing signage, or stop down to f/5.6–f/8 for scene-wide clarity when layering crowds, taxis, and those irresistible vending machines.
Shutter Speed for Busy Intersections
A fast, bustling Shibuya Crossing begs for smart shutter choices, and the sweet spot depends on the story the photographer wants to tell.
To freeze urban motion, try 1/500s; for dreamy traffic blur, dip to 1/8–1/2s with steady bracing.
Pan at 1/30s for kinetic streaks.
Compose from elevated viewpoints for layered energy.
- Freeze crisp footsteps
- Paint silky scooter lines
- Pan neon-lit commuters
- Mix static anchors with motion
ISO Settings for Night Photography
Those motion tricks at Shibuya are just the start—night in Tokyo glows, and ISO is the lever that keeps that glow clean or gritty.
For crisp night exposure near Akihabara’s neon, start around ISO 800–1600.
Raise ISO sensitivity to 3200 in dim alleys of Golden Gai.
Watch for noise—embrace grain for mood, or tame it with in-camera reduction.
Test, review, adjust, wander.
Aperture Choices for Depth of Field
While the city hustles around them, aperture becomes the street shooter’s secret dial for storytelling in Tokyo.
They use aperture selection to sculpt depth of field: f/1.8 isolates a neon-lit face in Shibuya; f/5.6 keeps a couple and kanji signs crisp; f/8–11 locks in alley textures.
Choose freedom, choose intent—twist the ring, command the scene!
- Isolate subjects, blur chaos
- Keep duos sharp, background readable
- Maximize detail in alleys
- Balance light, speed, and style
Smartphone Photography Optimization
Smartphone shooters can make Tokyo shimmer: use Portrait Mode at shrine gates or neon-lit alleys to sculpt depth, then tap to lock focus on your subject so bokeh doesn’t get weird.
For blinding contrasts at Shibuya Crossing or sunset over Odaiba, switch on HDR or Smart HDR, steady the phone, and let it blend highlights and shadows like a pro.
After the shot, polish fast with apps locals love—LINE Camera for playful stickers, SNOW for quick tweaks, and Lightroom Mobile for crisp, color-true edits that still feel authentically Tokyo!
Using Portrait Mode for Depth Effects
Because depth can turn a good Tokyo snap into a “whoa, print that” moment, portrait mode becomes the go-to tool for isolating subjects against the city’s neon and temple textures.
He suggests standing a few meters from lanterns in Asakusa or vending machines in Shibuya, tapping the face, and letting depth effects melt backgrounds into creamy bokeh.
Move feet, not zoom!
- Frame subjects with torii gates for layered blur
- Use leading alley lights to sculpt separation
- Switch to 2x lens for flattering compression
- Keep hairlines clear to avoid edge glitches
HDR Settings for High-Contrast Scenes
How do those blinding Shibuya billboards and inky alley shadows both look crisp in one shot?
Enable auto HDR techniques, then lock exposure by pressing-and-holding on midtones; nudge exposure slightly down for neon.
Use contrast management: avoid extreme highlights in-frame, tilt to reduce glare, then shoot.
In Asakusa at sunset, brace the phone, fire a burst.
Moving crowds?
Try HDR “medium” to minimize ghosting.
Photo Editing Apps Popular in Japan
Neon tamed and shadows balanced?
They’ll love how Japan’s favorite apps conjure clean highlights and cinematic grit, letting Shibuya’s glow breathe.
Local creators blend modern sliders with nostalgia—think film cameras and vintage lenses—then share fast.
Try these, tweak boldly, and post with flair!
- Snapseed: precise control, pro-level curves.
- VSCO: moody film looks.
- Lightroom Mobile: selective masks.
- Meitu: quick polish, playful.
Drone Photography Rules and Regulations
Before launching a drone over Tokyo’s glittering skyline, a smart shooter checks where flight is legal—think designated parks or coastal zones, not over crowds, airports, or Imperial grounds.
They confirm MAFF- and MLIT-related airspace maps, scan NOTAMs, and stick to daytime, visual-line-of-sight rules to keep things safe and drama-free.
Permits matter: they apply for a Japan Civil Aviation Bureau authorization (DID/150m/night operations), carry their registration ID on the craft, and file location-specific permissions when filming near sensitive sites—easy paperwork, epic footage!
Where You Can Legally Fly Drones
A savvy flyer quickly learns that Tokyo’s skyline isn’t a free-for-all—yet there are clear, legal pockets where drones can soar.
Think riverbanks outside dense zones, rural edges of Tama, or spacious coastal parks—always cross-check drone flight regulations and local notices.
Some sites welcome hobbyists; others expect courtesy calls rather than aerial photography permits.
Fly smart, capture bold, leave only prop-wash.
- Arakawa river stretches
- Edogawa floodplain parks
- Odaiba’s outer waterfront
- Western Tokyo farm belts
Required Permits and Applications
Securing the green light to fly in Tokyo isn’t mysterious—it’s a checklist game, and it’s absolutely doable.
He starts with Japan’s Manned Aircraft Act: register the drone, display the ID, and confirm weight class.
Next, he navigates the permits process through the MLIT portal, submitting flight routes, altitudes, and time windows.
For parks, rivers, or rooftops, he follows local application procedures, adds landowner consent, and buffers lead times.
Composition Techniques for Urban Landscapes
For punchy impact, a photographer can use Tokyo’s architecture as bold leading lines—think Shinjuku’s skyscraper canyons or the Yoyogi National Stadium’s sweeping curves—to pull the eye straight to the subject.
To add character, they can frame scenes with traditional elements like vermilion torii at Nezu Shrine or a paper lantern at Asakusa, letting modern towers peek through for a smart old-meets-new contrast.
And in the city’s bustle, they should hunt for negative space—an empty crosswalk at dawn in Ginza or a pale sky above Odaiba—so the main subject breathes, pops, and doesn’t get lost in the neon chaos!
Leading Lines in Tokyo’s Architecture
Two of Tokyo’s best-kept composition secrets are everywhere: rails and roads that act like arrows for the eye.
A savvy shooter harnesses leading lines to carve architectural depth, letting platforms, overpasses, and neon-lit crosswalks guide attention.
Think sunrise at Shinjuku’s canyons, twilight under Ginza’s elevated tracks—clean horizons, bold diagonals, and daring perspectives.
Chase symmetry, then break it for drama!
- Hunt vanishing points at Odaiba
- Use zebra crossings in Shibuya
- Align monorail curves in Hamamatsucho
- Anchor horizons with Sumida bridges
Framing with Traditional Elements
Although neon steals the headlines, the smartest Tokyo frames often borrow from tradition—think shrine torii, temple gates, noren curtains, and paper lantern clusters.
Use Traditional framing to anchor city chaos with Cultural elements: Asakusa’s Kaminarimon, Meiji Jingu’s towering torii, or Yanaka’s fluttering noren.
Step back, align edges, wait for a kimono or cyclist, then shoot.
Bonus: lantern glow at blue hour feels gloriously rebellious.
Negative Space in Crowded Locations
A clever way to tame Tokyo’s bustle is to carve out negative space—clear, calm areas that let a subject breathe.
Think sky gaps over Shibuya, blank station walls in Harajuku, or river reflections by Sumida.
Smart crowd management plus framing techniques isolate motion, spotlighting your hero.
Move slightly, wait a beat, then snap—freedom!
- Dawn alleys near Asakusa
- Subway platform edges
- Rooftop vistas in Shinjuku
- Riversides at sunset
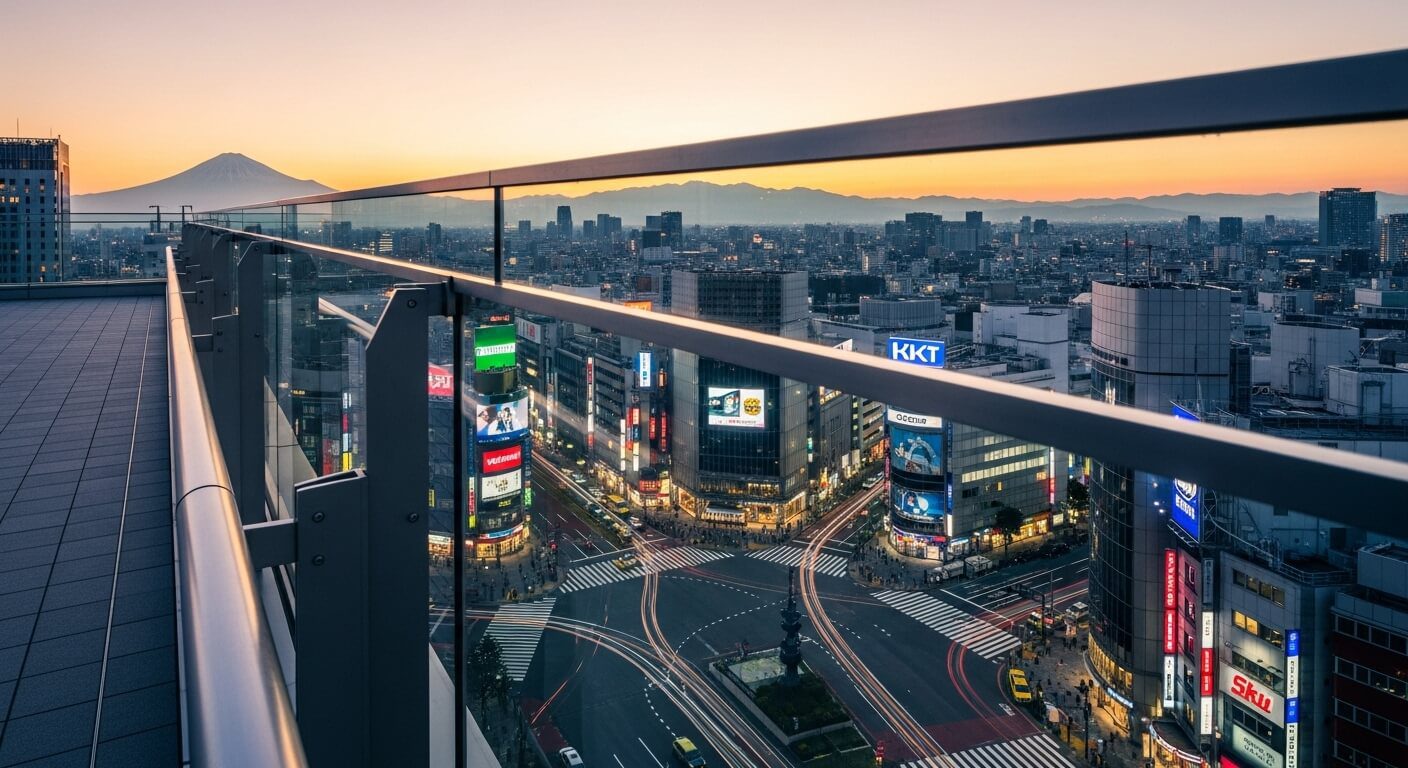
Time-of-Day Photography Strategy
Timing shapes Tokyo’s mood, so readers are urged to chase blue hour around pre-dawn Asakusa and post-sunset Odaiba for cool-toned skylines and mirror-like reflections.
For golden hour, east-facing spots like Tokyo Skytree’s riverside shine at sunrise while west-facing viewpoints—Shibuya Sky or Roppongi Hills—catch warm, cinematic sunsets.
Midday?
They can work Shimokitazawa alleys and temple courtyards using deep shadows, then at night pivot to Shinjuku and Akihabara for neon sign portraits and long-exposure light trails.
Pack a small tripod, arrive 30–45 minutes early, and watch wind forecasts—glassy water and steady air make those city lights look extra magical!
Blue Hour Magic: Pre-Sunrise and Post-Sunset
Ever wonder why Tokyo looks its most cinematic when the sun ducks just below the horizon?
During blue hour, neon signs glow like brushstrokes, reflections bloom on wet streets, and the sky leans indigo.
A savvy shooter hits pre sunrise for empty crossings and soft gradients, then returns post-sunset for electric color and mirror-like rivers.
Think steady hands, quick feet, and a small tripod—freedom comes from being ready.
- Chase Sumida River bridges for skyline silhouettes and shimmering trails.
- Aim for Shibuya’s side streets; puddles become liquid canvases after rain.
- Frame Tokyo Tower from Roppongi backstreets to dodge crowds and snag depth.
- Ride up Odaiba’s promenade; glass and water amplify that cool glow.
Use ISO 400–800, shoot RAW, and bracket—choice thrives on options.
Golden Hour Locations: East vs. West Positioning
Golden light plays differently depending on where the city faces, so think in terms of horizons: east-facing spots catch sunrise glow, west-facing vistas soak up sunset fire.
For east golden hour, he suggests Odaiba’s bayside promenades and the Arakawa riverside—water doubles the radiance, while low bridges frame sleek silhouettes.
Try Asakusa’s Sumida Park, too; the Skytree blushes like it’s in on the secret.
Chasing west sunset views?
Head to Shibuya Sky for a skyscraper panorama, neon warming under a tangerine sky.
Yoyogi Park’s open lawns deliver long shadows and golden rim-light on cyclists and trees—simple, stunning.
On clear days, Setagaya’s Todoroki Valley gives a leafy corridor that glows, hushed and cinematic.
Pack a lightweight prime, arrive 30 minutes early, and ride that luminous crescendo!
Midday Photography: Making Harsh Light Work
Why fear noon when Tokyo turns the dial to high-contrast drama?
Under harsh sunlight, the city carves razor-sharp shadows and sparkling highlights—perfect for graphic frames and bold moods.
A savvy shooter uses midday lighting to isolate subjects, chase geometric patterns, and let reflective surfaces sing.
Think Ginza facades, Asakusa arcades, or the Marunouchi business canyons—clean lines, crisp edges, zero apology.
- Hunt shadow corridors under elevated tracks near Yurakucho.
- Find mirrored symmetry at Omotesando’s Tokyu Plaza entrance.
- Capture punchy silhouettes on Shibuya’s pedestrian overpasses.
- Use temple eaves in Asakusa for latticed light.
Angle the lens low to elongate shadows, then expose for highlights to keep detail.
Polarizer ready, hat on, stride free—embrace contrast, not compromise!
Night Photography: Neon Signs and Light Trails
Three minutes after sunset, Tokyo flips the switch from concrete to kinetic.
In Shinjuku’s Kabukicho, neon sign photography thrives—glossy kanji, buzzing tubes, rain-slicked streets reflecting pinks and cyans like liquid candy.
A wide lens frames towering marquees; a polarizer tames glare; shooting slightly underexposed protects color pop.
Don’t be shy—step into alleys for symmetry and delicious chaos!
For motion, Shibuya Crossing and Yurakucho’s rail arches are perfect labs for light trail techniques.
Set shutter between 1–6 seconds, ISO low, aperture around f/8–f/11, tripod planted, and use a two-second timer to dodge shake.
Pan with taxis for ribboned streaks, or let trains paint steel-blue lines.
After rain?
Jackpot reflections.
Stay nimble, respectful, and curious—Tokyo rewards those who wander.
Photography Etiquette and Cultural Considerations
Before snapping away in Tokyo, a smart shooter checks temple and shrine rules—no tripods in many precincts, no flash inside halls, and absolutely avoid photographing worshippers mid-prayer.
On the streets, ask for consent with a friendly nod or quick phrase, skip close-ups of kids, and remember that shops, cafés, and private buildings often prohibit commercial use without written permission.
Keep alleys quiet, don’t block entrances, and buy a small item if you linger near a storefront—good manners win smiles and better shots!
Temple and Shrine Photography Rules
Even with a camera itching to snap, temple and shrine grounds ask for a gentler rhythm—respect first, photos second.
A savvy visitor checks posted signs, follows temple photography etiquette, and watches how locals move: cleanse hands, bow lightly, then frame the shot.
If in doubt, ask a staffer; shrine photo permissions can vary by hall, altar, or ceremony, and a quick nod saves awkwardness.
Golden hour flatters vermilion toriis and incense curls, but silence wins over shutters near prayer.
Skip flash indoors, avoid blocking paths, and keep tripods discreet or leave them behind—many sites ban them.
Offer a small donation, smile, and travel light.
You’ll leave with crisp images and goodwill—Tokyo karma, unlatched.
- Look for “no photo” icons
- Keep distance from worshippers
- Shoot wide, then step away
- Thank attendants cheerfully
Street Photography Consent Guidelines
Stepping from hushed temples to Tokyo’s buzzing sidewalks, the etiquette shifts but respect still anchors the shot.
Street photography thrives here—neon reflections, darting cyclists, quirky fashion—but people deserve dignity.
When faces are central, ask first with a quick, friendly “Shashin, ii desu ka?” A nod or smile usually seals it; if they decline, pivot gracefully and capture the scene’s rhythm instead.
Mind privacy considerations: children, medical situations, school uniforms, and visibly distressed individuals are no-go zones.
For portraits you plan to publish or monetize, a simple model release—paper or phone-based—keeps things clean.
Shoot wide in crowded crossings, use reflections to anonymize, or frame from behind; the story still sings.
Share a preview, offer to AirDrop, and watch strangers become collaborators!
Private Property and Commercial Restrictions
A quick reality check: many of Tokyo’s most photogenic spots are technically private property, from sleek department store atriums to cozy alley izakaya and trendy cafés.
Management can set Private restrictions—tripods, flash, or full-on “no photography” zones—especially around luxury boutiques and artist markets.
For commercial limitations, malls, rooftop observatories, and themed cafés often require permits for shoots that look professional, even if the gear is just a mirrorless and a big smile.
Think nimble.
Ask staff with a friendly hello, keep setups minimal, and move swiftly when crowds swell.
When in doubt, pivot to public viewpoints—riversides, pedestrian decks, and station plazas deliver epic frames without friction.
Freedom loves light footprints!
- Scout signage first
- Travel light: camera, prime lens
- Ask, then snap quickly
- Keep tripods stowed
Respecting Local Residents and Businesses
While the city dazzles at every corner, good photos come easier when neighbors feel respected.
In quiet alleys near Yanaka or residential lanes in Shimokitazawa, keep voices low, step aside for bikes, and avoid blocking doorways.
Morning markets in Tsukiji’s outer streets?
Move with the flow, not against it, and pocket tripods when crowds thicken.
Cultural sensitivity shines in small choices.
Ask before photographing shopkeepers, shrines, or patrons inside ramen counters; a simple sumimasen with a smile opens doors.
Practice respectful photography at family-run cafés by buying a drink before snapping that latte art—fair trade for ambiance!
At night, watch reflections on windows; that cinematic shot might capture private interiors.
When in doubt, frame wider, crop later, and leave only good impressions.
Essential Gear and Accessories
Before chasing neon nights and temple calm, one packs smart: a lightweight mirrorless with a fast prime for street scenes, plus a versatile zoom for skyline vistas.
For dim ramen shops and artful cafes, a compact LED panel or clip-on flash works wonders, and extra batteries and high-capacity memory cards keep the shutter clicking when trains and sunsets won’t wait.
Rainy season sneaks up in Tokyo, so a packable rain cover, microfiber cloths, and a few silica gel packets save gear—and pride—when the skies decide to photobomb.
Recommended Camera Equipment for Tokyo
Because Tokyo swings from neon-lit nights to tranquil shrine mornings in a heartbeat, smart gear choices make all the difference.
A lightweight mirrorless body keeps movement nimble on rush-hour platforms, while thoughtful Camera accessories tame the city’s pace—spare batteries for marathon strolls, a fast UHS-II card for burst captures, and a folding wrist strap for tight alleys.
For Lens choices, a versatile 24–70mm handles Shibuya scale shifts, and a compact 35mm f/1.8 shines for ramen counters and dusk streets.
- Ultra-wide 16–35mm for sweeping crossings and temple gates
- 70–200mm (or 90mm prime) for candid layers from pedestrian bridges
- Clip-on variable ND to smooth water at Hamarikyu or rooftop vistas
- Packable mini-tripod for frame-precise night cityscapes without clogging bags
Stay nimble, stay curious, and let the city perform.
Portable Lighting for Indoor Shots
Two small lights can turn a cramped Tokyo izakaya or serene tea room into a studio on the go.
Portable lighting frees creators from dim corners and yellow casts, letting indoor portraits shine with true color and gentle depth.
Think pocket LEDs with adjustable temperature and brightness; they slip into a jacket and set up fast.
For izakayas around Shinjuku, bounce a light off a white menu or wall for soft, flattering glow—no harsh shadows, no bartender side-eye.
In Asakusa’s wooden tea houses, aim one key light at eye level and place a second as a subtle rim, separating subject from warm cedar backdrops.
Add mini diffusers or a folded napkin to tame hotspots, and use magnetic grids to control spill.
Quiet, respectful, cinematic.
Shoot freely!
Backup Batteries and Memory Cards
A pocketful of power keeps Tokyo shoots humming from sunrise at Shibuya Scramble to neon-soaked midnight in Akihabara.
A smart traveler packs two or three backup batteries—fast-charging, high-capacity cells that snap in when skylines demand another frame.
Pair them with speedy UHS-II or CFexpress cards for silky bursts at teamLab or skate action under Harajuku’s overpasses, and keep a slim USB-C power bank to top up between ramen slurps.
Think of memory like ramen toppings: more is more.
Carry multiple small cards to spread risk, label them by district, and rotate after each location.
A waterproof card wallet (bonus: bright color) saves the day in crowded stations.
These camera accessories keep photo storage safe—and creative momentum unchained.
- Extra batteries, fully charged
- High-speed, durable memory cards
- Compact USB-C power bank
- Bright, protective card wallet
Weather Protection for Rainy Season
Those extra batteries won’t matter if a sudden tsuyu downpour soaks the camera at Shinjuku Gyoen or along Nakameguro’s canal.
Smart shooters pack rain gear: a compact umbrella, a quick-fit camera rain cover, and waterproof shoe covers for puddle-hopping freedom.
Add weatherproof accessories like a silicone body skin, lens hood to repel droplets, and hydrophobic lens wipes to banish mist fast.
Tripods need rubber feet for slick bridges in Yanaka or Odaiba; a microfiber towel rides in an outer pocket for swift lens dabs.
Sling a dry bag in your backpack—phones, filters, and SD cards stay bone-dry even on the Ginza Line dash.
Bonus tip: wrap a silica gel pack in the camera pouch.
Tokyo rains hard; you shoot harder!
Photo Editing Tips for Tokyo Images
Ready to make those Tokyo shots pop?
Think bold color grading to nail Shinjuku’s neon glow, crisp contrast to sharpen steel-and-glass skylines, and smart tourist removal with burst shots or content-aware tools—because nobody needs a stranger mid–peace sign in their frame.
Keep it natural by lifting shadows, taming highlights, and applying gentle texture and clarity, enhancing detail without turning skin or skies into plastic.
Color Grading for Neon Aesthetics
This is where Tokyo’s neon magic really clicks into place: color grading that amplifies electric blues, hot magentas, and inky shadows.
For neon color grading, a smart move is pushing cool tones into shadows and keeping skin tones natural; that balance lets lively hues breathe without looking radioactive.
Think Shinjuku alleys glowing like soda pop, reflections rippling on rainy streets, and signage humming with energy—edit to match that pulse.
Use HSL to nudge teals toward cyan and magentas toward fuchsia, then add a gentle split-tone: cool shadows, slightly warm highlights.
Keep noise under control; grain should feel cinematic, not crunchy.
Finish with selective color masks, guiding eyes to the glow, letting the city whisper “stay out late.”
- Boost cool shadows thoughtfully
- Protect realistic skin tones
- Nudge HSL for teals and magentas
- Add subtle cinematic grain
Contrast Adjustments for Urban Photography
Neon hues set the vibe; contrast gives Tokyo’s streets their backbone.
For urban frames in Shibuya or Akihabara, start with contrast enhancement around 15–25%, letting blacks deepen without choking shadows.
Then nudge midtone contrast using a subtle S‑curve—highlights lift signage, midtones keep skin natural, shadows stay gritty but readable.
At night, rein in color saturation a touch so reds don’t scream; target blues and magentas selectively to preserve atmosphere.
In Harajuku’s daylight alleys, use local adjustments: dodge faces and shop fronts, burn asphalt edges to funnel attention.
Try clarity low and texture moderate—crisp, not crunchy.
Shooting under rain?
Embrace reflections.
Boost micro‑contrast in puddles, warm the highlights slightly, and let the city glow like a rebellious postcard.
Removing Tourists from Busy Locations
How often does the perfect Tokyo shot get photobombed by a dozen strangers in puffer jackets?
Here’s the playbook for Crowd free photography without losing the city’s pulse.
A savvy local leans on timing techniques: shoot Asakusa at dawn, Shibuya Sky right at weekday opening, and teamLab just before closing—when crowds thin and security yawns.
Capture a burst of frames from a fixed spot; later, auto-align and median-stack them to erase moving people like magic.
- Scout vantage points above street level for cleaner frames.
- Use a compact tripod; lock composition, shoot 20–40 images.
- Median stack in Photoshop or Affinity; mask stubborn stragglers.
- Clone small distractions; heal reflections and stray elbows.
Bonus tip: wear black—fewer mirror-glints, more stealthy freedom.
Maintaining Natural Look While Enhancing Details
Even after a late-night ramen run, a Tokyo frame shouldn’t look overcooked.
For natural enhancement, they start by lowering contrast and nudging shadows up—Shinjuku neon breathes, skin tones stay human.
Then they add micro-clarity only to textures—crosswalk paint, temple wood, sushi rice—using masks for precise detail preservation without crunchy halos.
Color stays honest but lively.
They cool highlights in Akihabara to calm LEDs, then warm midtones in Asakusa for lantern glow.
Vibrance beats saturation; it lifts quiet hues without punching viewers in the eyes.
For night scenes, they tame luminance noise first, then sharpen edges selectively.
Finally, they dodge and burn with a feathered brush: lift faces, deepen sky pockets, keep black point gentle.
Tokyo looks awake, not caffeinated.
Instagram Posting Strategy
Ready to make those Tokyo shots pop on Instagram?
They’ll want smart hashtags (#tokyostreet, #shibuyasky, niche tags in Japanese), prime posting windows around local commute hours, and geotags like Shibuya Crossing, teamLab Planets, and Yanaka Ginza to reach travelers and locals alike.
Tie it together with a cohesive feed—consistent color grading, recurring motifs (neon nights, serene shrines), and a light rhythm of Reels and carousels—because a beautiful grid stops the scroll faster than a bullet train.
Best Hashtags for Tokyo Photography
Curiously, the right hashtags can turn a quiet Tokyo snapshot into a buzzworthy post, drawing locals and travelers straight to a feed.
Savvy shooters blend broad and niche tags: think #Tokyo, #VisitJapan, and #TokyoPhotography alongside #NeonShinjuku, #AsakusaVibes, or #ShimokitazawaStreets.
Tie visuals to color contrast and framing techniques with #JapanAesthetic, #LeadingLines, #ReflectionsOfTokyo, and #SymmetryHunters.
Location anchors like #ShibuyaCrossing, #TeamLabPlanets, and #OdaibaSunset help wanderers find exactly your view.
- Use 3–5 broad tags, 5–10 niche neighborhood tags, and 3–5 style tags tied to your composition.
- Pair scenes with vibe-specific tags: #NightCity, #RainyTokyo, #SakuraDreams, #AutumnInJapan.
- Add Japanese tags for local discovery: #東京カメラ部, #東京散歩, #写真好きな人と繋がりたい.
- Rotate sets to avoid repetition and keep reach fresh, flexible, and fun.
Optimal Posting Times for Maximum Engagement
While the city never truly sleeps, Instagram’s Tokyo audience spikes at specific hours, and timing posts to those rhythms boosts reach fast.
He sees strongest engagement right before the commute—7:30–9:00 a.m.—when trains hum and thumbs scroll.
Even better, 6:30–8:30 p.m.
delivers lively likes as neon wakes and coworkers unwind, then a late surge around 10:30–11:30 p.m.
for night owls chasing freedom.
Content matters to the clock.
Post Sunset reflections from Odaiba or Tokyo Bay between 6:00–7:30 p.m.
to tap warm light and romantic vibes.
Share Shibuya or Shimokitazawa graffiti murals at lunchtime, 12:00–1:00 p.m., when quick breaks invite bold colors.
Weekends shift later—aim for 9:00–11:00 a.m.
and 8:00–10:00 p.m.
Test, track, adjust; let data steer, but keep the spirit wild!
Geotags and Location Tags That Work
A smart geotag in Tokyo doesn’t just say “Japan”—it drops a pin where the magic happens and funnels locals and travelers straight to the feed.
Geotag accuracy matters: tag “Shibuya Scramble Crossing” instead of vague “Shibuya,” or pinpoint “Omoide Yokocho” rather than broad “Shinjuku.” Dial in Location sharing to spotlight hidden alleys, rooftop views, and seasonal festivals that spark discovery.
Use tags that ride real-time buzz—think “TeamLab Planets,” “Yanaka Ginza,” or “Takeshita Street”—so your post hooks curious wanderers.
Mix micro-locations with landmarks to capture both niche explorers and casual scrollers.
Safety note: post Stories from the spot, but delay feed posts if crowds feel intense.
- Tag the exact shrine gate, not the whole park
- Pair landmark + alleyway
- Ride event-specific tags
- Delay posting for safety and mystique
Creating Cohesive Feed Aesthetics
Because a Tokyo feed can feel chaotic fast, cohesion starts with a simple palette and repeatable motifs that tie neon nights to serene mornings.
Think color harmony: pick two or three tones—sakura pink, electric cyan, inky black—and let them guide Shibuya crosswalks, Asakusa alleys, and riverside sunsets.
Use vintage filters sparingly to unify grain and warmth, so vending machines, ramen bars, and temple lanterns glow like the same story.
Anchor themes help.
Circles of manhole art, shrine torii lines, or reflections in convenience-store glass become a signature.
Batch-edit in Lightroom presets, keep exposure steady, and alternate close-ups with wide frames for rhythm.
Post in sets—Tsukiji textures Monday, Golden Gai glimmers Thursday.
It feels intentional, yet free—like wanderlust with a compass!
Transportation Between Photo Locations
Getting between Tokyo’s photo gems is easier than it looks—think swift metro hops linking Shibuya, Asakusa, and Odaiba, with clear signage and transfer-friendly IC cards.
For sunrise temples or foggy skyline shots, taxis are clutch and surprisingly efficient before traffic wakes up.
Mid-day strolls through Shimokitazawa or Yanaka offer rich street scenes and candid moments.
Plan smart: cluster nearby spots, buffer 10–15 minutes for transfers, and watch the clock so you snag golden hour instead of the last train scramble!
Metro Routes Connecting Major Photo Spots
Two lines open most camera-ready corners of Tokyo fast: JR Yamanote and Tokyo Metro Ginza.
Together they stitch Shibuya, Shinjuku, Harajuku, Ginza, Ueno, and Asakusa into a swift loop, perfect for hopping between neon skylines and temple calm.
Photographers can chase urban wildlife in Ueno Park at sunrise, then plunge into Shibuya’s hidden alleyways by lunch—no car needed, just tap a Suica and glide.
Aim for off-peak windows—after 10 a.m.
and before 4 p.m.—for breathing room and clean compositions.
Transfers are easy: Hibiya to Ginza at Ginza Station, Fukutoshin to Yamanote via Shibuya’s well-signed passages.
Trains run every few minutes, so missed rides barely matter—blink and the next one arrives!
- Loop power: Yamanote = instant connection
- Golden light: Asakusa via Ginza Line
- Nature fix: Ueno Park, quick hop from Ueno
- Night glow: Shinjuku–Shibuya in minutes
Taxi Services for Early Morning Shoots
Ever wondered how to leap between sunrise spots before the trains wake up?
A cab unlocks the city at blue hour, letting shooters zip from Asakusa’s quiet alleys to Odaiba’s glowing skyline without clock-watching.
Think freedom with seatbelts—no transfers, no crowds, just soft light and open roads.
Here’s the play: handle Taxi booking the night before via apps like Go, S.Ride, or JapanTaxi, then pin precise pickup points—hotel entrances or conbini corners work great.
Request early morning routes that avoid expressway tolls if you’re budgeting, or use them to sprint across town for that first flare over Tokyo Tower.
Drivers know backstreets; ask for quick hops between viewpoints, meter running.
Carry cash or IC cards, pack tripods low-profile, and enjoy the hush.
Walking Routes for Street Photography
A smart pair of shoes can be the best transit pass in Tokyo, turning neighborhoods into a living contact sheet.
On foot, the city’s seams reveal urban perspectives that trains rush past—alleys humming with ramen steam, neon bouncing off puddles, and crosswalk ballets ripe for candid moments.
This route-first mindset links photo spots naturally, keeping curiosity in the lead.
Start in Shibuya, then drift to Daikanyama via backstreets lined with ivy and minimalist cafés, before winding to Nakameguro’s canal reflections.
In Asakusa, loop from Senso-ji to Kappabashi’s storefronts, catching artisans at work.
Golden Hour in Kagurazaka serves stone lanes, lantern glow, and surprise shrines—chef’s kiss!
- Follow vending-machine constellations at dusk
- Duck market arcades for layered frames
- Shadow-hunt under elevated rails
- Pause at convenience stores for people-watching
Time Management for Multiple Locations
How to wrangle Tokyo’s sprawl without wasting daylight?
Start by clustering spots along one rail line—Shibuya, Omotesando, Harajuku—so you ride once, shoot thrice.
Use Suica/IC cards to glide through gates, and check Google Maps’ live platform info; missed transfers vanish minutes, not hours.
Build timing patience into the plan: pad 10 minutes per hop for ticket lines, elevators, and the surprise ramen detour you’ll absolutely take.
Aim shoots around light timing: golden hour on Odaiba’s waterfront, neon bloom in Shinjuku, soft morning at Asakusa before tour buses swarm.
When distances stretch, the Yamanote Line is your moving tripod—circle city, hop off where light sings.
Rain?
Embrace reflections in Ginza.
Bonus trick: shoot one anchor spot per block, then freestyle nearby gems.
Weather Considerations and Backup Plans
Tokyo’s weather keeps photographers on their toes, so smart shooters map rainy-day backups like teamLab Planets, Tokyo Station’s Marunouchi corridors, the Nezu Museum, and sprawling shopping arcades in Ginza and Shibuya.
Overcast skies are a gift—soft, shadowless light flatters street portraits in Shimokitazawa, neon reflections in Shin-Okubo, and temple textures at Senso-ji—while typhoon season (roughly August–October) demands checking JMA alerts, skipping riverside spots, and sticking to sheltered vantage points.
In summer’s heat and humidity, they pack silica gel, lens cloths, and rain covers, stash batteries in the shade, and towel-dry gear between air-conditioned pit stops—sweaty, yes, but absolutely worth the shots!
Rainy Day Indoor Photography Locations
When storm clouds roll in, the city doesn’t shut down—it glows indoors.
A savvy shooter ducks into Tokyo’s museums and design hubs where indoor art pops under moody spotlights, and polished floors cast dreamy light reflections.
Think bold color, clean lines, and backgrounds that make portraits feel cinematic.
Grab a compact umbrella, then chase that glossy shine like a rebel with taste.
Shibuya Sky’s interior corridors, teamLab Planets’ mirrored water rooms, and Ginza’s luxury arcades deliver crisp compositions.
Meanwhile, cozy kissaten cafés invite storytelling close-ups of steam and smiles.
Metro stations like Otemachi offer futuristic tunnels—shoot wide, then go tight on textures.
Keep batteries warm, lens cloth ready, and shoes grippy; slick tiles are photogenic, but gravity loves drama.
- teamLab Planets: mirrors, water, barefoot magic
- Ginza arcades: chrome, couture, neon shimmer
- Shibuya Sky interiors: glass geometry, skyline slices
- Retro kissaten: wood grain, latte art, human warmth
Overcast Sky Photography Opportunities
Why do gray skies make colors sing?
Under overcast lighting, Tokyo’s neon and temple reds pop without harsh shadows, giving portraits soft, flattering glow.
Head to Yanaka Ginza for textured alleys and warm shopfronts, then glide to teamLab Borderless’ exterior murals—matte skies avoid glare.
At Meiji Jingu, mossy stones and cedar greens feel cinematic; think mood enhancement, not gloom.
Crave reflections?
Hit Odaiba’s waterfront boardwalk; flat light turns puddles into crisp mirror canvases.
For street vibes, Ameya-Yokocho’s canopies diffuse everything—perfect for bold produce shots and candid smiles.
Pack a clear umbrella for sparkle, a microfiber cloth, and a fast prime lens.
If rain threatens, pivot to Tokyo Station’s Marunouchi streetscapes or covered shotengai markets—freedom through flexible planning!
Typhoon Season Precautions
How about braving typhoon season with smarts, not luck?
A savvy shooter checks the Japan Meteorological Agency app, watches wind tracks, and builds storm preparedness into every plan.
When skies bruise purple and gusts rise, they pivot to covered vantage points—Shinjuku Southern Terrace, Tokyo Station’s arcades, or the Odaiba decks just before lockdowns.
If alerts spike, they postpone; freedom means choosing the right moment, not fighting nature.
They draft backup routes using flood risk management maps, steering clear of low-lying riverbanks like Sumida during peak surge.
Trains may pause; they hedge with walkable clusters—Asakusa alleys, Kappabashi, and nearby cafes for cozy edits.
Pack cash, a portable charger, and a lightweight poncho.
Then capture post-storm reflections—neon doubled, streets rinsed, city reborn.
- Track reliable forecasts and wind alerts
- Map safe, covered photo spots near transit
- Avoid riverfront zones during surge warnings
- Plan post-storm golden-hour walks
Heat and Humidity Equipment Protection
Storm savvy is only half the game; summer in Tokyo brings sauna-level heat and soup-thick humidity that can fog lenses, sap batteries, and turn camera grips slick.
Think lightweight freedom: a breathable sling bag, silica gel packs for humidity control, and microfiber cloths tucked in every pocket.
Use lens hoods and simple equipment shielding—rain covers double as sweat guards—when shooting at Meiji Jingu or along the Sumida River at noon.
Beat condensation by acclimating gear: stash cameras in a zip bag when moving from icy cafes to blazing streets in Harajuku.
Power management matters—rotate two small batteries, shaded by a hat or towel, and rest gear under temple eaves between bursts.
Night shoots at Odaiba feel cooler, but keep wipes handy; sea air still clings!
Wrapping Up
In the end, Tokyo rewards curious shutterbugs at every turn.
With over 13 million residents and an average of 20,000 photos snapped at Shibuya Crossing daily, the city practically stages its own photo festival.
Readers are urged to time golden hours, chase seasonal color, and ride efficient trains to string together iconic views and hidden gems.
Pack a lens cloth, a pocket umbrella, and a playful spirit—Tokyo’s neon, noodles, and narrow lanes will do the rest!