Tokyo Cherry Blossom Photography: Best Angles, Timing & Camera Settings
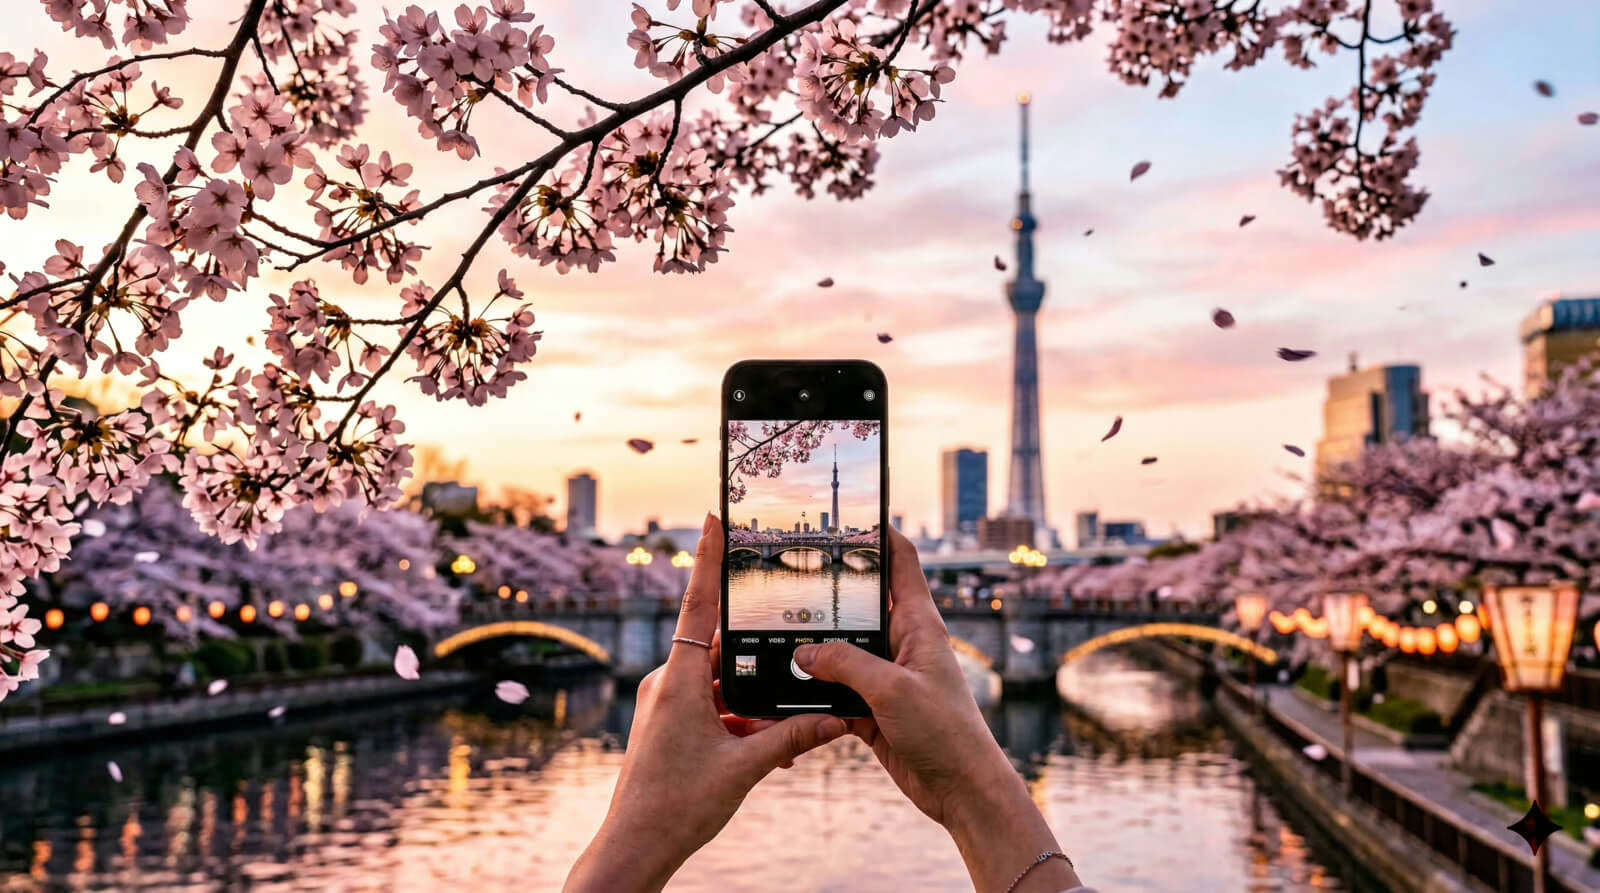
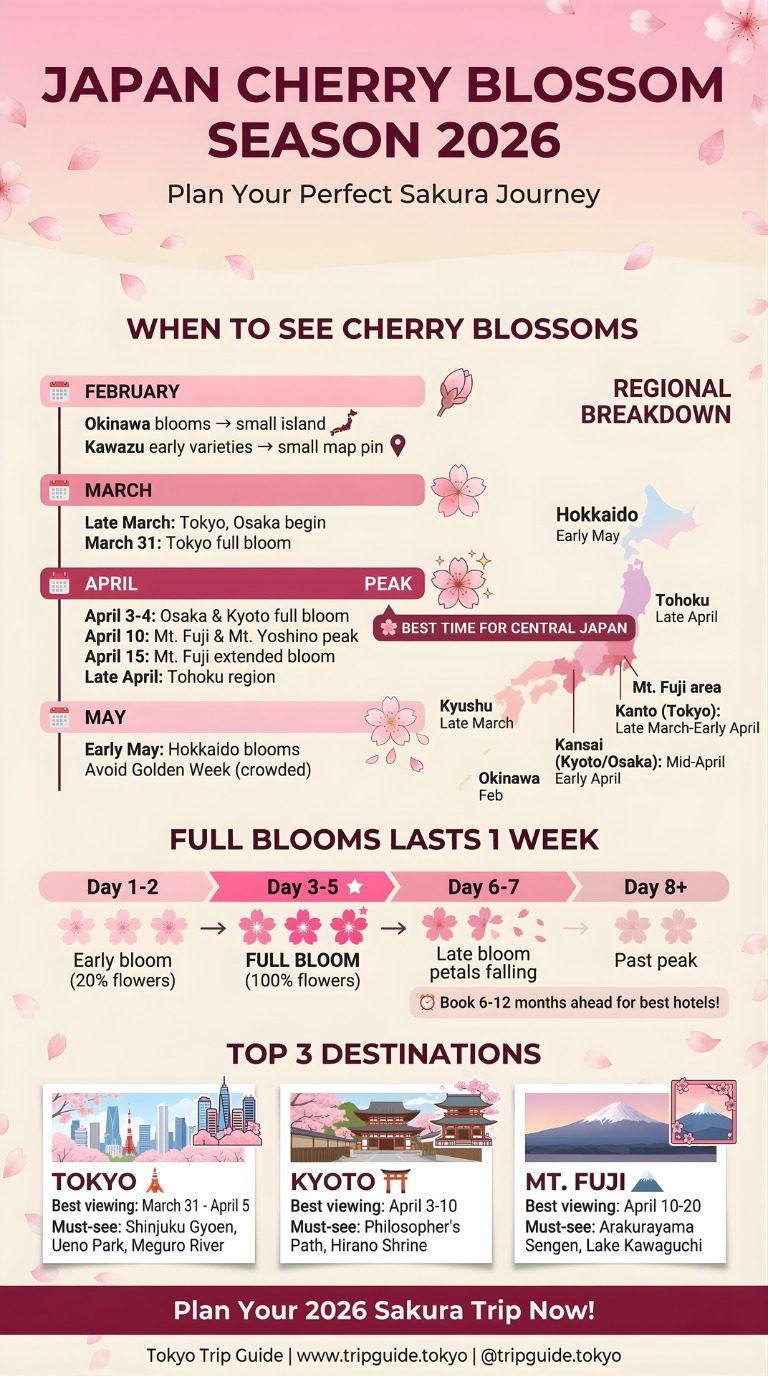
How to Photograph Cherry Blossoms in Tokyo: Complete Guide – The secret to unforgettable sakura shots in Tokyo starts with timing, then angle—always in that order. Peak bloom lasts a fragile five to seven days, so monitoring forecast maps and temperature swings pays off.
Aim for early mornings after calm nights; dew adds sparkle, crowds vanish, and petal color glows softly.
Golden hour warms white petals into blush, while blue hour cools scenes into dreamy pastel. Angles unlock personality: shoot low under branches to let petals canopy the frame, then pivot upward to silhouette blossoms against open sky.
Try reflections in puddles for mirror magic without gadgets.
For a broader look at where and when blooms peak across the city, our Tokyo sakura forecast and predictions guide covers neighborhood-by-neighborhood timing updates.
TLDR
Hide- Target 3 days before peak bloom and monitor forecasts (JMA, Sakura Navi) to catch early blossoms and adapt to weather shifts.
- Shoot at dawn for pastel light and minimal crowds; return at golden and blue hours for backlit petals and city-light reflections.
- Use wide apertures (f/1.8–f/4) for bokeh; stop to f/8–f/11 for sharp landscapes; adjust shutter for petal freeze or motion.
- Compose with low canopy frames, reflections, leading lines, and urban elements like bridges, lanterns, trains, and Skytree.
- Prioritize Chidorigafuchi, Meguro River, Ueno Park, Shinjuku Gyoen, and Sumida Park; visit weekdays, early mornings, or rainy periods.
Best Tokyo Cherry Blossom Photography Locations
Tokyo’s top sakura photography spots are Chidorigafuchi, Meguro River, Ueno Park, Shinjuku Gyoen, and Sumida Park — each offering distinct light conditions, backdrops, and crowd patterns that suit different shooting styles.
Plan a route that hits canopy parks at dawn, rivers at golden hour, and skyline views at blue hour for a full, camera-happy day. Weekday mornings and rainy periods consistently deliver the cleanest frames.
Tokyo Trip Add-Ons
Equip yourself for the ultimate Tokyo adventure with the following add-ons, curated just for you.
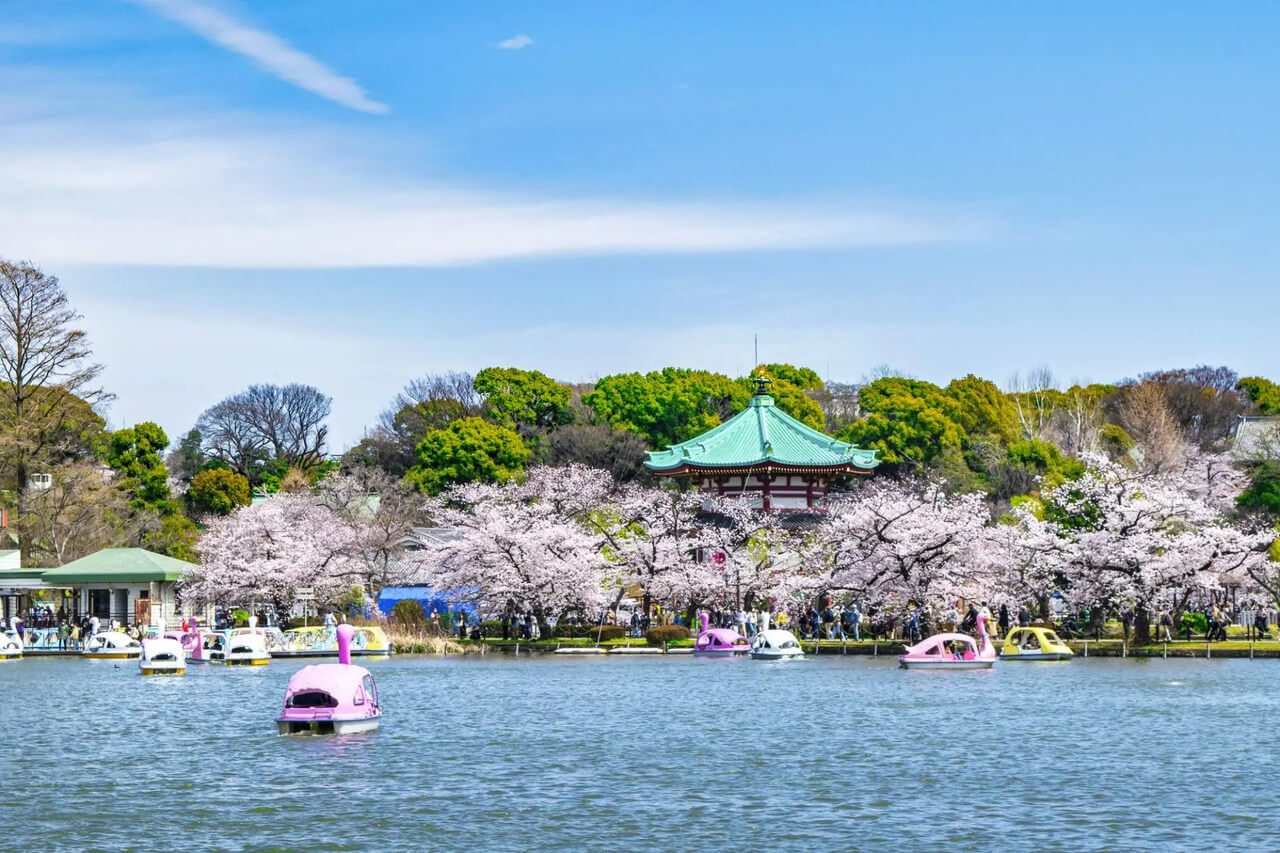
Ueno Park: Canopy, Pond Reflections & Festival Atmosphere
Ueno Park hosts roughly 1,200 cherry trees along its main promenade and around Shinobazu Pond, making it one of Tokyo’s largest and most photographed sakura sites.
The park is open 24 hours and free to enter; the Ueno Zoo and museums inside charge separate admission.
A low angle and a longer focal length compress the arching blossom canopy into a glowing tunnel — ideal for leading lines and romantic silhouettes.
- Tokyo Fashion Areas Comparison: Harajuku vs. Ginza vs. Shibuya Style Districts
- Tokyo Typhoon Season: Safety Tips & Indoor Backup Plans
- Tokyo Christmas Guide: Illuminations & Holiday Events
- Tokyo Translation Apps: Must-Have Tools For Non-Japanese Speakers
- Spring Cherry Blossom Complete Guide: Best Viewing Spots & Timing in Tokyo
- Tokyo New Year’s Guide: Shrine Visits & Holiday Traditions
Early weekday mornings keep frames clean amid the festival buzz.
Shinobazu Pond Reflection Shots
Shinobazu Pond turns into a natural mirror at golden hour, doubling the pink canopy in picture-perfect reflections.
Stand near Bentendo Hall (the small island shrine), angle low, and meter for highlights.
Arrive at sunrise for calmer water surfaces, gentle breezes, and fewer crowds.
Tree-Lined Pathways for Tunnel Effect
Ueno’s main promenade morphs into a blush-pink tunnel each spring, creating a natural studio where petals filter light like softboxes.
For the cinematic tunnel effect: shoot low with a wide lens, center leading lines, backlight petals at golden hour, and include lanterns for scale.
Crowd Management at Ueno Park
Arrive before sunrise, then pivot to midday pockets near Shinobazu Pond when tour groups break for snacks. Respect drone restrictions — Ueno Park prohibits drone flight.
Use benches, gentle slopes, and bridge railings to elevate angles. Patience wins; motion blurs vanish.
Chidorigafuchi: Moat-Side Sakura Perfection
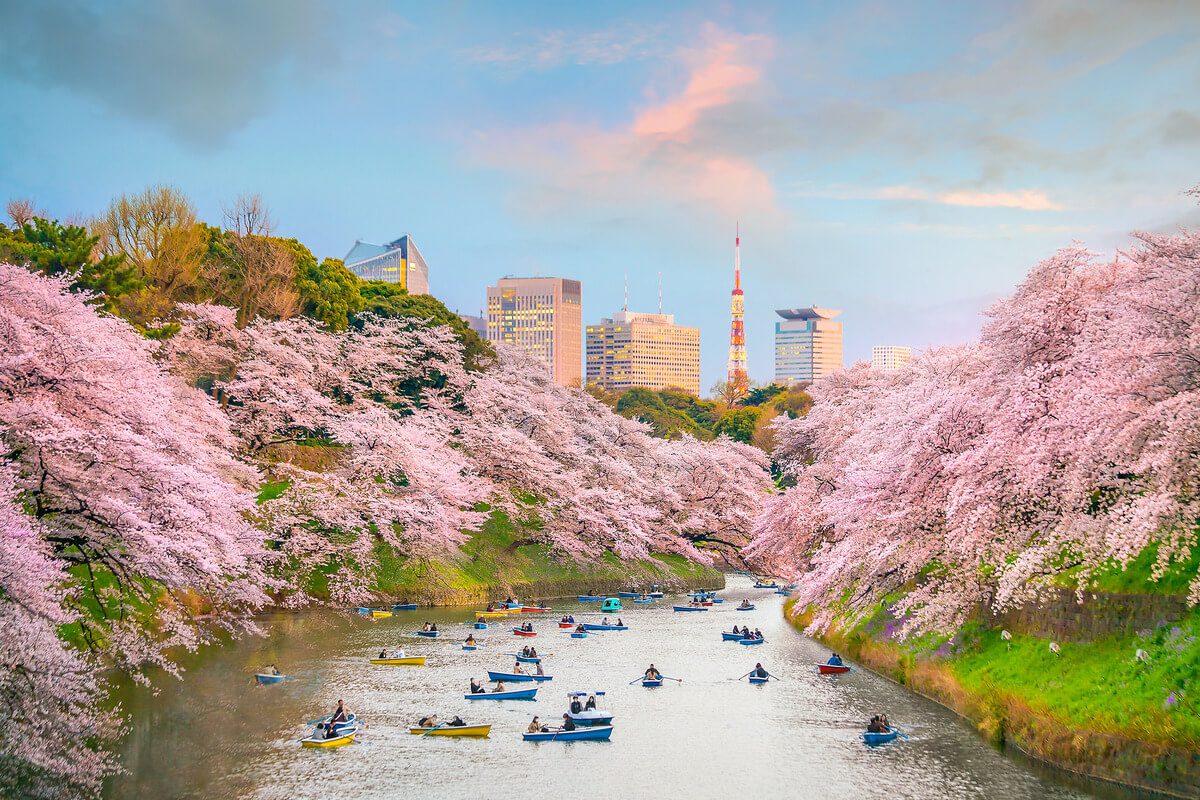
Chidorigafuchi is a 700-metre moat-side promenade in Chiyoda, lined with roughly 260 cherry trees that cascade over the water. Rowboat rentals (approx.
¥800 for 30 minutes) operate during bloom season, typically 9 AM–8 PM. The evening illumination runs until 10 PM during peak bloom.
Return after sunset for the famed illuminations; stabilize with a monopod, shoot around ISO 800–1600, try 1/60–1/125 s to preserve sparkle, and bracket exposures to keep palace stones textured and blossoms glowing.
Boat Rental Photography Opportunities
A boat on Chidorigafuchi’s calm moat lets photographers frame sweeping sakura canopies from water level — perspectives that shore-bound crowds can’t touch.
Aim low for mirror-like reflections, backlight petals for glow, use wide lenses close to branches, and shoot bursts during gentle ripples.
Evening Illumination Techniques
Once lanterns spark on, the moat becomes a ribbon of light and blush-pink. Arrive just after blue hour; soft cobalt skies flatter sakura.
Shoot low at the waterline for lantern reflections, then step back for layered bokeh. Use a fast lens, steady elbows, and breathe — blur-free freedom.
Imperial Palace Views as Backdrop
At Chidorigafuchi, cherry arches frame the Imperial Palace walls, delivering crisp backdrop views that feel timeless.
Shoot dawn for glassy water, frame turrets with overhanging boughs, use a polarizer to tame glare, and rent a rowboat for a low, cinematic perspective.
A telephoto compresses blossoms and ramparts beautifully.
Meguro River: Cherry Blossom Corridor Photography
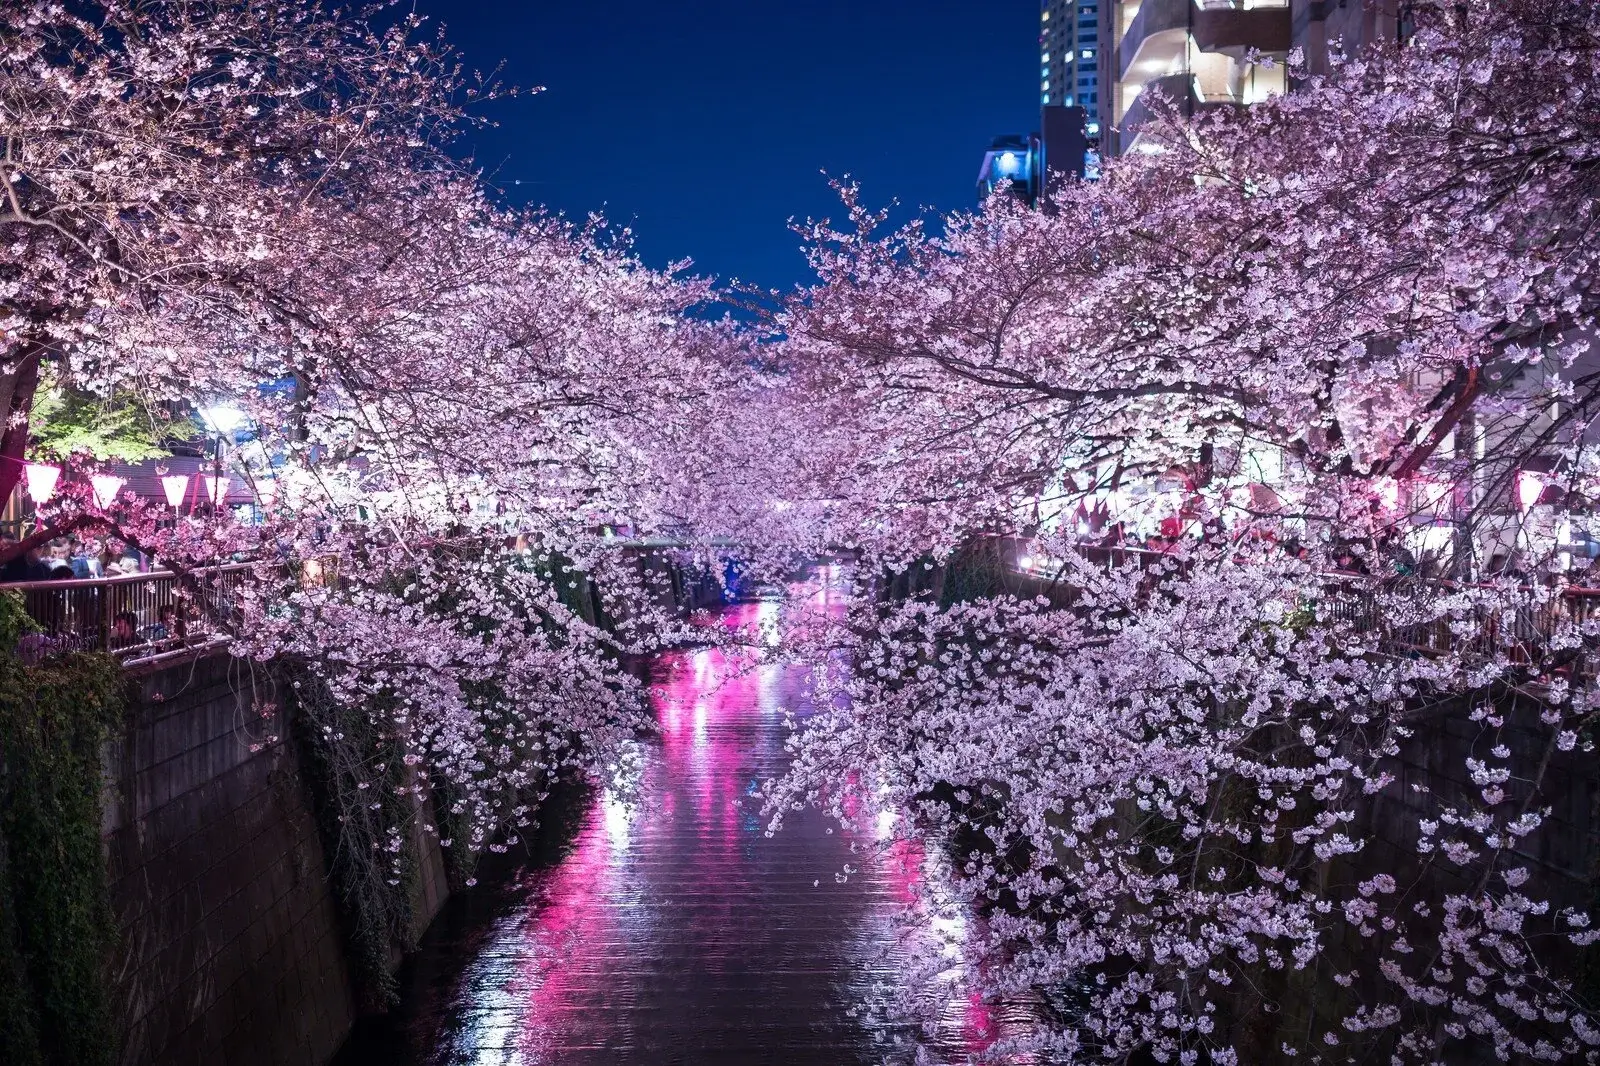
The Meguro River sakura corridor stretches roughly 4 km between Nakameguro and Meguro stations, lined with approximately 800 cherry trees. The Nakameguro section is the most photographed.
Pink lanterns illuminate the canal nightly during bloom season, typically 6–10 PM.
Bridge viewpoints turn the canal into a ready-made runway for leading lines — stand mid-bridge to center the water and let the banks of blossoms guide the eye straight through the frame. After sunset, the pink lanterns switch on and the scene glows.
Bridge Perspectives and Leading Lines
Bridge framing turns strolls into cinematic shots, while leading lines pull eyes straight through the pink tunnel.
Hop bridge to bridge at blue hour — lamps glow, petals sparkle, and reflections double the drama.
Stand mid-span, align rail shadows, shoot diagonals, and center the vanishing point.
Overhanging Branches Creating Natural Frames
The real magic along Meguro River appears when branches arc overhead and knit a pink canopy, turning the walkway into a ready-made frame for portraits and city scenes.
Stand where limbs cross above bridges; crouch low to layer blossoms, reflections, and cyclists.
Mornings offer calm; breezes shake confetti.
Night Lantern Photography at Meguro River
Under lantern glow, Meguro River transforms into a ribbon of blush and gold, perfect for dreamy night shots.
Scout bridges for symmetrical frames, shoot from blue hour into full dusk, use railings as impromptu tripods, and bracket exposures for balanced highlights.
A slow shutter and steady breath let the current paint light streaks.
Shinjuku Gyoen: Three Garden Styles in One
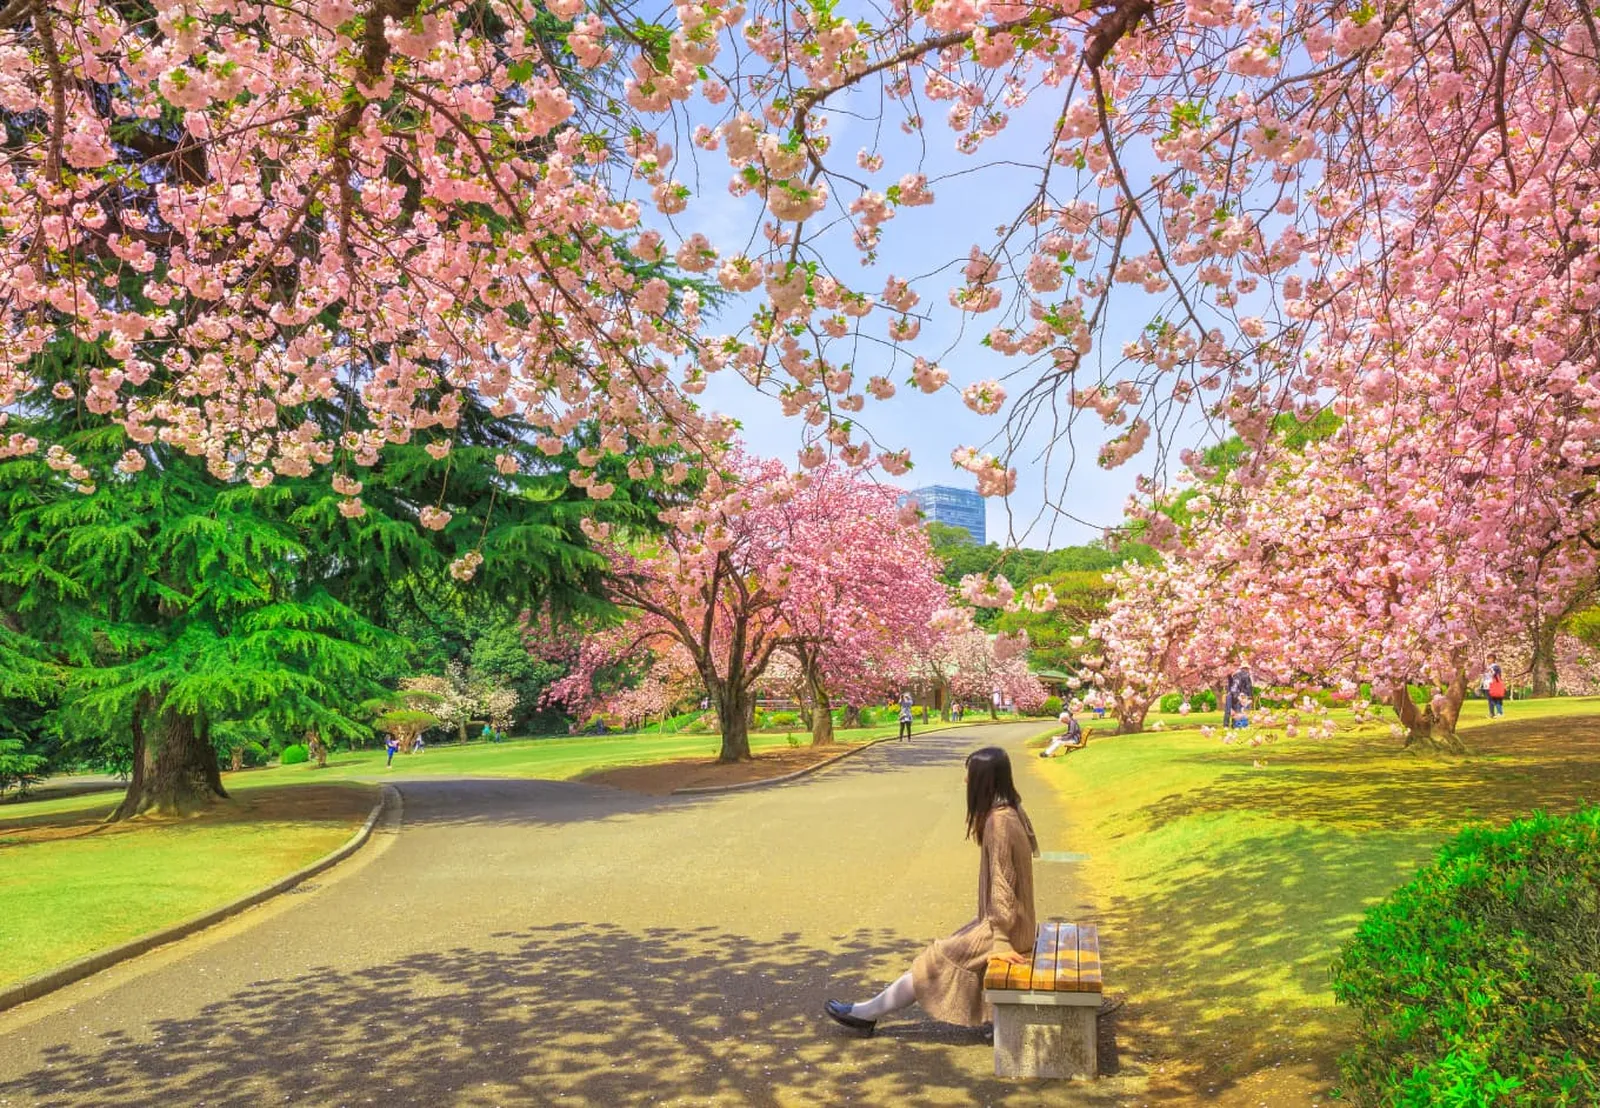
Shinjuku Gyoen covers 58.3 hectares and contains approximately 1,500 cherry trees across 65 varieties. Entry costs ¥500 for adults.
The park is open 9 AM–4:30 PM (last entry 4 PM) and is closed Mondays. Alcohol is prohibited, keeping the atmosphere calm compared to other hanami venues.
Early-blooming Kanzakura (February) and late-blooming Yaezakura (April) extend the photography window well beyond a single frantic week.
Broad lawn expanses are perfect for wide-angle shots framing sweeping blossom canopies against skyline snippets and reflective ponds.
Early and Late Blooming Varieties
Shinjuku Gyoen’s mix of early and late bloomers stretches sakura season far beyond a single frantic week. Kanzakura blooms from late January; Someiyoshino peaks in late March to early April; Yaezakura follows in mid-April.
Track each variety to chase early bloom blush and late petal-fall confetti across multiple visits.
Lawn Areas for Wide-Angle Compositions
The Central Lawn is Shinjuku Gyoen’s secret weapon for wide-angle sakura shots, letting branches frame the skyline while people-sized scale keeps compositions honest. Arrive early, hug the tree line, and anchor horizons low.
Then pivot to capture kids running, kites fluttering, and petals drifting like cotton.
Traditional Tea House Integration
The park’s teahouses — including the Rakuutei and Shokatei — sit beside mirror-still ponds under low-slung eaves, turning cherry blossom frames into storybook scenes. Time visits around golden hour; reflections glow, crowds thin.
Frame doorways as natural vignettes, capture reflections from verandas, and mix telephoto compression with wide context shots.
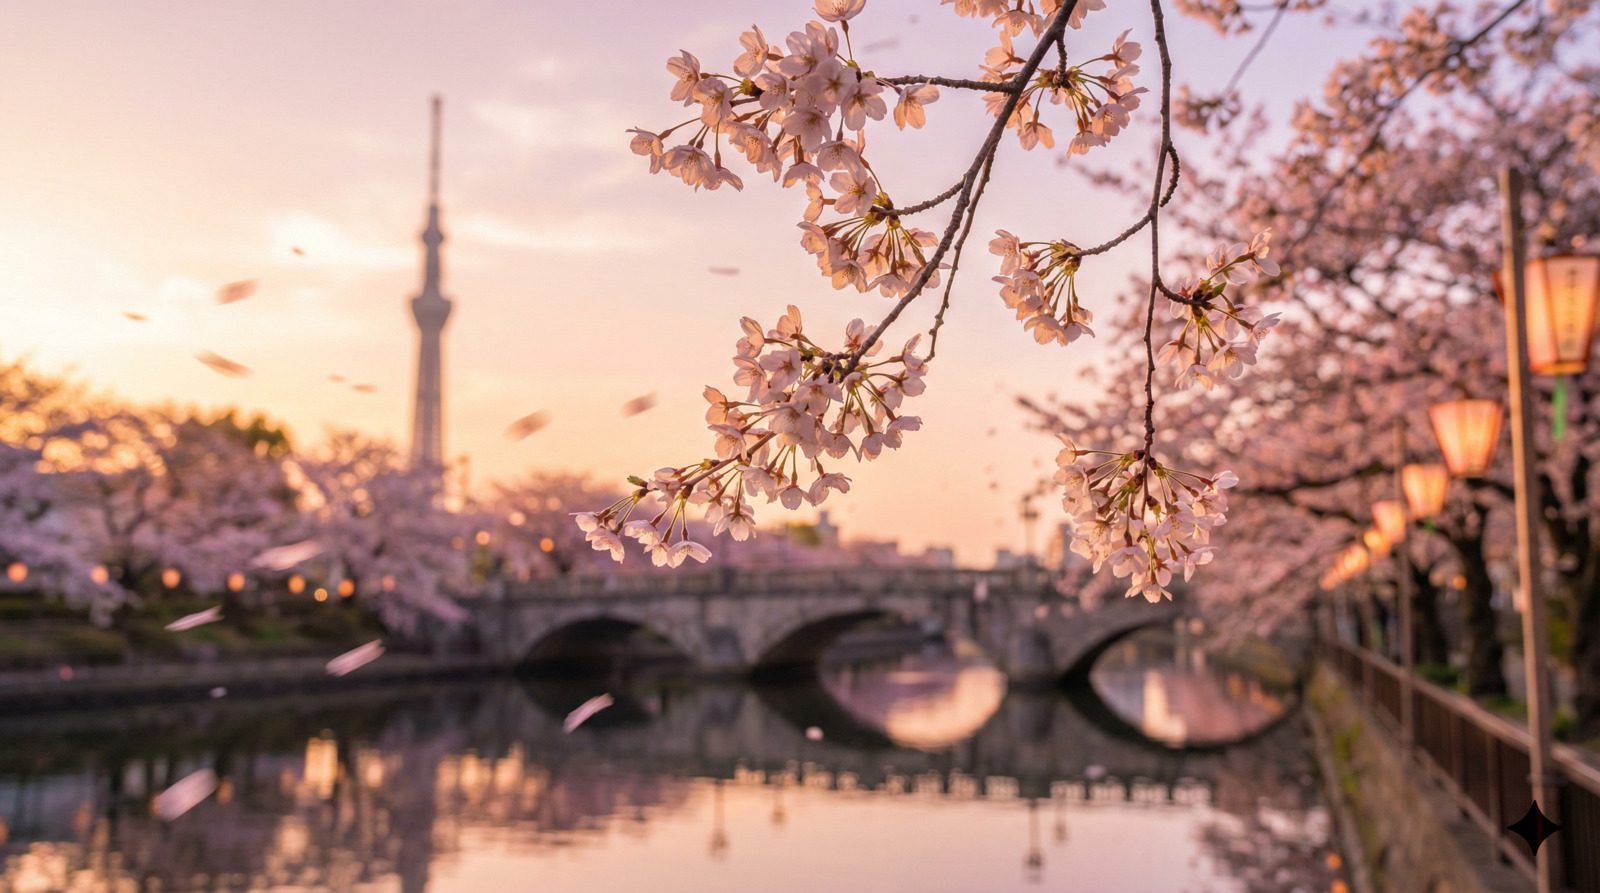
Sumida Park: Tokyo Skytree and Sakura Combination
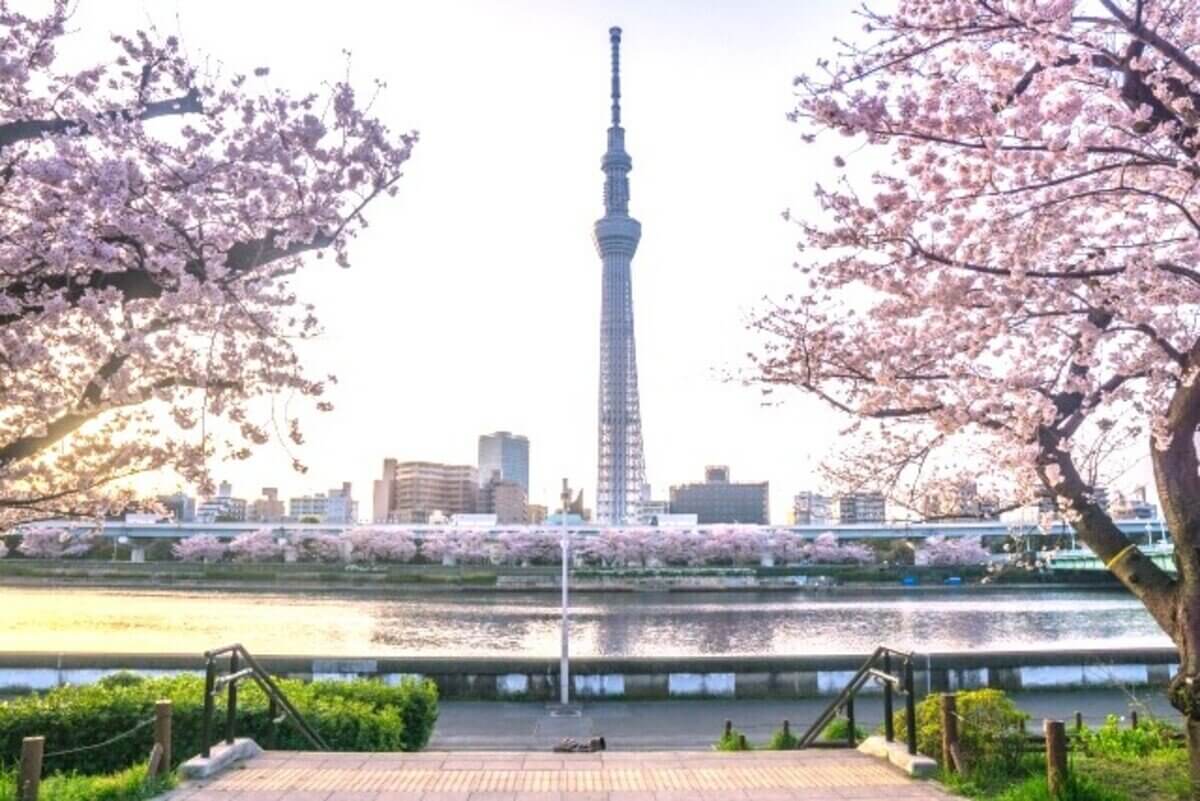
Sumida Park lines both banks of the Sumida River in Asakusa and Mukojima, with approximately 600 cherry trees. The park is free and open 24 hours.
Tokyo Skytree (634 m) stands roughly 1 km northeast, making it a natural backdrop from the riverside paths.
Head to the riverside paths for mirror-like reflections, shoot passing yakatabune boats at blue hour, and snag long exposures from Azuma-bashi or Kototoi-bashi for a glossy, cinematic glow.
Arrive at sunrise on weekdays or after the evening commuter rush for fewer crowds and softer light.
Modern Architecture Meets Nature
From riverside paths in Sumida Park, cherry trees frame Tokyo Skytree like a living picture window — nature and futurism in one shot.
Spot urban contrasts in pale petals against gleaming steel, then wait for neon reflections to simmer after dusk.
Snap wide, then go tighter for graphic lines and soft blooms.
River Reflections and Boat Photography
From Sumida Park’s riverside, a photographer lines up petals, tower, and sky in one frame. Hop onto yakatabune for urban boat scenes, timing gentle wakes to paint rippled mosaics.
Golden hour glows, bridges frame silhouettes, and a polarizer tames glare — postcard-ready, zero regrets.
When Is the Best Time to Visit Sumida Park for Photos?
The best time to photograph Sumida Park is weekday dawns (5:30–7 AM) during peak bloom for empty paths and soft light, or weekday evenings after 8 PM when commuter crowds thin and Skytree reflections shimmer on the river.
Post-rain late mornings also deliver exceptional clarity and reflective puddles. Avoid Saturday and Sunday afternoons during peak bloom week — the park becomes extremely crowded between 11 AM and 6 PM.
When Is the Best Time to Photograph Cherry Blossoms in Tokyo?
The best time to photograph cherry blossoms in Tokyo is three days before peak bloom (mankai), at dawn between 5:30–7 AM on weekdays.
This window combines early-stage blossoms, minimal crowds, and soft pastel light — ideal for clean compositions at all major spots.
Peak bloom typically falls between late March and early April, lasting five to seven days.
Monitor the Japan Meteorological Agency (JMA) sakura forecast and the Sakura Navi app for precise neighborhood-by-neighborhood timing.
Bloom Forecast Websites and Apps
The Japan Meteorological Agency publishes official sakura forecasts from late January, tracking first bloom (kaika) and full bloom (mankai) dates by prefecture and city district.
The Sakura Navi app and WeatherNews Sakura Ch. offer push alerts and real-time crowd reports.
Because Tokyo blooms in waves, compare forecasts by neighborhood: bayside parks in Koto ward tend to bloom slightly earlier, while cooler western suburbs like Kichijoji lag by two to four days.
Japan Meteorological Agency Updates
The JMA releases sakura stage updates — first bloom, 50% bloom, full bloom, and petal fall — based on observations from a designated standard tree in each region.
Track first bloom and full bloom alerts, compare against historical averages, and watch for sudden cold snaps that can delay or accelerate the schedule by several days.
Regional Variation Across Tokyo
Tokyo’s sakura don’t all open at once, and that staggered timing is a photographer’s secret advantage. West-side hills in Setagaya and Meguro often pop first; breezy bayside parks in Koto lag.
Use neighborhood forecasts to hop trains: Koishikawa Korakuen, then Yanaka’s alleys, then Nakameguro — each a few days apart.
Mankai vs. Hanafubuki Stages
Mankai — full bloom — is when canopies fuse into soft pink ceilings, ideal for wide-angle and portrait shots. Hanafubuki, the petal-storm finale, turns paths into confetti rivers and rewards fast shutters and motion blur.
Track mankai on JNTO and WeatherNews; set wind alerts for hanafubuki days and revisit riversides after gusty nights.
Peak Bloom Week Planning
Arriving about three days before peak bloom gives photographers a head start as buds blush, crowds thin, and compositions feel fresh.
Watch the forecast for weather windows: crisp blue skies after a cold front, dreamy overcast for even tones, or a light drizzle that deepens petal color.
Keep a backup date in your pocket, shifting shoots between Nakameguro evenings and Shinjuku Gyoen mornings if wind or rain disrupts plans. Flexibility wins the bloom lottery.
Arriving Three Days Before Peak
Three days ahead of peak bloom hits the sweet spot — close enough to feel the crescendo, early enough to dodge the biggest crowds.
Scout angles at Shinjuku Gyoen on arrival day, catch sunset at Sumida Park on day two, and shoot blue-hour boat shots at Chidorigafuchi on day three before mankai crowds surge.
Weather Window Opportunities
Watch cloud cover closely during peak week. Thin overcast yields creamy, even light at Chidorigafuchi; broken clouds ignite Sumida Park sunsets.
Track wind speed — under 10 km/h keeps petals poised on branches. When a calm golden hour opens, sprint to Meguro River: reflections sparkle, crowds hum, and frames sing.
Backup Date Flexibility
Sakura schedules love to tease, then pivot at the last minute. Build backup date flexibility by holding two alternate mornings, tracking three neighborhoods simultaneously, prioritizing flexible lodging, and watching buds rather than headlines.
Shift to sunrise sessions after rain for bonus puddle reflections and cleaner air.
Time of Day Photography Windows
For crowd-free frames and pearly light, hit dawn first — 5:30–7 AM — when petals glow softly and popular spots like Ueno Park feel private.
Return for golden hour, one hour before sunset, when branches ignite and faces look warm.
After the sun slips, stick around for blue hour, roughly 30 minutes after sunset, as lanterns and city lights shimmer against indigo skies along Meguro River.
Pack a lightweight tripod, set a low ISO, and you’ll walk away with a full day’s reel.
Dawn Photography Before Crowds (5:30–7 AM)
Dawn is prime time to claim Tokyo’s cherry blossoms before the crowds surge. Arrive 5:30–7 AM for dreamy pastel skies, crisp air, and effortless crowd control.
Key dawn spots: Chidorigafuchi moat reflections, Ueno Park lanterns still glowing, Meguro River mirror-stills, Shinjuku Gyoen gates opening at 9 AM (arrive early to queue), and Sumida Park skyline frames.
Golden Hour Magic (One Hour Before Sunset)
As the sun slides low and Tokyo warms to honeyed light, golden hour turns sakura into glowing confetti on branches and water. Aim for west-facing banks at Meguro River, catching petal rain drifting through backlit alleys.
Shoot wide, then switch to 85mm for creamy bokeh; meter highlights, embrace flares, and move constantly.
Blue Hour Illuminations (30 Minutes After Sunset)
Blue hour is Tokyo’s quiet encore — the city exhales and the sakura start to glow. Head to canals and plazas where lanterns flicker and blue-hour reflections double every blossom.
Shoot 30 minutes after sunset with a tripod ready and ISO low. Key blue-hour spots: Chidorigafuchi boats, Meguro River bridges, Sumida Park skyline frames, and Ueno’s temple lantern paths.
Do Weekdays Really Make a Difference for Cherry Blossom Photography?
Yes — weekday mornings at Tokyo’s sakura spots are dramatically less crowded than weekends. Parks like Shinjuku Gyoen and Chidorigafuchi can feel serene on a Tuesday dawn but shoulder-to-shoulder on a Saturday afternoon during peak bloom.
Late evenings on weekdays are equally effective. Head to Meguro River or Sumida Park after 8 PM, when lanterns shimmer on the water and tripods suddenly have space to breathe.
Rainy weekdays are the ultimate crowd-clearing event.
Weekday Morning Advantages
Weekday mornings give cherry blossom hunters a blissful head start: softer light, open paths, and room to breathe.
Fewer commuters crowd Sumida Park, golden-hour glow bathes Chidorigafuchi, bridges at Meguro River stay clear, and quick tripod setups happen without sidelong glares.
Beat the tour buses and own the scene.
Late Evening Quieter Periods
Late evenings slip into a sweet lull when crowds thin and neon glimmers bounce off pale petals.
Seek dusk tranquility at Chidorigafuchi’s moat, where lantern reflections ripple like liquid chrome.
Then roam Sumida Park’s riverside paths — tripod-friendly, security relaxed.
Grab 50mm or wide-angle lenses, embrace slow shutters, and let streaking trains paint kinetic, candy-colored backgrounds.
Rainy Day Opportunities
Rain delivers fewer crowds, glistening blossoms, and cinematic umbrella reflections that turn streets into mirror stages.
Shoot under Nakameguro bridges, frame lanterns in Sumida Park, work Shinjuku Gyoen’s covered paths, and catch canal ripples in Kiba.
Trust the showers — they uncover intimate frames and rebellious quiet.
Camera Settings for Cherry Blossom Photography in Tokyo
Dialing in the right camera settings makes the difference between flat snapshots and images that glow.
Use wide apertures (f/1.8–f/4) for dreamy bokeh or stop down to f/8–f/11 for crisp branch landscapes.
Match shutter speed to the breeze — 1/500 s for fluttering petals, slower with a tripod for silky motion.
Keep ISO low (100–400) in daylight but bump it confidently to 800–3200 when clouds roll in or lanterns flicker on.
Set white balance to Cloudy or a custom Kelvin of 5800–6500 to honour delicate pinks without turning them neon.
Aperture Selection for Different Effects
Aperture choice shapes the sakura mood. Shoot wide open at f/1.4–f/2.8 for buttery bokeh, isolating a single blossom while Tokyo’s neon or temple lanterns melt into dreamy orbs.
Switch to f/5.6–f/8 for crisp textures on branching clusters along Meguro River. Go f/11+ for full-scene storytelling — bridge, river, and distant skyline under pink canopies.
Wide Open f/1.4–f/2.8 for Bokeh
Wide apertures like f/1.4 to f/2.8 turn Tokyo’s busy backdrops into buttery swirls while letting blossoms pop with luminous clarity.
Step close and fill the frame, align a single bloom, backlight petals, use an ND filter in bright conditions, and keep shutter speed fast enough to avoid motion blur.
Meguro River and Chidorigafuchi are ideal playgrounds for this technique.
f/5.6–f/8 for Sharp Branch Details
This sweet mid-range locks in crisp branch textures while keeping blossoms lively and dimensional.
At Chidorigafuchi during golden hour, gentle light boosts branch clarity while the aperture keeps petals sculpted.
Try single-point AF on a leading twig, then recompose. Nudge ISO to 400 and keep shutter above 1/250 s if the breeze picks up.
f/11+ for Landscape Context
Two clicks to f/11–f/16 and the scene snaps into a cohesive story: blossoms up front, moats, bridges, and skyline all rendered with confident depth.
Use aperture priority to lock consistency, then chase light without hesitation.
Watch for lens flare — sometimes magic, sometimes a nuisance — so shade the front element. Focus one-third into the scene for maximum sharpness.
Shutter Speed Considerations
Shutter speed is your secret sauce: set 1/500 s to freeze fluttering petals mid-air, crisp and sparkling like confetti over the Sumida River.
When a breeze rolls through Ueno Park, try 1/125–1/250 s to show just a whisper of motion, keeping branches sharp while leaves hint at life.
Want dreamy petal rain along the Meguro Canal at dusk? Slow it down to 1/15–1/30 s, brace your elbows or use a rail, and let silky streaks tell the story.
Freezing Falling Petals at 1/500 s
A crisp 1/500 s shutter speed is the sweet spot for freezing drifting sakura petals mid-flight, capturing each flutter like confetti paused in midair.
Use burst mode and pick the sharpest flecks.
Prioritize bright, backlit petals near Meguro River bridges. Set ISO 200–400, aperture f/2.8–f/5.6, and angle toward low afternoon sun for maximum sparkle.
Wind Movement at 1/125–1/250 s
At 1/125–1/250 s, wind movement becomes a graceful whisper rather than a blur. Frame along Sumida Park paths, where gusts riffle clusters, while keeping faces sharp.
Use continuous AF, stabilize with a relaxed stance, and time gusts between passing trains. The sweet spot: airy petals, crisp branches, and a sense of living motion.
Slow Shutter for Petal Rain Effect
For a dreamy petal rain look, slower speeds around 1/4–1 s let blossoms streak like soft confetti while trunks and landmarks stay steady.
This works in Ueno Park breezes or along Meguro River bridges, where petals tumble like tiny kites.
Use an ND filter at golden hour, ISO 100–200, aperture f/8–f/11, a tripod, and a 2-second timer. Compose with dark backgrounds for maximum petal contrast.
ISO Management in Variable Light
When Tokyo’s sakura glow in crisp daylight, keep ISO low — around 100–400 — to preserve silky tones and razor-clean detail.
As twilight settles over the Sumida River or Ueno Park lanterns flicker on, bumping ISO to 800–3200 keeps shutter speeds workable without turning petals into blurs.
To tame noise, enable in-camera long-exposure NR, shoot RAW for smarter denoising later, and expose slightly to the right so shadows don’t crumble.
Low ISO 100–400 for Daylight
ISO 100–400 is the sweet spot for crisp, colour-true cherry blossom shots in Tokyo’s bright daylight, letting the sensor sip light rather than guzzle it.
Use ISO 100 at Shinjuku Gyoen at noon, ISO 200 for reflective ponds, ISO 320 amid clouds, ISO 400 under tree canopies, and bracket exposures along Chidorigafuchi for safety.
ISO 800–3200 for Evening Shoots
At twilight, nudge ISO to 800–3200 for handheld freedom along Meguro River and Chidorigafuchi.
Pair f/1.8–f/2.8 apertures with 1/80–1/200 s shutter speeds to catch lantern glow without blur.
Meter near highlights, lock exposure, and shoot RAW. Brace on railings for extra stability — silky petals and sharp lanterns reward the effort.
Noise Reduction Techniques
Twilight ISO pushes are fun, but grain can creep in — tame it with smart noise control. Shoot RAW and leverage luminance vs.
colour NR separately in post. Expose to the right, avoiding clipped highlights.
Use a tripod with a lower ISO and slower shutter when possible. Apply selective NR via masks to protect petal detail, and add gentle grain for cohesive texture.
White Balance for Accurate Pink Tones
For rosy sakura hues, switching to the Cloudy white balance preset gently warms petals so they glow like they’re lit at sunset.
When light shifts around the Sumida River or Ueno Park, set a custom Kelvin between 5500–6500 to keep pinks lush without turning them orange.
Watch for blue colour casts from shade or reflective water; tilt the balance warmer and you’ll banish the cold-toned look in a snap.
Cloudy Preset for Warm Enhancement
Switching white balance to the Cloudy preset gives cherry blossoms a gentle, flattering warmth.
Petals glow, river reflections mellow, and skin tones look sun-kissed without harsh edits.
This warm enhancement suits moody afternoons along Meguro River and Ueno Park’s breezy lanes — set it, roam freely, and let the blush bloom.
Custom Kelvin 5500–6500 Range
Dialing a custom Kelvin between 5500 and 6500 nails true-to-life sakura pinks while keeping skin tones natural along the Sumida or Chidorigafuchi at golden hour.
Try 5600 K at midday and 6200 K near sunset.
Pack a gray card, collapsible reflector, and an ND filter for precise colour control in the field.
Avoiding Blue Colour Casts
Nothing sours sakura shots faster than a chilly blue cast sneaking over delicate pinks, especially along the breezy Sumida or mirror-still Chidorigafuchi.
Switch white balance to Cloudy, nudge Kelvin toward 6000–6500, use a gray card for precision, shoot RAW, and warm shadows in post.
Simple moves, big payoff.
Composition Techniques for Sakura Photography in Tokyo During Spring Season
Strong composition transforms a pretty scene into a memorable photograph.
Frame with foreground branches for instant depth, use negative space and minimalism to let petals breathe, and follow leading lines along park pathways to guide the eye.
Small human elements — a cyclist, a kimono, a child with taiyaki — give scale and charm. Think layers, clean skies, curving promenades, and a playful sense of scale.
Framing with Foreground Branches
Nudging the camera so nearby sakura branches skim the frame adds soft blur and a sense of being under the canopy.
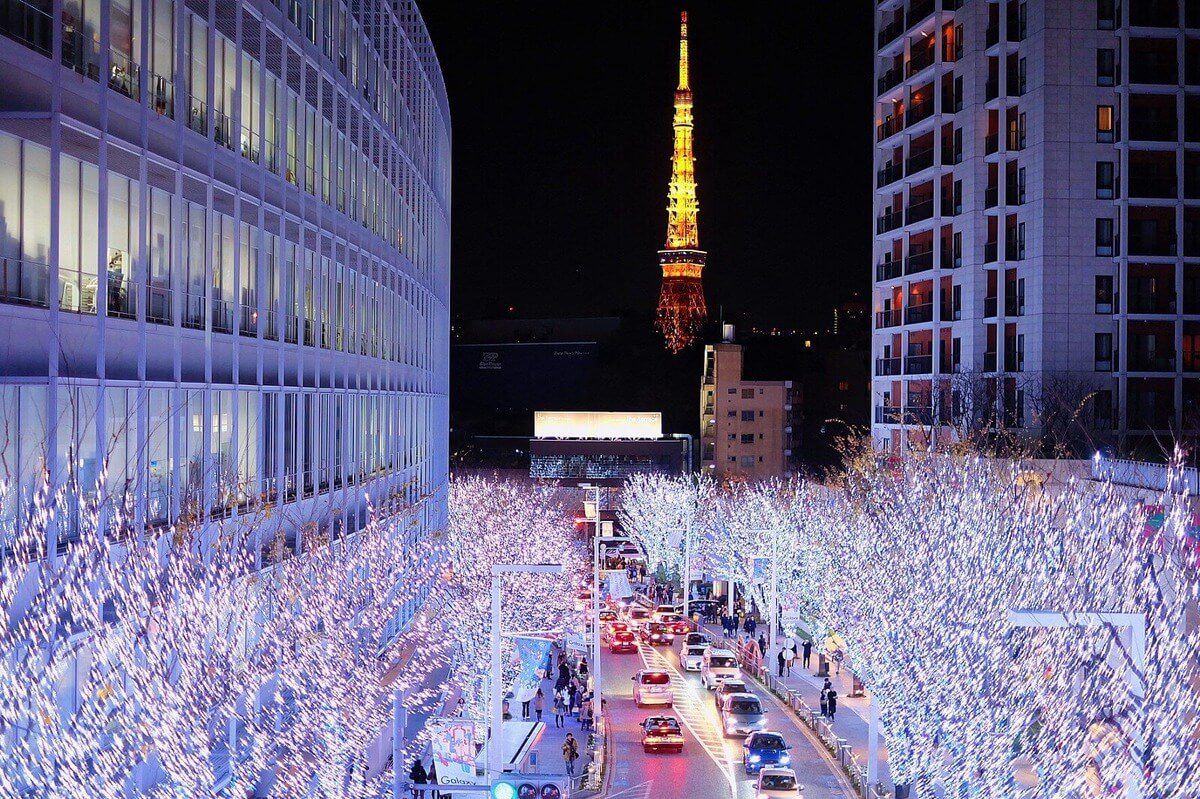
Those same blossoms become natural frames around Tokyo icons — Tokyo Tower peeking through pink arches in Shiba Park, or lantern-lit petals encircling canals in Nakameguro.
For extra magic, stack multiple bloom layers by shooting from a low angle toward mid-distance trees and a far landmark, creating a dreamy gradient of petals that feels cinematic.
Creating Depth with Near Elements
Bring a nearby branch into the frame and let it whisper along the edges or blur in front, guiding the eye toward the main scene.
This boosts depth perception through playful foreground layering, especially around Meguro River and Shinjuku Gyoen at golden hour.
Use f/2–f/4 for creamy blur, angle diagonally for motion, and focus on mid-distance blossoms.
Cherry Blossoms as Natural Frames
Crouch under overhanging branches at Chidorigafuchi or along Meguro River, isolating boats, bridges, or neon glints within a frame of petals.
Tilt slightly, shoot wide open, and let soft bokeh cradle the subject.
This technique is liberating, precise, and joyfully simple — no special gear required.
Layering Multiple Bloom Levels
Layering multiple bloom levels adds depth, story, and that cinematic you-are-here feeling. Stack petals near-to-far along Sumida Park paths and Meguro River bridges.
Use wide apertures for creamy foreground, align mid-tree clusters with landmarks, pause for backlit sparkle at sunset, and anchor with a sharp subject before letting the layers breathe.
Negative Space and Minimalism
For a minimalist sakura shot, point the lens upward and use the pale Tokyo sky as a clean background — instant breathing room for soft pink petals.
Isolate a single branch against that open space, letting one crisp cluster sing while the city bustle politely exits the frame.
This approach nods to Japanese aesthetic principles — ma (meaningful emptiness) and wabi-sabi. Embrace restraint, leave generous margins, and let the blossom whisper instead of shout.
Sky as Clean Background
A clear Tokyo sky makes the perfect canvas for sakura, turning delicate petals into bold silhouettes and letting colour pop without distractions.
Face south at noon for cobalt impact, shoot sunrise pastels, apply +0.3 EV exposure compensation, use a polarizer to reduce glare, and wait for wind pauses before pressing the shutter.
Single Branch Isolation
Frame one arc of sakura over Sumida Park’s river glow at sunrise, letting negative space breathe. A single bloom pops against pale sky, crisp and striking.
Step closer, use a longer focal length, and shift slightly to dodge cluttered trunks. Soft backlight and clean compositions reward patience.
Japanese Aesthetic Principles in Sakura Photography
Negative space becomes a trusted guide when you lean into Japanese aesthetic principles. A minimalist composition lets blossoms breathe; colour harmony calms the frame even amid Tokyo’s buzz.
Frame sky as canvas, isolate one bloom, align soft colour harmony, use leading emptiness, and keep tones whisper-quiet.
Leading Lines and Pathways
Tree-lined walks at Chidorigafuchi and Ueno Park create natural perspective, their arching sakura forming a tunnel that pulls viewers straight into the frame.
Follow rivers and Edo-era moats for graceful S-curves, then switch to low angles along stone paths in Shinjuku Gyoen or Rikugien to stack petals, texture, and leading lines.
Tree-Lined Walks Creating Perspective
A tree-lined path under sakura becomes a natural corridor, pulling the eye forward and sculpting depth like a gentle funnel of pink.
Step slightly off-centre for dynamic perspective, crouch low to let trunks loom, frame with overhanging branches, time golden hour for soft gradients, and include walkers for scale and story.
Rivers and Moats Guiding the Eye
Waterlines turn into arrows for the eye, aligning blossoms and reflections and pulling viewers toward the subject with gentle momentum.
Along Chidorigafuchi and Meguro River, low angles let ripples act as guides.
Frame petals against stone or sky for natural framing, and shoot at blue hour when lanterns glow and mirrored sakura double the drama.
Stone Paths Through Gardens
The eye follows stone paths that whisper “this way” through Tokyo’s classic gardens.
Shoot low and let stones stretch like rails, time dawn glow for soft pinks, place a figure for scale, track curves toward blossoms, and use wet reflections after rain for extra depth.
Shinjuku Gyoen and Rikugien offer the best stone-path compositions in the city.
Human Elements and Scale
To show the true scale of sakura canopies, frame people strolling or picnicking beneath the trees — Ueno Park’s broad lawns and Shinjuku Gyoen’s open fields make perfect size references.
For timeless contrast, photograph visitors in traditional kimono at Asakusa or along Meguro River at golden hour.
Don’t skip candid hanami moments — laughter, clinking bento boxes, and wind-tossed petals at Yoyogi Park or Sumida Park add story, rhythm, and a dash of charming chaos.
People Under Trees for Size Reference
Place a person beneath the canopy to anchor the scene and reveal the trees’ sweeping scale.
Frame from a low angle for towering arcs, keep the subject small and centred wide, shoot during blue hour, use backlight for glow, and pace compositions between clusters.
Ueno Park’s promenade and Shinjuku Gyoen’s Central Lawn are ideal for this technique.
Traditional Kimono Photography
Seek soft morning light at Shinjuku Gyoen, frame low to let petals crown the subject, and mind kimono etiquette — left over right, tidy obi, no trampling roots. Highlight traditional fabric textures: silk sheen, woven motifs.
Guide gentle movement, capture mid-step turns, and let pastel petals echo patterned sleeves.
Hanami Party Candid Moments
While petals drift like confetti, hanami parties turn parks into open-air living rooms — prime time for candid storytelling. Shoot from ground level for grand canopies, backlight smiles at golden hour, capture toasts mid-gesture, and include blankets for scale.
Layers, leading lines, and playful foregrounds complete the composition.
Lens Selection for Cherry Blossom Photography
Lens choice shapes the sakura story.
Pack a wide-angle to capture grand avenues of blossoms framing Tokyo landmarks, a standard zoom for versatile walk-around shooting, and a telephoto to compress layers of petals into painterly bands along Meguro River.
For close-up magic, a macro lens reveals pollen-dusted stamens and translucent petals glowing at twilight — just watch the breeze, steady the shot, and prepare to gasp.
Wide-Angle Lenses for Grand Landscapes
A 16–35mm lens lets the frame drink in full tree canopies without chopping off fluffy pink crowns.
It is perfect for capturing entire park scenes at Shinjuku Gyoen or Ueno Park — paths, ponds, and picnickers all tucked into one crisp, story-rich shot.
Aim wide near temples or Tokyo Station for architectural integration shots, letting petals kiss stone, glass, and steel.
16–35mm for Full Tree Coverage
A 35mm focal length hits a sweet spot for capturing an entire cherry tree without stepping halfway into the street — wide enough to frame the full canopy, yet natural enough to keep branches from looking stretched.
Step back two paces, shoot slightly upward, keep horizons level, use f/5.6–f/8, and wait for breezes to settle before pressing the shutter.
Capturing Entire Park Scenes
A wide-angle lens at 16–24mm lets lawns, ponds, and blossom canopies breathe — perfect for Ueno Park’s promenades and Shinjuku Gyoen’s vast lawns.
Seek sunrise glow, stagger foreground petals, and use leading paths.
For altitude without a drone, shoot from elevated walkways or gentle hillsides within the parks.
Architectural Integration Shots
Wide-angle lenses (16–24mm) make cherry blossoms draped over temples, bridges, and sleek towers sing.
Frame petals against steel and stone with bold foreground branches and dynamic leading lines.
Key spots: Asakusa’s pagoda at dawn, Nihonbashi arches, Skytree canal reflections, and Tokyo Station’s domed brick facade.
Standard Zoom Versatility
A 24–70mm standard zoom is the all-purpose hero for cherry blossom photography in Tokyo — wide enough for riverside sakura tunnels, tight enough for candid portraits under fluttering petals.
It is perfect for walk-around shoots in Ueno Park or along Meguro River, letting you travel light while staying ready for surprise petal showers.
A quick twist of the zoom ring shifts from lanterns to isolated blossoms to a skyline kiss of Tokyo Tower without missing a beat.
24–70mm All-Purpose Range
A 70mm focal length delivers natural-looking perspectives with just enough compression to tidy up busy backgrounds.
It frames faces and blossoms gracefully while maintaining a respectful working distance from trees and hanami parties.
Think riverwalks at Meguro, shrine paths at Nezu, or palace moats glowing at dusk — one lens handles all of it.
Walk-Around Photography Convenience
Locals sling a standard zoom before hopping on the Yamanote Line because it offers freedom in one lens — wide for Shinjuku Gyoen gate crowds, midrange for Yanaka’s petals flurrying past bicycles, a quick twist for street portraits.
No lugging lens swaps, no fuss.
Handheld versatility respects quiet shrines and keeps you nimble along Meguro River.
Quick Composition Adjustments
A standard zoom pays off most at composition time, when scenes shift by the heartbeat in sakura season.
Punch in for faces framed by petals, then glide wide for river reflections — no lens swap, no missed magic.
Twist to 24mm for sweeping branches, nudge 50mm for candid smiles, snap 70mm for bokeh blossoms, and add a polarizer for glare-free water.
Telephoto Lenses for Compression and Detail
Switching to a 70–200mm in Tokyo’s sakura spots lets branches stack beautifully, compressing layers of pink like a pastel accordion.
From across a moat at Chidorigafuchi or down an alley in Yanaka, it cleanly isolates distant blossoms, trimming distractions and guiding the eye right to the petals.
Open the aperture for creamy bokeh and watch lanterns, water ripples, and temple roofs melt into a dreamy backdrop.
70–200mm for Compressed Branches
A 200mm lens turns tangled sakura branches into layered ribbons of pink, gently compressing distance so blossoms stack like buttercream on a cake.
Aim along Meguro River or Shinjuku Gyoen alleys at golden hour.
Stand back and fill the frame, align parallel branches, shoot f/2.8–f/4, use a monopod for steadiness, and watch wind patterns before pressing the shutter.
Isolating Distant Blossoms
A 135–300mm telephoto plucks a single blossom from Tokyo’s sprawling pink canopy. Frame from riverwalks along Meguro or the breezy Sumida embankment, where distant petal isolation thrives across water gaps and temple courtyards.
Aim slightly uphill from bridges, compress shrine roofs and sky, and use bloom layering techniques — foreground clusters, mid-branch accents, distant lanterns — for elegant depth.
Bokeh Background Blur
A telephoto lens compresses Tokyo’s cherry-lined avenues, turning crowds into buttery bokeh while keeping petals razor-sharp.
Shoot wide open, watch for lens flare at sunrise in Ueno Park, then refine with gentle colour grading for dreamy pastel tones.
Use 85–200mm lenses, stand far and focus close, f/1.8–f/4 apertures, and backlight for sparkle.
Macro Lenses for Intimate Details
A macro lens turns Tokyo’s blossoms into tiny worlds, letting individual flowers fill the frame with crisp edges and dreamy backgrounds.
It brings the stamen’s golden dust and the petal’s silky texture into sharp relief, revealing patterns you’d normally miss during a quick stroll under the trees.
After a light rain or early-morning mist, water droplets cling like jewels — get close, steady your hands, and watch those sparkling spheres reflect the whole park.
Individual Blossom Close-Ups
A true macro lens, ideally 90–105mm, lets petals, pollen, and dewdrops fill the frame without casting shadows.
For individual blossom close-ups around Sumida Park and Shinjuku Gyoen, shoot at dawn for calm air, use backlight for glow, keep ISO low, stabilize with a monopod, and compose diagonally for a dynamic, non-static feel.
Stamen and Petal Texture
Stamen filaments and velvety petal grain ask for precision from a 90–105mm macro lens.
Shoot at f/5.6–f/8 to reveal petal veins, then lean in, steady your breath, and pivot subtly.
Morning side-light pops textures — blink and those tiny pollen sculptures vanish. Shinjuku Gyoen’s quieter corners are ideal for undisturbed macro sessions.
Water Droplets on Petals
Two minutes after a spring drizzle, Tokyo’s blossoms turn into tiny gemstone displays — perfect for a macro session.
A 90–105mm macro lens isolates water droplets and amplifies petal shimmer, especially in Ueno Park’s calm alcoves.
Use f/5.6–f/8 for crisp droplets, manual focus peaking, backlight for sparkle, a polarizer to tame glare, and shoot before the breeze arrives.
Weather Conditions and Cherry Blossom Photography
Weather shapes every cherry blossom shot in Tokyo, so plan your strolls with the sky in mind.
Overcast mornings deliver buttery, shadow-free light for close-ups, while sunny afternoons beg for backlit petals at Shinjuku Gyoen or along Meguro River, where blossoms glow like lanterns.
Don’t ignore rain — umbrellas and slick streets add romance. Then chase the post-rain golden hour at Chidorigafuchi, when puddle reflections sparkle and the air feels freshly perfumed.
For real-time air clarity that affects how far your backgrounds render, check the Tokyo air quality guide for travelers before heading out.
Overcast Days for Soft Lighting
Cloudy skies are a secret weapon for Tokyo’s sakura shots — overcast light spreads evenly, flattering every petal like a gentle studio softbox.
With harsh shadows tamed, you can shoot under branches at Ueno Park or along Meguro River all day, capturing faces, blossoms, and water reflections without squint-inducing contrast.
Colours pop too; the pinks look richer and more nuanced. Set white balance to Cloudy, bump saturation slightly, and enjoy that creamy, pastel glow.
Even Diffused Light Benefits
Under diffused overcast light, petals reveal a soft glow, colours stay true, and highlights behave.
The city’s parks feel calmer too — perfect for roaming freely and shooting longer without fuss.
Benefits include balanced skin tones for candid portraits, rich pastel detail on petals, easier metering across scenes, subtle reflections on waterways, and consistent exposure from alley to avenue.
Avoiding Harsh Shadows
Soft, even overcast light tames the hard-edged shadows that often wreck cherry blossom shots.
On moody mornings at Ueno Park or alongside Meguro River, clouds act like a giant diffuser, preventing harsh shadows under petals.
Seek bridges, temple gates, and reflective puddles; shoot midday without fear. Embrace umbrellas, hand warmers, and nimble framing.
Rich Colour Saturation on Overcast Days
An overcast day turns Tokyo’s sakura into colour-rich candy, boosting pinks and whites without the glare that bleaches details.
Roam riversides and shrine paths when clouds soften contrast.
Shoot along Meguro River footbridges, use a polarizer for extra pop, slightly underexpose, hunt reflective puddles, and frame with dark trunks to make petals sing.
Sunny Days and Backlighting
On bright Tokyo afternoons, backlighting turns sakura petals into glowing confetti — stand slightly below the canopy and expose for the highlights to keep that luminous blush.
For the classic sun-through-branches effect, position the sun at the edge of a cluster near golden hour, then nudge your framing to create a crisp starburst.
Feeling playful? Tilt the lens just off-axis and use a small aperture to tame lens flare into tasteful orbs, like tiny lanterns dancing along Meguro River.
Translucent Petal Photography
Sunny mornings in Tokyo are the sweet spot for translucent petal magic, when low-angle light slips through sakura like stained glass.
Chase translucent petals along Meguro River, pausing where branches hang low and the breeze hints at petal rain.
Face the sun but frame shade edges, shoot f/2–f/4 for glow, spot meter on petals, and wait for gusts near bridges.
Sun Through Branches Effect
Sunny mornings are perfect for the sun-through-branches effect that makes Tokyo’s sakura look celestial.
Stake out Shinjuku Gyoen or along Meguro River, where dappled sunlight slips between blooms, casting a dreamy branches silhouette.
Aim toward the low sun, meter for highlights, then step sideways to catch shimmering halos. Try brisk bursts; breezes jiggle blossoms like confetti.
Lens Flare Creative Use
Controlled flare turns Tokyo’s sakura into cinema. Under sunny backlight at Ueno Park or along Meguro River, lens flare becomes a creative tool — warm halos, prismatic streaks, and dreamy glow that still keeps petals crisp.
Tilt toward the sun then nudge off-axis, stop down to f/11–f/16, shade with a fingertip, clean the front element, and shoot near golden hour.
Rainy Cherry Blossom Photography
Rainy days in Tokyo turn sakura into gleaming jewels — wet petal close-ups with beaded raindrops are perfect for macro shots under gentle, even light.
Around Ueno Park and along Meguro River, umbrella-covered hanami scenes create colourful patterns and candid storytelling moments.
Don’t forget puddle reflection opportunities near temple courtyards and station plazas; frame low, angle toward lanterns or neon, and wait for a ripple to add a playful flourish.
Wet Petal Close-Ups
Drizzle-kissed mornings make each sakura petal look lacquered — perfect for intimate, wet petal close-ups that glow on screen.
Scout quiet paths in Ueno and along Meguro River, chasing dewy petals and soft petal rain.
Shoot tight, angle low, and let highlights sparkle. Use a polarizer to tame glare, manual focus on droplets, and wipe the lens gently between shots.
Umbrella-Covered Hanami Scenes
For umbrella photography, head to Nakameguro’s canal or Shinjuku Gyoen’s broad paths, where commuters and picnickers create lively, layered frames.
Aim slightly elevated, then wait for clusters of umbrellas to align — stripes, transparents, polka-dots.
Catch rain reflections on lacquered bridges and benches, bump ISO, keep shutters brisk, and embrace the colourful chaos.
Puddle Reflection Opportunities
On rainy Tokyo days, reflections mirror petals and lanterns, turning modest puddles into cinematic frames.
Scout Ueno Park’s walkways after showers, use a wide lens and kneel low, wait for calm between ripples, frame lanterns and torii gates, and embrace wet shoes for the best angles.
Patience and a low perspective are the only gear requirements.
Post-Rain Golden Light
When a shower clears, Tokyo’s air snaps into crystal clarity, making cherry blossom colours pop like fresh paint — perfect for crisp, low-ISO shots along Meguro River or Chidorigafuchi.
Get close to those petals; water droplets bead into tiny lenses that sparkle in the slanting golden hour.
Look up too — dramatic post-rain cloud formations catch warm light over Tokyo Skytree and Shinjuku Gyoen, giving you layered skies, glowing branches, and gallery-worthy silhouettes in one easy frame.
Cleansed Atmosphere Clarity
A fresh shower rinses Tokyo, and the city feels polished — perfect for cherry blossom photos with razor-clear detail and luminous colour.
With urban pollution momentarily settled and atmospheric haze scrubbed, edges pop and skies glow.
Aim for sunrise after storms, frame blossoms against distant peaks, use polarizers sparingly, and explore Sumida Park viewpoints for maximum clarity.
Water Droplets on Blossoms After Rain
Just as the sun slips under the storm’s edge, water droplets cling to petals at Chidorigafuchi’s moat or Ueno Park’s quieter paths and the blossom sparkle hits like confetti. Crouch low, backlight the bloom, and use a wide aperture for creamy bokeh.
A polarizer trims glare, while gentle breath steadies focus.
Dramatic Cloud Formations
Post-rain Tokyo becomes a stage where the sky goes full drama over blush-pink canopies.
Cloud inversions hug rivers while shafts of gold ignite petals — pure atmospheric drama.
Aim for Sumida Park bridges at sunset, frame against Skytree silhouettes, shoot wide then punch in, bracket exposures for texture, and wait five minutes because clouds morph fast.
Night Cherry Blossom Photography
Night cherry blossom photography in Tokyo — known as yozakura — shines at classic spots like Meguro River, Chidorigafuchi, and Rikugien, where lantern-lit paths, shimmering water, and petals glow like tiny moons.
For tack-sharp frames, use a sturdy tripod, 2-second timer or remote, and turn image stabilization off during long exposures.
A low ISO, around f/5.6–f/8, and shutter speeds from 1/4 to several seconds keep lights crisp without mush.
Balance street lamps with ambient sky by shooting during blue hour, nudge white balance warmer (around 3500–4500 K), and try gentle light painting with a dim flashlight to kiss foreground blossoms.
Yozakura Illumination Locations
For night shoots that sparkle, Chidorigafuchi’s light-up events wrap the moat in golden glow, with boat rentals giving photographers dreamy reflections and intimate angles.
Roppongi Hills Mori Garden offers a refined oasis — lantern-lit paths, mirrored ponds, and city skyline accents — perfect for crisp compositions without the crowds if you arrive early.
For pure energy, the Meguro River Lantern Festival lines kilometres of water with colour, so stake out bridges near Nakameguro Station and pack a fast lens.
Chidorigafuchi Light-Up Events
Chidorigafuchi’s springtime illumination runs nightly during peak bloom, typically 6:30–9:30 PM, and is free to view from the promenade.
Boat rentals operate until 9 PM (last entry 8:30 PM) during the light-up period.
Shoot from the ramp curve, frame boats beneath boughs, use reflections, go on weekdays, and pack a lightweight tripod.
Roppongi Hills Mori Garden
Mori Garden stages intimate yozakura with pond-side lanterns, stepping stones, and low boughs that practically brush your shoulders.
Time your visit at blue hour: reflections glow, urban silhouettes frame blossom clusters, and wind makes ripples shimmer.
Hug the waterline for mirror shots and shoot from bridges or gentle slopes for layered petals against city light.
Meguro River Lantern Festival
The Meguro River Lantern Festival is Tokyo’s most famous night-sakura runway, where pastel canopies glow over kilometres of water between Nakameguro and Ikejiri.
Best shooting hour: 6:30–8:00 PM.
Best bridges: Saigoyama and Azuma. Recommended lenses: 24–70mm and a fast prime.
Settings: ISO 800–1600, 1/125 s. Go light, shoot fast, and chase windless moments for steady reflections.
Tripod Techniques for Sharp Night Shots
For tack-sharp yozakura scenes, set long exposures around 2–10 seconds to soak in the lantern glow while keeping ISO low and noise tame.
A remote shutter release or the camera’s 2-second timer prevents press-induced wobble — because even a gentle tap can blur delicate petals.
For DSLR users, enabling mirror lock-up adds a final precision tweak, eliminating micro-vibrations so every blossom edge looks crisp and luminous.
Long Exposure Settings (2–10 Seconds)
Long exposures between 2 and 10 seconds turn Tokyo’s cherry blossoms into luminous clouds while water and traffic paint silky trails. Use ISO 100–400, f/8–f/11.
Try 2–4 s for gentle flow and 6–10 s for bold light streaks. Expose for highlights, stabilize the tripod, and breathe before triggering the shutter.
Remote Shutter Release Usage
A wireless remote makes hands-off shooting easy, letting you breathe between frames without nudging the tripod. Set a two-second delay if needed, then trigger the shutter release from a pocket.
Roam Meguro River or Chidorigafuchi, frame reflections, and fire bursts confidently. No handshake, just crisp petals and silky light trails.
Mirror Lock-Up for Maximum Sharpness
Engaging mirror lock-up tames the tiny vibrations that can blur petals during long exposures along Meguro River’s glowing banks.
Use a sturdy tripod with legs spread low, enable mirror lock-up in-menu, add a 2-second timer, shield from wind with your body, and review at 100% for micro-sharpness.
One small switch, big difference.
Balancing Artificial and Natural Light
Night under the sakura means juggling neon signs and moonlit petals. Start by planning multiple exposure blending to balance glowing lanterns with soft blossom detail.
When the sky stays brighter than the foreground, a graduated neutral density filter can tame highlights right in-camera at Chidorigafuchi.
For scenes with extreme contrast — reflection-filled canals and luminous shrines — try careful HDR processing, merging bracketed shots for natural results without a crunchy look.
Multiple Exposure Blending
Multiple exposure blending shoots separate frames for highlights and shadows, then merges them for a natural, luminous result. Bracket ISO 100, f/8, with varied shutters.
Lock the tripod and disable stabilization. Blend in masks, feather softly, capture a clean sky and pure blossoms, and add subtle light painting accents.
Try this at Meguro River or Chidorigafuchi.
Graduated Neutral Density Filters
A graduated neutral density filter does the heavy lifting for balancing glowing lanterns and pale sakura petals in one frame.
Slide the dark band over lantern rows at Meguro River or temples in Ueno, and keep petals luminous.
Choose soft-edge graduated filters for uneven horizons, rotate gently, meter twice, and savor balanced exposures.
HDR Processing Techniques
When the sensor can’t handle the scene’s wild dynamic range, HDR blending rescues the shot.
Bracket +2/0/−2 EV, lock the tripod with a 2-second timer, mask halos manually, warm white balance to around 3500–4200 K, and deghost swaying petals in post.
Keep the result natural and lively — let the night breathe.
Light Painting Cherry Blossoms
With a small flashlight, test gentle feathering passes for subtle petal sparkle.
Then switch to an LED light wand for smooth, even strokes that wrap trunks and branches like moonlight — perfect along Meguro River’s quieter bends after 10 PM.
Experiment with creative angles: sweep from low to rake texture across bark, trace from behind to craft glowing halos, or arc from the side to sculpt depth without blowing out delicate pinks.
Flashlight Enhancement Methods
A small flashlight and deliberate movement sculpt petals, separate branches from neon lighting, and play off urban graffiti for rebellious contrast. Keep shutter times slow, breathe, then paint softly — no harsh blasts.
Feather edges with a diffuser, sweep upward arcs, backlight for glow, hide the beam source, and sync with passing cyclists for dynamic light trails.
LED Light Wand Techniques
An LED light wand sweeps colour modes along low branches, pausing to paint illuminated petals during long exposures. Shiba Park and Sumida’s riverside paths feel wonderfully open after midnight.
Keep ISO low, shutter long, and move smoothly. Try warm tones for romance, cool hues for neon drama — no permits required, just freedom.
Creative Illumination Angles
When blossoms turn to velvet silhouettes after midnight, the magic comes from where the light lands.
Backlight for haloed fringes, low sidelight to reveal texture, upward beam through clusters, cross-light to carve branches, and aerial sweep to paint pathways.
Sculpt petals with artificial lighting and let the angles tell the story.
Smartphone Cherry Blossom Photography
Smartphones can work magic under Tokyo’s blossoms. Use Portrait mode to sculpt creamy background blur around petals and friends.
When the sun blasts through branches or lanterns glow at dusk, switch on HDR to balance bright skies and inky shadows.
Stitch sweeping paths along Meguro River or Ueno Park with Panorama for an epic ribbon of pink.
For finer control, try third-party apps that unlock manual focus, ISO, and shutter speed — perfect for taming wind-blown branches and squeezing extra detail from twilight scenes.
Portrait Mode for Depth Effects
Portrait mode makes a single blossom or smiling face pop, giving crisp subject isolation while turning the rest of the park into a creamy pastel haze.
Shinjuku Gyoen and Ueno Park are perfect testing grounds.
Pay attention to bokeh simulation quality: check edges around hair and petals for odd blur halos.
For best results, stand about 1 to 2 metres from your subject with the nearest blossoms slightly in front and behind them — instant depth, instant wow.
Subject Isolation from Background
Use Portrait mode to pop a single blossom or a friend’s face against a dreamy wash of pink.
Tap to lock focus, step back then zoom slightly, keep backgrounds distant, shoot at eye level, and avoid busy patterns.
Move closer and let Ueno Park’s arches or Meguro River’s bridges frame the hero for maximum impact.
Bokeh Simulation Quality
Edge detection and blur rendering determine whether faux bokeh looks delicious or distracting.
Test bokeh simulation on busy Tokyo backdrops — lanterns in Asakusa, neon in Shinjuku — then check for halos around petals and stray hair.
Boost colour contrast with gentle saturation, tap to focus on a blossom, lock exposure, and keep highlights tame. If masks wobble, shoot again.
Optimal Distance from Blossoms
Distance is the make-or-break factor for dreamy bokeh. At two feet: crisp faces, soft blooms.
At three feet: balanced separation. At arm’s length: creamy backgrounds.
Near clusters: emphasise texture. Stepping back adds context.
Balance blossom cluster proximity with background separation — think shrine roofs, lanterns, or river glints. Portrait Mode rewards exploration.
HDR Mode for High Contrast Scenes
HDR on a smartphone helps balance a blazing Tokyo sky with inky cherry tree branches, keeping petals luminous without turning the scene into a flat pastel pancake.
To avoid an over-processed look, tap to expose on the blossoms, lower exposure slightly, and keep the phone steady so textures stay crisp.
If the light is soft — think overcast mornings at Shinjuku Gyoen — or when you want dramatic silhouettes at sunset along Meguro River, switch HDR off for cleaner contrast and faster shooting.
Balancing Bright Sky and Dark Branches
On a high-contrast day, HDR evens tones so dark branches keep texture while bright skies don’t blow out.
Enable HDR auto, lower the exposure slider, tap focus on blossoms, shoot at golden hour, and shade the lens with your hand to reduce flare.
Quick tweaks, big freedom — no tripod needed, just timing and touch.
Avoiding Over-Processed Look
Restraint keeps smartphone blossom shots looking natural. Ease HDR strength so petals keep gentle translucence rather than plastic shine.
Nudge exposure down, add minimal clarity, and let shadows breathe. Favour subtle filtering over aggressive smoothing, and apply a faint editing glow only at dusk.
Trust real colour, avoid neon pinks, and keep contrast soft.
When to Turn HDR Off
Sometimes the smartest move is to ditch HDR and let the scene breathe. Under Tokyo’s sakura, HDR settings can flatten sparkle and mute natural light.
Toggle it off for backlit petals at golden hour, moody clouds over Shinjuku Gyoen, lantern-lit evenings in Ueno, reflections on the still Sumida River, and fast-moving festival crowds where speed matters more than tonal range.
Panorama for Wide Cherry Blossom Scenes
Panorама mode is brilliant for vertical panoramas that capture towering cherry trees and temple gates in one elegant frame.
Plant feet, rotate from the hips, keep the phone level, and move at a steady, metronome-like pace.
Ask friends to freeze during the sweep.
To prevent stitching errors, avoid moving subjects, lock exposure and focus before starting, and pivot from a single point rather than stepping forward.
Vertical Panorama for Tall Trees
For skyscraper-tall sakura like the giants in Shinjuku Gyoen or along Ueno Park’s main path, a vertical panorama lets the frame climb from gnarled roots to cotton-candy canopies.
Spot trunks with textured bark, anchor feet and tilt gently upward, lock exposure on mid-tones, align light gaps between branches, and finish with sky as an airy finale.
Smooth Panning Techniques
Smooth panning is the secret sauce that makes sprawling sakura scenes look seamless. Practise steady camera movement along Sumida River paths at sunset — elbows tucked, hips pivoting, pace calm.
Lock exposure, pre-visualise start and end points, and glide. Breathe, relax, and let Tokyo unfurl across the frame.
Stitching Error Prevention
Lock AE/AF before panning, keep the phone level using the grid overlay, overlap 30% for safer pixel stitching, avoid moving crowds by waiting a beat, and check software compatibility before shooting.
Stable footing near Sumida Park’s river paths and calmer breezes make stitching behave.
A little foresight saves panoramas from ghost branches and wobbly horizons.
Third-Party Apps for Manual Control
For tighter control under Tokyo’s fluttering sakura, third-party apps like ProCamera and Halide give pro-style tools without lugging a DSLR.
Switch on RAW shooting to preserve fine petal textures and keep highlight detail in bright midday light.
Nudge manual focus to pinpoint a single blossom, then use focus peaking to lock sharpness as the breeze teases the branches.
ProCamera and Halide Options
ProCamera and Halide hand over real control — ISO, shutter, and white balance — so blossoms glow without blur.
Camera stabilisation features keep handheld frames crisp, while smart tools tame lens flare at sunrise along the Sumida.
Lock focus on a single petal, tune exposure for pale pinks, use zebra warnings, tap histograms, and save custom presets for quick deployment.
RAW Shooting Capabilities
Third-party apps like Halide, ProCamera, and Lightroom Mobile let the phone capture unprocessed image data, preserving every subtle pink gradient and tricky highlight along the Sumida’s shimmering water.
RAW sidesteps heavy camera firmware processing, giving expansive latitude for editing.
Push shadows under lantern-lit branches, tame neon reflections, and colour grade freely without compression artefacts.
Manual Focus for Precision
Manual focus is the small slider that can make or break a sakura shot. Use third-party apps for precision control, locking crisp stamens against buttery bokeh while crowds flow by the Sumida River.
Set focus peaking then glide the slider, tap infinity for skyline frames, nudge macro for petal veins, pair with slight exposure tweaks, and save custom focus presets.
Post-Processing Cherry Blossom Photos
Post-processing makes sakura shots sing. Start by nudging colour toward soft magentas while taming greens, then balance exposure and contrast so petals glow without blowing out highlights.
Finish with gentle sharpening and clarity to reveal filigreed edges.
Finally, clean the frame by cloning out stray wires, crowded elbows, or rogue signage — Tokyo is gorgeous, but a quick tidy lets the blossoms steal the show.
Colour Enhancement Techniques
To make Tokyo sakura pop, gently boost pinks and whites — think petal-fresh, not neon cotton candy. Use the HSL sliders to nudge magentas and reds for blossoms.
Tweak yellows and greens to keep leaves natural, and refine luminance so petals glow without losing texture. Watch saturation carefully — if skin tones turn orange or clouds lose detail, back off.
Boosting Pink and White Tones
A gentle push of pinks and a crisp lift of whites can turn a decent sakura shot into a postcard-ready keeper.
Warm the white balance slightly at dawn, nudge exposure to protect petals, lift highlights and soften whites, add gentle clarity near blossoms, and mask branches to preserve sky.
Subtle pink enhancement and clean highlights make the difference.
HSL Slider Adjustments
HSL sliders are where cherry blossom colours really sing. Shift magentas slightly toward pink, warm reds, and cool greens to let petals pop against riverside parks.
Then refine luminance — lift pinks, dim blues — so sunset reflections glow. Target hues separately, preserving sky depth while letting Ueno and Chidorigafuchi blossoms sparkle.
Avoiding Oversaturation
Nuclear pinks are not the goal. Keep Tokyo’s sakura believable — glowing, not blaring — by easing colour saturation, protecting delicate whites, and letting natural light do the heavy lifting.
Nudge saturation gently and prefer vibrance. Tame magenta hues first, use selective masks on blossoms, add noise reduction before sharpening, and compare against neutral grays for reality checks.
Exposure and Contrast Balancing
Taming bright petals and deep shadows is where sakura shots come alive. Start by recovering blown highlights to rescue delicate blossom texture.
Then lift shadow details to reveal bark grain, lanterns, and temple roofs hiding in the gloom.
With local adjustment brushes, gently paint contrast and exposure where needed — light on the blossoms, a touch darker on the sky — like giving each element its own spotlight.
Recovering Blown Highlights
For true overexposure correction and highlight recovery, lower exposure then nudge whites, pull highlights gently, use RAW always, enable soft clipping warnings, and apply selective masks on petals. A swift, deft touch saves petal texture and sky nuance.
Control the light — don’t let it tame you.
Lifting Shadow Details
Gentle shadow lifting preserves gritty bark texture while revealing hidden petals, lantern cords, and kimono patterns. Go slow — raise shadows, then add contrast enhancement to keep depth and punch.
Aim for dawn shots along Meguro River; balanced RAW files respond beautifully. Watch histogram edges, avoid haze, and keep blacks anchored.
Local Adjustment Brushes
Local adjustment brushes nudge specific petals, faces, and lanterns without flattening the whole scene.
Selectively boost contrast along branch lines, kiss highlights onto blossoms, and warm skin at twilight festivals.
Brighten eyes during hanami, deepen lantern reds, soften harsh bark, lift blossom highlights, and cool neon spill. Gentle, precise, and liberating.
Sharpening and Clarity
Use targeted sharpening to reveal silky veins and subtle edges without turning blossoms into crunchy cereal.
Nudge clarity to bring out branch grain and bark micro-contrast, but mask the sky and soft backgrounds so the scene stays airy and natural.
Watch for over-sharpening halos around petals and twigs. If you spot bright outlines, ease radius, lower amount, or add a touch of masking — Tokyo’s spring glow should shimmer, not sizzle.
Enhancing Petal Texture
Gentle texture enhancement beats brute-force sharpening for petal close-ups.
Use masking to target petals only, apply micro-contrast rather than global clarity, balance dehaze with softness, blend high-pass at low opacity, and finish with subtle colour noise reduction.
Aim for tactile, airy detail — never crunchy.
Branch Detail Emphasis
Crisp branch detail quietly anchors the scene and adds a sense of place. Nudge clarity and micro-contrast on bark, then mask blossoms to maintain softness.
Crop so twigs cradle temples or rivers, add subtle texture with a low-radius sharpen, and celebrate tactile, wind-kissed wood. Branch focus guides the eye like a gentle trail.
Avoiding Over-Sharpening Halos
Zoom to 100–200% and scan high-contrast edges where pale petals meet dark branches or blue sky. Lower radius and raise amount modestly, use masking on edges, prefer texture over clarity, add micro-contrast selectively, and finish with subtle dehalo tools.
Preserving velvet textures and crisp twigs without glowing outlines is the goal.
Removing Distractions
Remove stray tourists with careful cloning, one bench at a time, so blossoms keep centre stage. Use spot removal tools to zap sensor dust, signage specks, and rogue petals, then tidy backgrounds by softening busy railings or bright vending machines that steal the eye.
Think subtle — feathered brushes, low-opacity healing, and small strokes keep textures natural while preserving that dreamy Tokyo sakura glow.
Cloning Out Tourists
A clean cherry blossom frame is absolutely possible, even if Ueno Park felt like a festival of elbows and selfie sticks.
Shoot a tripod time-lapse for clean plates, auto-align then mask moving people, use Content-Aware sparingly, heal shadows and reflections, and preserve branch edges carefully.
Nimble edits, not heavy-handed surgery.
Cleaning Up Backgrounds
With tourists whisked away, attention shifts to background clutter — the stray signpost, neon vending glow, or sagging utility wire sneaking through the sakura haze. Frame low and tight, angle branches to mask distracting elements, and step sideways to dodge signage.
Seek clean backdrops: riverside reflections in Nakameguro, palace moats, dawn mist in Shinjuku Gyoen.
Spot Removal Tools
Spot removal tools turn tiny Tokyo distractions into vanishing acts, perfect for scrubbing out a rogue petal smear or a blinking vending-machine halo.
Use a soft brush, sample nearby textures, feather edges lightly, zoom to 200% for accuracy, and avoid repetitive cloning patterns that create obvious tiling.
Swift, precise, and playful.
Creative Cherry Blossom Photography Ideas
Ready to get playful with Tokyo’s sakura? Frame bold silhouettes at sunset along Sumida Park, chase glassy reflections in the moat at Chidorigafuchi, then add energy with motion blur and panning as cyclists glide under pink canopies.
For a final flourish, try Intentional Camera Movement along Meguro River, sweeping the camera in gentle arcs to paint dreamy pastel streaks without needing fancy gear.
For more creative location ideas across the city, our guide to Tokyo’s most Instagram-worthy photo spots covers angles beyond sakura season.
Silhouette Photography at Sunset
Sunset in Tokyo turns sakura into striking silhouettes, with dark tree forms etched against a blushing pink sky — perfect for bold, graphic frames.
Head to Sumida Park or along Meguro River, position subjects under the blossoms, and meter for the sky.
Shoot wide at 1/500–1/1000 s, keep ISO low, and wait for that fiery minute after the sun kisses the horizon.
Dark Tree Forms Against Pink Sky
The hour before daylight slips away is prime time for cherry blossom silhouettes — bold, inky branches etched against a cotton-candy sky.
Expose for the sky, not the trees, for maximum contrast.
Seek west-facing banks at Sumida Park, watch reflections at Chidorigafuchi moat, align temple roofs at Asakusa, use 85–135mm for compressed layers, and bracket exposures to keep highlights pure.
People Silhouettes Under Blossoms
Turn the evening promenade into a stage and let passersby become graphic silhouettes beneath the sakura canopy.
Ueno Park’s Shinobazu Pond and Sumida Park by the river work beautifully, where sunset glows low and warm.
Stand slightly uphill, meter for sky, and wait for couples, cyclists, and dogs to drift through. Capture shadow play amid petal rain.
Dramatic High Contrast Images
From playful promenade silhouettes, the mood sharpens into bold, inky contrasts that make petals and people pop like cut-paper art against a blazing sky. Odaiba’s boardwalk or Sumida Park bridges at golden hour are ideal.
Face west and meter for sky, drop ISO and tighten aperture, shoot profiles, frame branches low, and bracket exposures.
Reflection Photography Techniques
Reflection shots come alive in Tokyo after a spring shower — puddles along Ueno Park paths or Asakusa side streets turn petals into dreamy doubles. A low angle and a quick tilt of the phone do wonders.
Rivers and moats like Chidorigafuchi act as natural mirrors at blue hour, where a polarizing filter tames glare and a slow shutter smooths ripples for a painterly sheen. Glass building reflections around Marunouchi and Shinjuku add a sleek, urban twist.
Puddles After Rain
Tokyo’s cherry blossom magic lingers in puddles that turn sidewalks into pocket-sized mirrors. Act fast before ripples fade.
Crouch for ultra-wide symmetry, nudge petals for texture, wait for clean skies, use backlight at dusk, and frame crosswalk lines for graphic impact.
Reflections after rain deliver playful puddle distortion and cinematic symmetry — no ticket required.
River and Moat Mirrors
Tokyo’s broad rivers and storied castle moats stretch blossoms into glassy channels like watercolour paintings.
For crisp water reflections, arrive at dawn when breezes sleep and crowds haven’t stirred.
Seek boat symmetry under Chidorigafuchi’s branches, framing oars mid-stroke. Shoot low, use a polarizer lightly, and bracket exposures.
Step away, reframe, breathe.
Glass Building Reflections
Tokyo’s gleaming façades double cherry trees across office towers and boutique hotels like pop-art postcards.
Scout Marunouchi and Shinjuku at golden hour for neon reflections and skyscraper distortion, then wait for windless pauses.
Tilt up from sidewalk glass, frame skybridge grids, use a polarizer to tame glare, try night shoots after rainfall, and align blossoms with corner seams.
Motion Blur and Panning
For motion magic, slow the shutter and pan gently to follow falling petals, letting them streak into soft pink trails that feel like spring confetti.
Track people walking under the trees along Meguro River or in Ueno Park, keeping subjects crisp while the background blurs into energetic ribbons.
When the wind stirs branches, a tripod, ND filter, and 1/5–1 second exposures turn swaying boughs into dreamy brushstrokes.
Following Falling Petals
A local eye tracks petal drift along Sumida riverside breezes, catching falling grace as pink confetti spins.
Pan at 1/15–1/30 s near Meguro River bridges, backlight petals at sunrise, pre-focus along wind lanes, use ND filters for silky streaks, and pivot with gusts rather than against them.
Quick feet, steady breath, fearless shutter drags.
People Walking Under Trees
People drifting under sakura tunnels turn motion into the story. Set a slow shutter, pan with footsteps, and let trails of pink and denim blur into freedom.
At Nakameguro or Ueno Park, read crowd density like tide charts. Anchor a sharp subject, swing with motion, and embrace joyful, streaked serendipity.
Wind Movement in Branches
A gust rattles the branches and suddenly the sakura aren’t just scenery — they’re performers.
Lean into wind sway at Shinjuku Gyoen’s open lawns or Sumida Park’s riverside gusts.
Use 1/10–1/4 s for blur, pan at chest level, anchor one sharp trunk, shoot crosswind angles, and use an ND filter in daylight.
Chase twilight; let lanterns paint trails.
Intentional Camera Movement (ICM)
Try vertical panning along trunks at Shinjuku Gyoen for silky, impressionist streaks.
Experiment with zoom burst effects on a tripod at Chidorigafuchi to send petals exploding from the frame like fireworks.
For true abstract cherry blossom art, use a slow shutter (1/5–1 s), nudge the camera in gentle arcs, and let the pastel pinks blend into dreamy swirls — golden hour is the ideal time to experiment.
Vertical Panning for Impressionism
Point the lens at a column of cherry blossoms and drag the camera straight up or down during a longer exposure, turning real branches into silky streaks of blush and white.
Use 1/4–1 second shutter, lock elbows and breathe out, pan vertically and steady, backlight blossoms, and seek simple backgrounds.
Shinjuku Gyoen’s long alleys are ideal at dawn’s soft glow.
Zoom Burst Effects
A zoom burst turns the scene into a radiant tunnel of pinks and whites racing toward the frame’s centre.
At Shinjuku Gyoen at golden hour, start at 1/10 s, twist the zoom smoothly, and embrace lens flare for sparkle.
Try tripod shots at Chidorigafuchi, count a steady one-two while zooming, and apply gentle colour grading to keep tones luminous.
Abstract Cherry Blossom Art
For abstract ICM results: drag shutter at 1/4–1 s, use low ISO and a narrow aperture, pan along branch lines, spin during neon reflections, and review then refine.
Each pass produces a unique result — the unpredictability is the point.
Meguro River’s lantern-lit banks after 9 PM offer ideal conditions for abstract night sakura.
Cherry Blossom Photography Etiquette
Before snapping away, etiquette matters. Respect hanami party spaces like little picnicking islands, and never step on tarps or squeeze through groups just for a shot.
Protect the trees by avoiding branch pulling, petal shaking, or leaning on trunks.
In tight crowds, keep tripods compact or skip them to stay nimble and courteous. Many parks discourage flash near night illuminations, so embrace ambient glow, bump ISO, and let those blossoms shimmer naturally.
Respecting Hanami Party Spaces
Think of hanami lawns like living rooms under the blossoms — if a tarp or rope marks a spot, feet off and lenses out from the edge.
Keep tripods and bodies from blocking anyone’s picnic panorama; crouch low, slide sideways, and let their view breathe while you snag that dreamy shot.
Snap quickly, smile a thank-you, and move on so everyone gets their moment under the pink confetti.
Not Stepping on Reserved Areas
Blue tarps mark reserved hanami spots — think temporary private property shaped by cultural restrictions and local courtesy.
A respectful shooter stays nimble and off the tarps.
Spot tape, signs, or tarps, ask a nearby group politely if unsure, use path edges for framing, kneel rather than step in, and pivot to less-crowded groves. Freedom with finesse.
Avoiding Blocking Party Views
Think like a considerate ninja: pause, scan for eye lines from blankets, and shift a step. Smart vantage point selection — edges of paths, bridge railings, gentle berms — keeps views open.
Watch natural crowd dispersal at sunset in Ueno and along Meguro River; slip into gaps, snag the shot, exit smiling.
Quick Shooting and Moving On
The smoothest etiquette is a quick click-and-glide. Snap, sidestep, and let hanami parties breathe.
Pre-frame shots while walking, step clear after two clicks, use silent shutter mode, keep gear minimal, and yield to picnic borders.
Think runway energy — move lightly, shoot decisively, and keep the good vibes flowing.
Tree and Branch Protection
A considerate shooter never shakes branches for extra petals, stays on the marked paths to protect delicate roots, and resists the urge to climb trees — no shot is worth a scraped trunk or a park ranger’s glare.
Treat each sakura like a fragile museum piece, and the canopy rewards with natural confetti, clean compositions, and zero guilt.
No Shaking Branches for Petals
Don’t shake cherry blossom branches for that petal rain shot. Local caretakers prioritise branch stability, and even slight forced movement adds stress to the tree.
Let the breeze do the choreography. Wait for gusty moments after trains pass, use burst mode for falling petals, frame reflections in water, backlight blossoms at golden hour, and compose tighter to suggest motion.
Staying on Designated Paths
Footpaths are lifelines for the trees and the turf beneath them. Treat path restrictions as creative prompts, not chains.
Follow visitor guidelines, then work the edges: kneel low, angle upward, frame lanterns, bridges, and drifting petals for depth.
Protect the roots, keep tripods on pavement, and wait for gaps in foot traffic.
Patience buys pristine bokeh and guilt-free brilliance.
Not Climbing Trees for Shots
Climbing sakura trees is a hard no — both for safety and for the trees’ fragile health. Security watches, fines happen, and broken bark means fewer blooms next year.
Choose creative ground-level angles instead: shoot low with wide lenses, use reflections in puddles, frame with foreground petals, stand on public steps never trunks, and wait for breezes to capture motion.
Tripod Consideration in Crowds
Tripods in Tokyo’s sakura crowds need finesse. Compact tripod solutions that fold small and hug close to the body keep pathways clear and tempers calm.
During peak time, handheld shooting is king — boost ISO, use image stabilisation, and brace against railings to snag crisp frames without becoming a sidewalk obstacle.
If extra support is needed, a monopod offers a courteous middle ground — ninja balance, not sprawling spider legs.
Compact Tripod Solutions
A compact tripod delivers stability without drama — portable support that tucks away fast between frames.
Use tabletop legs on benches or walls, deploy low-profile ground setups, choose quick-fold carbon models, add rubber feet for silent grip, and practise swift one-minute compositions.
Think nimble moves, respectful spacing, and clean compositions.
Peak Time Handheld Shooting
Peak bloom calls for nimble handheld shooting to keep footpaths flowing. Skip tripods during rush hours; locals glide, you should too.
Aim for sunrise serenity at Chidorigafuchi, stabilise with elbows tucked, exhale as you press.
Boost ISO, favour faster shutters, and savor the moving freedom of shooting without a fixed anchor.
Monopod Alternatives
Crowded sakura lanes beg for support that won’t block a single stroller’s path.
Clever, portable monopod alternatives include a wrist strap with sensor-shift stabilisation, a foldable chest brace, a trekking pole with a camera mount, a mini tabletop tripod pressed to railings, and a beanbag on bridge ledges.
Lightweight support keeps everyone moving and frames razor-sharp.
Flash Photography Restrictions
Flash can be jarring under the blossoms, startling nearby photographers and blowing out delicate pinks.
It also disrupts the calm hanami atmosphere, where soft lanterns and moonlit petals set a serene, whisper-quiet mood.
Use flash only when clearly permitted — think designated festival zones or guided night illuminations — and even then, dial it down with low power, bounce techniques, or a diffuser for gentle, respectful light.
Disturbing Other Photographers
A burst of light in a crowd of tripods and long exposures can ruin someone’s carefully timed shot.
Avoid crowd interference with sharp etiquette awareness — everyone gets their shot, nobody loses theirs.
Kill flash near long exposures, step wide rather than into frames, whisper rather than shout, shield screens at night, and confirm queues politely.
Affecting Hanami Atmosphere
Locals know petals glow naturally under lanterns; sudden bursts jar conversations, startle kids, and flatten colour. In high crowd density spots like Ueno Park or Meguro River, flashes ripple through groups, breaking that mellow buzz.
Choose higher ISO, slower shutter, and steady breath — preserve serenity, capture authenticity.
When Flash Is Acceptable
There are moments when a flash earns its keep. Use it sparingly with smart lighting techniques — soft, feathered pops, never blinding bursts.
Acceptable situations include dim lantern paths at Chidorigafuchi, fill-flash under Nakameguro bridges, backlit petals at dawn, overcast shrine courtyards, and quick portraits during light rain. Cherry blossoms and nearby visitors deserve gentle glow.
Peak Bloom Stages for Different Effects
Timing changes everything. At early bloom (Kaika), buds and first blossoms make crisp close-ups around Chidorigafuchi’s moat pop.
Full bloom (Mankai) turns Meguro River into a glowing tunnel perfect for wide angles and night shots.
Petal fall (Hanafubuki) delivers a flurry of pink confetti at Ueno Park that begs for slow-motion video. Post-bloom green leaves offer a fresh backdrop at Shinjuku Gyoen that flatters portraits with soft spring-light bokeh.
Early Bloom Photography (Kaika)
Kaika offers charming subjects — tight buds and the first brave blossoms — perfect for images that whisper anticipation and promise, like a prologue to spring.
Photographers can head to Chidorigafuchi’s quieter paths at dawn or Kitanomaru Park on weekday afternoons, using a 50mm or short telephoto to isolate fresh petals against still-bare branches.
Bonus: crowds are thinner before peak bloom, so move freely and work the changing light without playing tripod Tetris.
Buds and First Flowers Opening
The first sakura buds in Tokyo swell like tiny lanterns, hinting at pink fireworks to come.
Frame petal buds and first blooms at low angles, catching glints of river light and crisp sky.
Go nimble, travel light, and chase gentle backlight. Key early-bloom spots: Chidorigafuchi moat reflections, Ueno Park dawn paths, Yanaka Cemetery alleys, Meguro River footbridges, and Shinjuku Gyoen glasshouse edges.
Anticipation and Promise Theme
Before the city turns fully pink, early bloom — kaika — sets an irresistible mood of anticipation.
Frame tight clusters of first petals against steel and glass for bold urban contrast, then pan to lantern-lit shrines for cultural symbolism.
Hit Chidorigafuchi’s moats, Nakameguro bridges, and Ueno’s pathways. Go low, catch reflections, and embrace negative space.
Less Crowded Shooting Conditions
Early-bloom Kaika delivers off-peak calm, crowd-free paths, and soft, moody light — perfect for minimalist compositions and intimate details.
Think dew-speckled buds, gentle pastels, and playful negative space.
Arrive at blue hour, target riverside rows, use longer lenses, frame budding branches, and scout weekday mornings for the best conditions.
Full Bloom Photography (Mankai)
At mankai, Tokyo’s sakura form billowing canopies of petals — maximum flower coverage that turns riversides and boulevards into pastel tunnels.
This is the moment for classic imagery: symmetrical bridges at Meguro River, reflective moats at Chidorigafuchi, and postcard frames at Shinjuku Gyoen.
Arrive at sunrise for soft light and space to breathe.
Crowds peak too, so think weekday mornings, telephoto crops from elevated spots, or a quick escape to lesser-known stretches like Kanda River.
Maximum Flower Coverage
Mankai — full bloom — is when branches look frosted in pink and every breeze sends petals drifting like confetti.
Maximum coverage means bold framing, wide angles, and playful movement.
Shoot sunrise at Chidorigafuchi, use polarizers for sky pop, backlight petals, frame reflections, and embrace gentle wind for natural motion.
Classic Sakura Imagery
A true Tokyo spring snapshot starts with Mankai — those few electric days when every branch bursts into fluffy pink clouds.
Frame temples at Asakusa, mirror petals on Meguro River, and chase petal patterns swirling over ponds in Shinjuku Gyoen.
Shoot wide for canopy grandeur, then go macro for blossom symbolism — five-petalled stars, dew-bright stamens, soft gradients.
Highest Crowd Levels at Peak Bloom
Mankai week brings perfection and epic crowds simultaneously. Crowd density spikes at peak hours — late morning through sunset — when Ueno Park and Meguro River feel like slow-moving parades.
For breathing room, aim for dawn, drizzle, or weeknights; chase side streets and river bends. Dawn sprints, weeknight wanders, and drizzle magic all deliver cleaner frames.
Petal Fall Photography (Hanafubuki)
When Hanafubuki hits, photographers chase the cherry blossom snow along Sumida Park and Chidorigafuchi, where gusts turn branches into confetti cannons — keep shutters fast to freeze the swirl.
Afterward, Ueno Park’s paths and Meguro River’s banks glow with soft pink petal carpets; aim low, shoot along leading lines, and use a polarizer to tame glare on wet pavement.
Arrive early after windy nights or light rain, pack a clear umbrella for sparkle, and be ready to laugh when petals sneak into your hair.
Cherry Blossom Snow Effect
During peak bloom, brief gusts release a mesmerising snow effect — shimmering petal snowfall drifting across canals and courtyards.
Stand leeward on Sumida Park bridges, backlight petals near Ueno’s ponds, use 1/250 s for flutter and 1/60 s for streaks, wear dark clothing for contrast, and track forecasted breezes around sunset.
Timing, angles, and wind matter.
Petal Carpets on Ground
Gusts settle and Tokyo swaps swirling petals for plush pink rugs underfoot — hanafubuki’s quieter encore.
Seek petal carpets along Chidorigafuchi paths, Sumida Park’s riverside, and Ueno’s pond edges; early morning light makes ground coverage glow.
Aim low, tilt up, and let ripples or bicycle tracks add playful texture. Breezes rearrange patterns — free, living canvases.
Fleeting Beauty Documentation
A sweet spot arrives just after peak bloom as Tokyo stages hanafubuki — petal blizzards that turn sidewalks and waterways into gentle storms of pink.
Time shoots for gusty afternoons, chasing seasonal foliage drama and urban contrasts — sakura snow against neon, trains, and rivers.
Move light, shoot fast: Chidorigafuchi boats at low angles, Sumida Park ferry wake, Meguro River bridges.
Post-Bloom Green Leaves
Once the petals fade, Tokyo flips to a fresh spring palette, with glossy green leaves catching dappled light — perfect for crisp, textured shots that feel like nature’s reset button.
With fewer tourists around, photographers can linger on bridges in Chidorigafuchi or stroll Yanaka’s side streets, framing serene canals and luminous foliage without elbow duels.
Lean into the renewal theme: pair soft morning backlight with leaf veining, shoot puddle reflections after a spring shower, and add a pop of colour — vermilion shrine gates or a bright bicycle — for a playful, story-rich composition.
Fresh Spring Foliage
Tokyo’s cherry spots don’t clock out after petal fall — the trees shift into a luminous canopy of fresh green that is fantastic for photography.
Chase crisp light in parks and along rivers, framing urban wildlife like herons and darting sparrows against leaf-glow.
Key spots: backlit leaves at Shinjuku Gyoen, reflective ponds in Rikugien, riverside frames along Meguro, wide angles at Yoyogi’s lawns.
Fewer Tourists After Peak Bloom
Quiet streets and roomy park paths make post-bloom Tokyo a gift for photographers who hate jostling tripods.
Find crowd-free moments at Yanaka Cemetery and along Meguro River’s quieter stretches, where emerald canopies frame lingering petals.
Prioritise off-peak visits — early weekdays, just after sunrise. Shoot reflections on calm canals and pivot to telephoto for clean backgrounds.
Nature’s Renewal Theme
Even after the petals fade, Tokyo flips the set to a fresh scene — lush, lime-green canopies that glow in soft morning light and scream renewal to any lens.
Frame post-bloom leaves against an urban street or modern skyline, chasing contrast, texture, and that crisp, reborn vibe.
Backlit leaves at sunrise, reflections in canal glass, wide angles under arches, and rain-kissed pavement all deliver.
Transportation and Logistics for Cherry Blossom Photography
Before sunrise, you’ll want a game plan: catch the first trains to Ueno or Chidorigafuchi, beat the crowds, and enjoy that cool, rosy light — coffee in hand, tripod ready.
Pack smart with a small roller or sling, clamp-on tripod feet for bridges, spare batteries in a warm pocket, and a rain cover because Tokyo’s spring can be cheeky.
For ambitious multi-spot days, cluster routes — Sumida Park to Asakusa alleys, then Yanaka’s lanes — and book lodging near stations like Ueno or Kanda for quick hops between golden hours. Our JR Pass vs.
Tokyo Metro Pass comparison guide can help you choose the most cost-effective rail option for a multi-park shooting day.
Early Morning Access Strategies
Beating the crowds starts with knowing the first train times, because catching that pre-dawn local or rapid line can put you under blooming arches at Ueno Park or along Meguro River before the latte crowd wakes up. If driving, scout coin-parking lots near hotspots the night before.
Smart move: book a hotel within a 10–15 minute walk of your chosen grove — Asakusa, Ochanomizu, or Kanda make great bases — so you can slip out, tripod in hand, and be shooting in that buttery blue hour with zero stress.
First Train Arrival Times
Check train schedules the night before and listen for station announcements promising earlier service on peak bloom weekends.
Key lines and stations: Yamanote Line to Ueno and Komagome, Chuo Line Rapid to Kichijoji, Ginza Line to Asakusa, Keio Inokashira Line to Inokashira-koen, and Toei Oedo Line for Shinjuku Gyoen access.
Freedom lovers hop aboard pre-dawn, chasing pastel skies and empty paths.
Parking Near Popular Spots
A smart driver arrives early, slips in quietly, and parks close without ruffling petals or neighbours.
Target coin lots near Ueno Park’s Shinobazu exit, Sumida’s side streets by Tokyo Skytree, and Chidorigafuchi’s evening-rate garages.
If full, embrace parking alternatives — manga-café overnight lots, suburban park-and-ride hubs, or car-sharing drop zones. Beat sunrise, win freedom.
Hotel Location Considerations
Choose a base camp that launches pre-dawn missions with zero fuss. Pick hotels near Yamanote or Ginza Line hubs for swift, sleepy-eyed exits.
Key options: Ueno/Okachimachi for walking distance to Ueno Park, Asakusa for Sumida blooms, Chiyoda for Chidorigafuchi boats, Meguro for canal glow, and Kichijoji for Inokashira calm. Bonus: room views over rivers feel cinematic at sunrise.
Equipment Carrying Solutions
Choosing how to carry gear matters in Tokyo’s blossom crowds — backpack for balance on long walks, sling bag for quick lens swaps on packed trains.
Pack a compact rain cover and microfiber cloth; spring showers and drifting petals can turn lenses misty fast.
Bring two spare batteries at minimum — cold mornings and heavy live view drain power quicker than you’d think, so you won’t miss that perfect burst of petals.
Backpack vs. Sling Bag
Weigh backpack comfort against sling bag convenience for quick moves between Nakameguro’s canal and Ueno Park’s alleys.
Swap lenses fast on bridges, balance weight during long strolls, slide through crowds with ease, secure valuables on metro sprints, and pivot from dusk glow to neon.
Keep it light, nimble, and ready for spontaneous detours.
Weather Protection Gear
A sudden Tokyo drizzle can flip a blossom shoot from dreamy to risky in seconds, so rain-ready carry solutions are nonnegotiable.
Pack weather-resistant clothing, then shield lenses with rainproof accessories and quick-draw covers.
Favour roll-top backpacks with sealed zippers; they shrug off squalls along Meguro River. Add microfiber towels, silicone lens hoods, and a compact umbrella on a strap clip.
Backup Battery Importance
Dead batteries at peak bloom along Chidorigafuchi is the saddest haiku. Pack a slim power bank and a reliable battery backup for fast swaps between boats and metro hops.
Carry two spare batteries, a pocket-size power bank, a USB-C fast cable, an insulated pouch for cold mornings, and charge during lunch breaks. Freedom thrives when gear keeps humming.
Multi-Location Shooting Plans
Planning a multi-park shoot is easy: map fast metro hops between hotspots like Ueno, Shinjuku Gyoen, and Meguro River, using JR Yamanote and Hibiya lines to keep transfers quick.
Budget 60–90 minutes per location for golden compositions — arrive early for soft light, then leave buffer time for surprises like street performers or a sudden petal shower.
Slot a lunch break near stations with reliable options — ekiben from Tokyo Station or noodles by Shinjuku-Sanchome — so energy stays high and gear stays moving.
Metro Routes Between Parks
Tokyo’s metro turns a cherry blossom crawl into a smooth, camera-happy sprint between parks.
Key routes: Ginza Line from Ueno Park to Asakusa, Chiyoda Line from Yoyogi Park to Nezu, Hibiya Line from Ebisu to Nakameguro, Oedo Line for Shinjuku Gyoen access, and JR Yamanote for looping park hops.
Trains glide fast, signage is friendly, and transfers feel effortless.
Time Allocation per Location
Budget 90 minutes per stop: arrival scout, test frames, then decisive shooting. Prioritise sunrise for soft colour contrast and late afternoon for juicy shadow play.
Add 15-minute transit cushions, because trains glide yet crowds surge. If a scene sings, linger; if light dies, pivot fast.
Freedom favours nimble plans.
Lunch Break Planning
A well-timed lunch break keeps energy high and gear steady without missing a single petal. Slot lunch between late-morning shoots and golden-hour scouting.
Pack onigiri, fruit, and electrolyte tabs, sit near restrooms and shade, choose stations with lockers, scout benches facing trees, and set 30-minute timers. For midday city views, hop lines fast and return refreshed.
Accommodation Near Blossom Spots
Staying within walking distance of Ueno Park lets photographers roll out at blue hour, beat the crowds, and stroll back for a midday card dump — no sardine-can trains required.
For moody canal shots and lantern-lit evenings, lodging along the Nakameguro River puts prime frames right outside the lobby.
Book several months in advance — cherry blossom weeks sell out fast — so lock flexible rates early, then tweak dates as forecasts shift.
Hotels Walking Distance to Ueno
Few bases put cherry blossom shooters closer to the action than hotels within an easy stroll of Ueno Park’s lotus-lined pond and sakura tunnels.
Pick Ueno, Okachimachi, or Keisei Ueno stations, target pond-facing rooms, confirm early check-in, seek rooftop terraces, and verify luggage storage for pre-dawn departures.
Dawn shoots are effortless from these bases.
Nakameguro River Area Lodging
This riverside base drops photographers right into Nakameguro’s famed sakura tunnel, where bridges become tripods’ best friends and soft lantern light turns night shoots cinematic.
Stay in compact boutiques along the canal for fast dawn access, then hop to Daikanyama or Shibuya in minutes.
Snack on seasonal food from pop-up stalls and chase reflections, lantern glow, and moody drizzle.
Booking Months in Advance
Two to four months ahead is the sweet spot for locking down rooms near Tokyo’s marquee sakura spots, because cherry blossom season turns neighbourhoods like Ueno, Asakusa, and Nakameguro into a beautiful booking frenzy.
Prioritise walkable stays, book refundable rates, set sunrise alarms, verify tripod rules at your chosen spots, and confirm quiet hours at the hotel.
Building Your Cherry Blossom Portfolio
Shaping a cherry blossom portfolio that feels cohesive yet fresh requires variety in composition styles — tight petals, sweeping avenues, reflective water scenes.
Craft a story through sequential series from first buds to moonlit blooms, and keep editing consistent with a signature colour palette and contrast so the set sings.
Share thoughtfully on social media with carousel narratives, geotag smartly, and stagger posts around peak bloom events for steady buzz.
Variety in Composition Styles
Think of your portfolio like a bento box: include sweeping wide shots of Meguro River’s pastel corridors, then sneak in crisp macro frames of dew-beaded petals at Shinjuku Gyoen.
Shoot both day and night — golden-hour glow for soft romance, blue-hour and lantern-lit festivals in Ueno Park for moody sparkle.
Don’t fear the weather; mist after light rain turns branches into watercolour, and a breezy day at Chidorigafuchi adds motion that feels alive.
Wide Landscapes to Macro Details
A well-rounded cherry blossom portfolio revels in range, and Tokyo serves it on a silver platter.
Capture wide riverside canopies at Sumida Park, frame shrine gates beneath blossoms at Nezu, isolate stamens with a macro lens, backlight petals for glowing translucence, and contrast pink drifts with modern glass.
Cherry blossom symbolism shines alongside cultural festivals, fuelling bold framings.
Day and Night Photography Mix
Cherry blossoms flip personalities between day and night. At sunrise, frame petals against pale skies along Meguro River, shooting low to catch glints on water and clean, uncluttered bridges.
Midday, chase bold contrasts in Ueno Park, then backlight blossoms near temple gates for radiant halos. After dusk, embrace night reflections and lantern illumination at Chidorigafuchi — steady tripod, slower shutter, minimal ISO.
Different Weather Conditions
Even when the forecast wobbles, Tokyo’s sakura deliver fresh moods that beg to be captured. Embrace seasonal variations — misty dawns, breezy petals, sudden drizzle, even post-storm glow.
Pack weather-resistant gear, then chase these vibes: soft rain for macro droplets on petals, overcast for creamy shadowless portraits, windy for motion blur alleys, post-rain for reflective puddles, and bluebird skies for crisp wide panoramas.
Storytelling Through Series
Think series, not singles: pick one Tokyo spot — say, Ueno Park or along Meguro River — and return across several days to track subtle shifts in light, crowds, and petal colour.
Document the bloom progression like a mini time-lapse in your camera roll, from tight buds and first blush to peak fluff and the confetti fall after a breezy afternoon.
Fold in people and culture — morning commuters under pink canopies, lunchtime hanami picnics with bento boxes, evening lanterns and laughter — so the sequence feels alive, not just pretty.
Single Location Over Multiple Days
One park, many moods — that’s the magic of visiting a single sakura spot over several days. Return and experiment with angles, times, and energy — sunrise whispers, urban nightlife glows.
Scout benches, bridges, and reflective ponds, rotate lenses daily, mix daylight and neon, track crowds’ rhythms, and note weather-driven textures. Freedom thrives in repetition; each visit reveals a fresh story.
Bloom Progression Documentation
Track seasonal bloom patterns with quick daily frames: tight bud, first blush, five-petal flare, breezy confetti.
Use consistent angles, morning side-light, and a neutral backdrop for clean comparisons.
Log dates and temperatures; Tokyo’s microclimates shift fast. Weave cherry blossom symbolism into captions — fleeting beauty, resilient renewal — and let your sequence feel like time-lapse freedom.
People and Culture Integration
After tracking buds to full bloom, the next storyline comes alive where petals meet people — because Tokyo celebrates sakura with gusto.
Watch locals picnic, laugh, and bow, folding cherry blossom etiquette into candid frames.
Capture hanami picnics at Ueno Park, frame shrine visits in Asakusa, seek festival lantern glows, include kimono-clad friends, and document cleanup rituals.
Editing Consistency Across Photos
To make a cherry blossom portfolio feel intentional, commit to a unified colour grading style — think soft blushes, gentle contrast, and clean whites that echo Tokyo’s spring light.
Keep a consistent processing approach across street scenes, riverside petals, and shrine courtyards, matching white balance, tonal curves, and grain so images feel like siblings, not distant cousins.
Present in a flowing sequence — wide opener, character-filled mid shots, then intimate details — to guide the viewer smoothly, like a stroll from Ueno Park to Chidorigafuchi at golden hour.
Unified Colour Grading Style
A unified colour grading style ties a cherry blossom portfolio together like a silk ribbon, helping images from Ueno Park, Nakameguro Canal, and Shinjuku Gyoen feel part of the same story.
Choose a pink hue anchor, balance warm and cool highlights, keep mid-skin tones neutral, nudge greens toward teal, and apply subtle film-like grain.
Cohesion without cages.
Consistent Processing Approach
Consistency starts with a repeatable workflow that treats every cherry blossom shot like a teammate, not a lone star.
Create a preset baseline, then tweak exposure, white balance, and colour grading with nimble restraint.
Harmonise composition balance — aligning horizons, taming distractions, syncing contrast. Batch-sync smartly, review individually, and keep notes.
Freedom thrives inside reliable habits.
Portfolio Presentation Flow
Think of a portfolio as a guided stroll beneath Tokyo’s sakura canopy — one path, many lovely turns.
A cohesive edit leads viewers from sunrise petals to urban nightlife glow, threading consistent tones, contrast, and pacing.
Sequence by light and mood, sprinkle surprises, and close with seasonal festivals for flair.
Open with dawn bridges, shift to park vignettes, feature street portraits, slide into urban nightlife, and celebrate seasonal festivals.
Social Media Sharing Strategies
Post on Instagram when Tokyo’s evening commute unwinds — around 7–9 PM local time — pairing broad tags (#cherryblossom, #sakura) with niche winners (#NakameguroSakura, #Chidorigafuchi) to boost reach without looking spammy.
Geotag with care: use precise spots like “Meguro River Cherry Blossoms” for discovery during peak season.
Switch to broader tags after crowded weekends if you want fewer copycat tripod lines and more portfolio mystique.
Instagram Best Posting Times
Two simple windows tend to deliver the most engagement for Tokyo’s sakura shots: early morning (6:30–8:30 AM) and evening (6:00–8:00 PM).
Sunrise calm boosts camera stabilisation and flower petal preservation, while twilight paints petals with cinematic glow.
Avoid weekday mid-afternoons, use Stories right after posting, and track insights weekly to refine your schedule.
Hashtag Selection for Reach
Mix broad tags like #CherryBlossom and #Sakura with niche gems — #TokyoHanami, #NakameguroNights, #ChidorigafuchiViews — to tap both crowds and connoisseurs.
Highlight botanical diversity and cultural symbolism with #UenoPetals, #ShintoShrinesInBloom, and #WeepingCherry.
Rotate 15–20 tags, pin 3 signature brand tags, study Top posts, and retire stale ones. Keep it playful and boldly exploratory.
Geotag Considerations
Geotags can make or break a cherry blossom post, guiding viewers straight to the exact bridge, shrine path, or riverside bend they’re dreaming about.
Balance discoverability with cultural sensitivity and privacy considerations, keeping crowds respectful and vibes free.
Tag neighbourhoods rather than micro-spots, delay posting until after leaving, use seasonal rather than secret locations, and share access tips rather than hidden shortcuts.
Alternative Cherry Blossom Photography Spots
Tokyo hides magical cherry trees in lesser-known parks and pocket gardens where petals carpet quiet paths and benches beg for a tripod.
In residential streets, surprise sakura tunnels pop up over bicycle lanes and corner shrines, perfect for golden-hour portraits without a crowd breathing down the lens.
Temples and major shrines stage serene scenes — stone lanterns, vermilion gates, and soft blossoms — so the frame sings with contrast and calm.
Lesser-Known Parks and Gardens
Skip the crowded hotspots and head to Rikugien Garden for traditional beauty — arched bridges, lantern-lit paths, and mirror-still ponds that make blossoms look twice as dreamy.
For a time-travel vibe, Koishikawa Korakuen pairs sakura with stone gates and vermilion bridges, offering angles that scream historic Tokyo without the tour-bus chaos.
Prefer motion in your shots? Inokashira Park delivers boat photography gold — row under petal showers and frame reflections at golden hour.
Rikugien Garden Traditional Beauty
A quiet detour off Komagome Station (Yamanote Line) leads to Rikugien, an Edo-period strolling garden where cherry blossoms glow like lanterns over mirror-still ponds. Entry costs ¥300 for adults; the garden is open 9 AM–5 PM.
Frame petals reflecting at the central pond at golden hour, shoot from Togetsukyo bridge, capture weeping sakura by Fukiage slopes, and embrace night illuminations during peak bloom.
Koishikawa Korakuen Historical Setting
Tucked beside Tokyo Dome, Koishikawa Korakuen offers a time-travel backdrop where sakura frame Edo-era scenery like living brushstrokes.
Entry costs ¥300 for adults; open 9 AM–5 PM.
The garden pairs refined architecture with looping ponds, stone bridges, and miniature mountains. Aim for golden hour; blossoms glow, reflections sharpen, crowds thin.
Try low angles near Engetsukyo Bridge, then pivot to teahouse vistas.
Inokashira Park Boat Photography
Inokashira Park’s glassy lake is peppered with swan boats and rowers beneath leaning cherry trees. Boat rentals cost approximately ¥700 for 30 minutes.
Time golden hour for luminous boat reflections and soft petals drifting like confetti. Go wide, then snag alleyway framing along bridges.
Sunrise mirror shots, backlit petals, swan-boat silhouettes, and low-angle shoreline frames all reward patience.
Residential Area Surprises
Think small streets, big payoffs: the Nakameguro backstreets glow with lantern-lit petals, offering quiet angles just steps away from the famous canal.
For calmer frames, Yanaka Cemetery serves peaceful scenes at golden hour — soft light, gentle breezes, and long pathways lined with blossoms that practically compose themselves.
Don’t skip tiny neighbourhood parks, where swing sets and cherry boughs create charming, everyday vignettes perfect for candid shots and low-angle close-ups.
Nakameguro Backstreets
A few steps off Nakameguro’s famous canal, the backstreets deliver quiet residential lanes where cherry trees lean over low walls, petals dust stoops, and bicycles nap beneath pink canopies.
Slip into hidden alleyways bursting with local street art, time blue-hour strolls, and keep footsteps soft.
Sunrise glow on pastel facades, reflections in shop windows, doorway portraits with blossoms, and bokeh from string lights all await.
Yanaka Cemetery Peaceful Scenes
Yanaka Cemetery’s lanes are draped in pale pink each spring, inviting unrushed strolls and frame-worthy peaceful scenes.
Photographers catch petals drifting past weathered stone, soft light filtering through branches, and long, cinematic paths.
Arrive at sunrise for empty avenues and gentle glow. Shoot low along the sakura tunnel, then pivot for telephoto compression.
Respect rituals and move quietly — Yanaka rewards care.
Neighbourhood Park Discoveries
Slip off the main sakura circuit and little residential parks start shining — mini oases with swings, slide towers, and one stubborn vending machine humming beside the blossoms.
Hidden alleyways guide feet to pocket groves, often near local bakeries perfuming the air.
Think intimate frames, playful silhouettes, and freedom to linger. Scout golden hour, frame playground geometry, follow alley cat paths, and snack between shoots.
Temple and Shrine Cherry Blossoms
Temple and shrine grounds turn into photogenic stages in spring, especially with the Sensō-ji pagoda peeking through frothy pink boughs for classic wide shots and dreamy telephoto compressions.
At Yasukuni Shrine, the official standard tree sets Tokyo’s bloom timing, so photographers can plan peak visits and snag clean compositions at opening time.
For urban drama, Zōjō-ji’s cherries frame Tokyo Tower in fiery orange at sunset; bring a mid-zoom and arrive 45–60 minutes before golden hour.
Sensō-ji Temple Pagoda Combination
At Sensō-ji, blushing sakura frame the vermilion five-story pagoda like a postcard come to life.
Arrive at blue hour, then pivot to golden light for silhouettes and glossy rooflines.
Shoot from Hōzōmon’s steps, use telephoto compressions, capture lantern bokeh, try night reflections, and time visits for early weekdays.
The temple precinct is free to enter and open 24 hours.
Yasukuni Shrine Standard Tree
Yasukuni Shrine’s famed standard tree — the bloom barometer Tokyo watches each spring — triggers official forecasts when its first five blossoms open.
The shrine is free to enter and open daily.
Arrive at golden hour, frame torii lines with soft petals, and step left of the main approach for clean angles.
Pack restraint — tripods draw side-eyes in the main precinct.
Zōjō-ji Temple with Tokyo Tower
Zōjō-ji’s cherry boughs frame Tokyo Tower like a postcard, while temple roofs glow at golden hour.
Arrive pre-dawn or during blue hour for clean lines, soft hues, and minimal crowds.
Best angle: main gate aligning with the Tower spire. Blue-hour tripod spot: courtyard centre.
Avoid midday crowds, respect rituals, and move lightly for the best compositions.
Wrapping Up: Your Tokyo Cherry Blossom Photography Game Plan
You’ll leave Tokyo with memory cards bursting and hearts lighter than sakura petals.
Time the shoot at blue hour, move fast between parks by JR lines, and frame boldly — low angles, reflections, and backlit blooms sing together.
Pack spare batteries, chase peak stages across neighbourhoods, and curate a tight set.
Monitor the Japan cherry blossom forecast for 2026 to lock in your travel dates before peak bloom sells out accommodation.
Go make images that smell like spring and sound like laughter.
Frequently Asked Questions (FAQs)
Do I need a permit to use a tripod at Tokyo’s cherry blossom spots?
Most public parks and riverside paths in Tokyo allow tripods during cherry blossom season, but some locations have restrictions. Ueno Park prohibits drone flight and discourages large tripods during peak hanami weekends.
Shinjuku Gyoen (entry ¥500) allows tripods but not commercial photography without prior permission. Chidorigafuchi’s promenade is generally tripod-friendly on weekdays.
Always check the park’s official rules before visiting and keep tripod legs compact in crowds.
Is Shinjuku Gyoen or Ueno Park better for cherry blossom photography?
Shinjuku Gyoen is better for calm, curated photography — no alcohol, lower crowd density, 65 cherry varieties, and a ¥500 entry fee that deters casual visitors. Ueno Park is better for atmosphere, festival energy, and free access, but crowds are significantly larger.
Shinjuku Gyoen suits portrait and wide-angle work; Ueno Park suits candid, documentary, and night lantern photography.
What is the best lens to bring if I can only carry one for sakura photography?
A 24–70mm f/2.8 standard zoom is the single best lens for Tokyo cherry blossom photography. It handles wide canopy shots, candid portraits, river reflections, and moderate telephoto compression without a lens swap.
If you prefer a prime, a 50mm f/1.8 offers excellent bokeh and low-light performance at a fraction of the weight and cost.
How far in advance should I book accommodation for cherry blossom season in Tokyo?
Book accommodation two to four months in advance for cherry blossom season, which typically peaks in late March to early April. Hotels near Ueno, Asakusa, Nakameguro, and Chiyoda sell out fastest.
Book refundable rates when possible, because exact bloom dates shift by one to two weeks depending on winter temperatures. Adjust your dates once the JMA releases its official forecast in late January.
Can I photograph cherry blossoms at night without a tripod?
Yes, but results improve significantly with support. At ISO 3200 and f/1.8 on a modern mirrorless camera, handheld shots at 1/80 s are achievable along well-lit spots like Meguro River and Chidorigafuchi during illumination events.
For longer exposures, reflections, or light painting, a compact travel tripod or monopod is essential. Brace against bridge railings as a free alternative in a pinch.
Are there any cherry blossom spots in Tokyo that are free and less crowded?
Yes. Yanaka Cemetery, Kanda River (between Nakai and Ochiai stations), Koishikawa Botanical Garden, and the Tama River embankment in Fuchu offer beautiful sakura with far fewer visitors than the headline spots.
Kitanomaru Park adjacent to Chidorigafuchi is free and significantly less crowded than the moat promenade itself. Visiting any location on a weekday before 8 AM dramatically reduces crowd density.
What should I wear for early morning cherry blossom photography in Tokyo?
Tokyo in late March to early April averages 8–14°C at dawn, with occasional rain. Wear layered, moisture-wicking base layers, a mid-layer fleece, and a packable waterproof jacket.
Comfortable walking shoes with grip are essential for wet stone paths and riverbanks. Bring thin gloves for camera handling in cold air and a compact umbrella or rain cover for your gear.
Dark, neutral clothing helps when shooting silhouettes and avoids reflecting light onto subjects.
